Projects
This guide explains the projects of MyCloudBook: how to turn them on, how to read the projects list with the income, the cost, and the profit of each job, and how to add, change, pin, and delete a project.
Overview
A project groups the documents of one job, for example the installation of a coffee bar for a hotel or a series of training days for a cafe. MyCloudBook then shows the income, the costs, and the profit of the job in one place. The project does not change the accounting of a document. It only marks the document as a part of the job.
The figures of a project come from the posted documents that carry the project: invoices and receipts on the sales side, and bills and expenses on the cost side. Estimates, project estimates, sales orders, purchase orders, and drafts belong to the project too, but they post nothing, so they do not change the income or the costs.
A project can belong to one customer, or to no customer. A project of a customer holds only the sales documents of that customer. A project without a customer, for example an internal project, can hold the sales documents of any customer. Purchase documents carry a project on each line, so one bill can share its costs between several projects.
The Projects screens are:
- the projects list, which this guide describes;
- the Add Project window, which also serves to change a project (Update Project);
- the project information screen, with the figures and the documents of one project (see the Project Information guide);
- the project estimates, the estimates with an internal cost side (see the Project Estimates guide);
- the Update Status and Update Progress windows (see the Project Status and Progress guide).
Turning on the Projects page
The Projects page is part of MyCloudBook, but it is hidden until an administrator turns it on. Only a user with the Admin role sees the Settings button.
- In the top bar, click Settings, then Preferences.
- In the General tab, select Track Projects Profitability in the Features group.
- Click Save. MyCloudBook asks to refresh the page. Save any open document first, then click Yes.
- After the refresh, the item Projects appears in the left navigation, between Expenses and Reports.
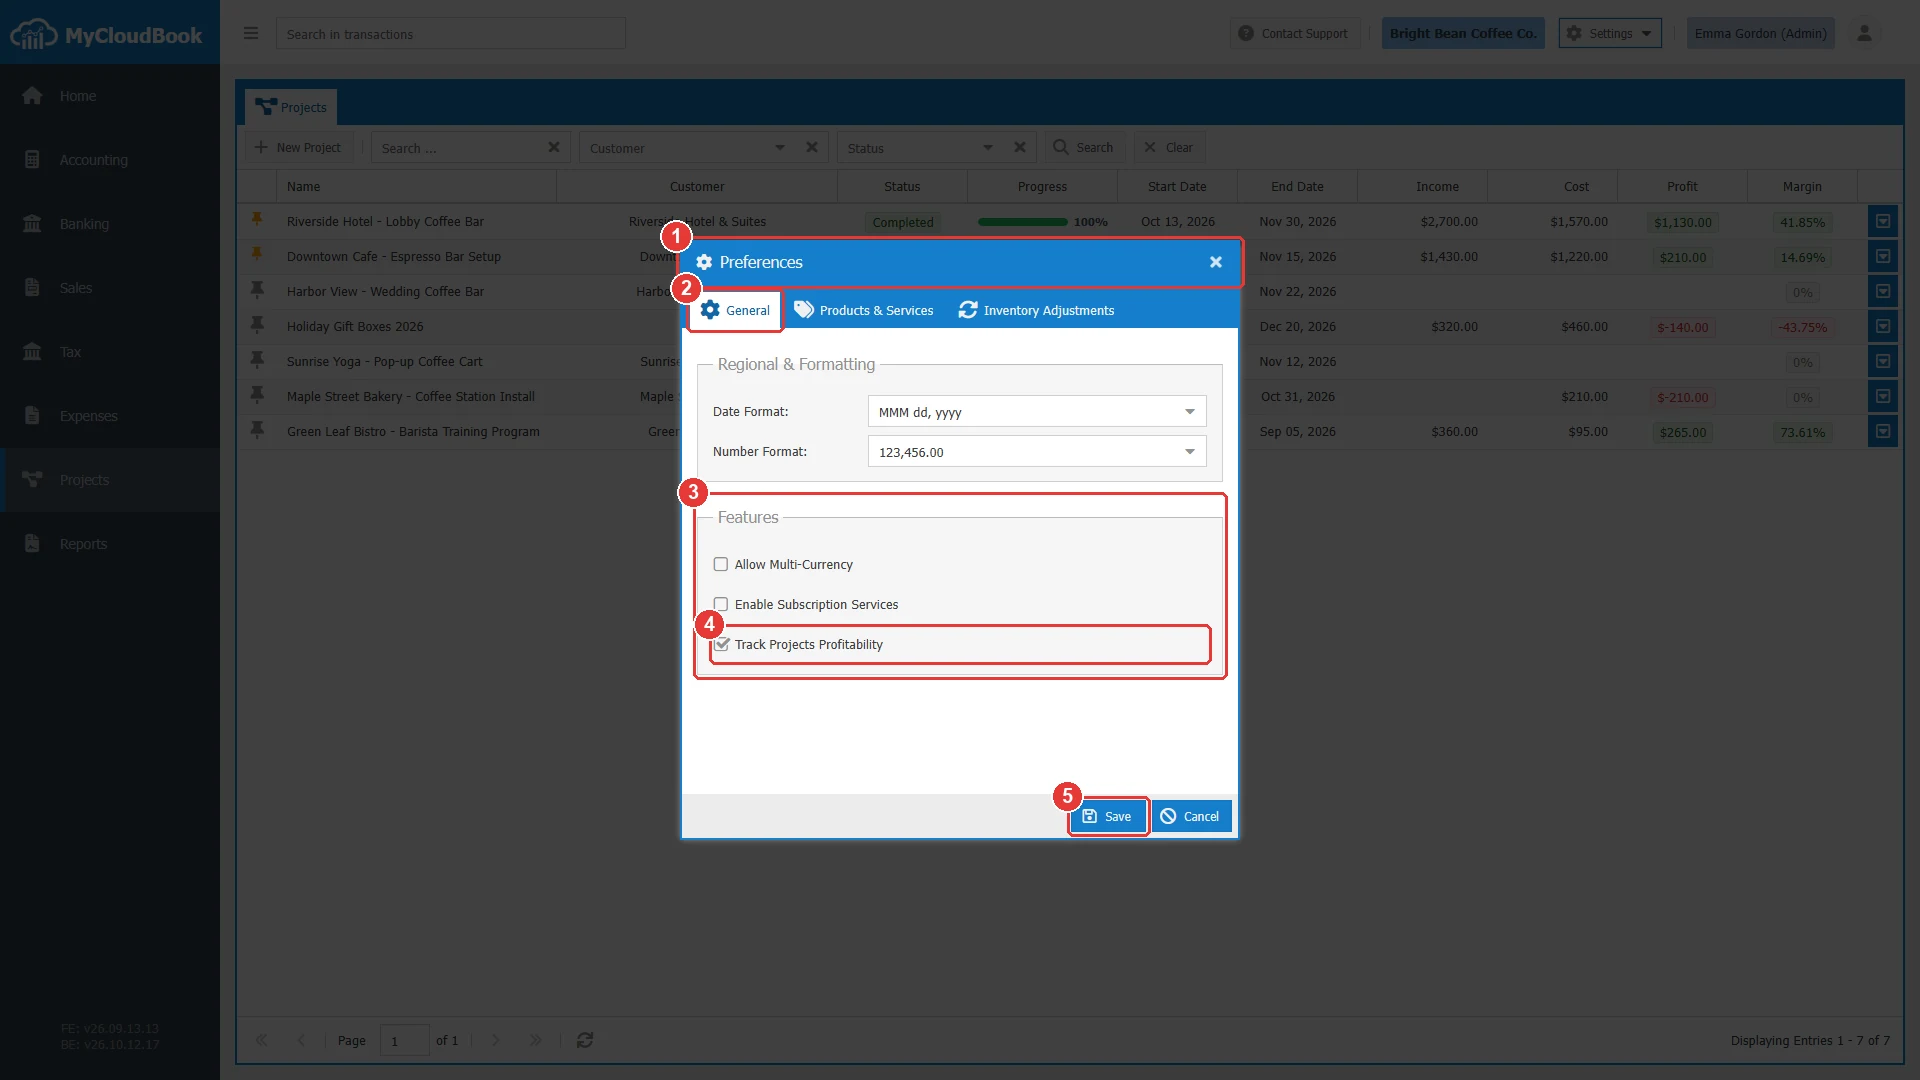
- 1The Preferences window.
- 2The General tab.
- 3The Features group.
- 4Track Projects Profitability. Shows the Projects page and the Project fields of the documents.
- 5Save.
While the company has at least one project, the setting cannot be turned off.
How to open the screen
- In the left navigation, click Projects.
- The Projects tab shows the projects list. It is always the first tab of the Projects page.
Each project that you open gets its own tab next to the list, with the project name as its title.
The projects list
The list shows one row per project. The pinned projects come first, followed by the other projects from the newest to the oldest. A double click on a row opens the project information screen.
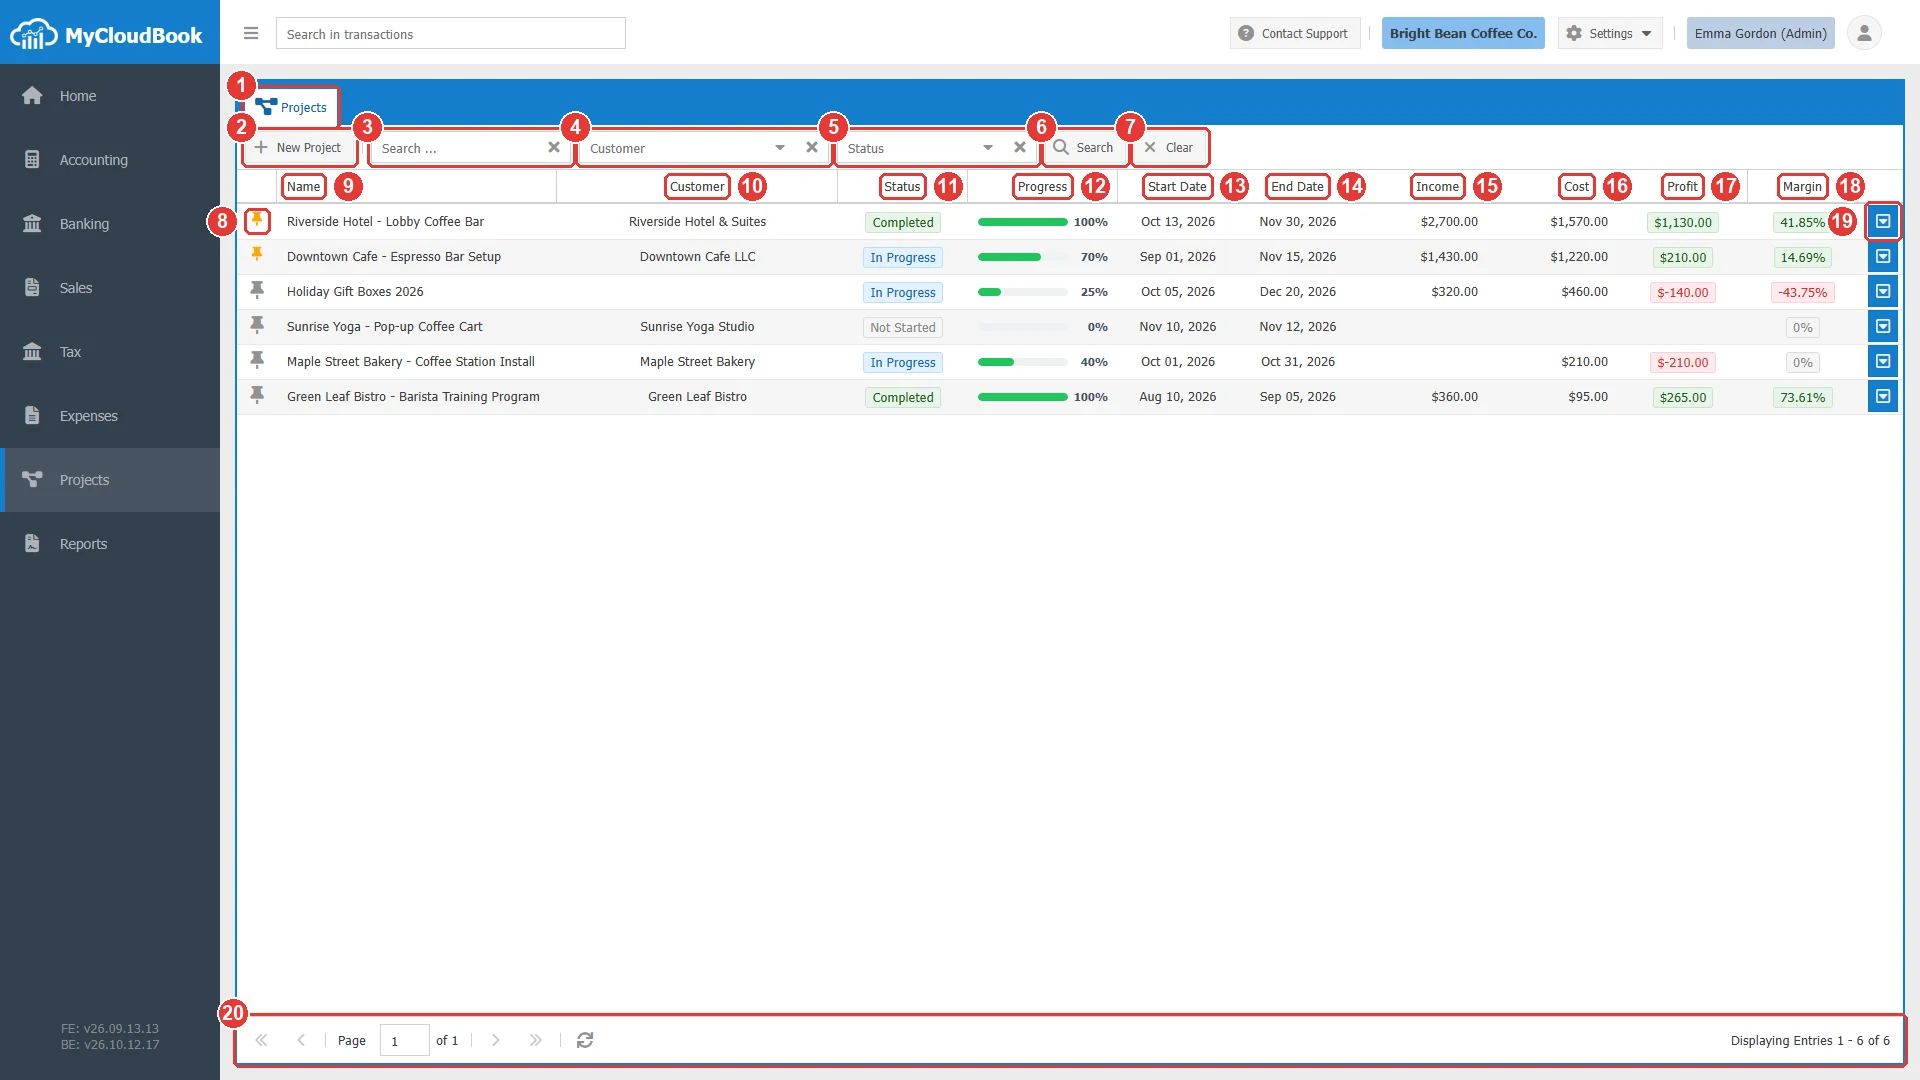
- 1Projects tab.
- 2New Project. Opens the Add Project window.
- 3Search .... Finds the projects whose name contains the text. Press Enter to search. The letter case does not matter.
- 4Customer. Shows only the projects of one customer.
- 5Status. Shows only the projects of one status.
- 6Search. Runs the search with the three filters together.
- 7Clear. Empties the three filters and shows every project.
- 8The pin icon. An orange pin marks a pinned project. Click the icon to pin or unpin the project.
- 9Name. The name of the project.
- 10Customer. The customer of the project. The cell is empty for a project without a customer.
- 11Status. Not Started (gray), In Progress (blue), Completed (green), or Cancelled (red).
- 12Progress. The share of the work that is done, as a bar and a percentage.
- 13Start Date. The planned start of the project.
- 14End Date. The planned end of the project.
- 15Income. The income of the project from its invoices and receipts, without sales tax.
- 16Cost. The costs of the project from its bills, its expenses, and the cost of the stock products that its invoices sold.
- 17Profit. Income minus Cost. Green for a profit, red for a loss.
- 18Margin. The profit as a percentage of the income.
- 19The row actions button, with View, Edit, and Delete.
- 20The paging toolbar.
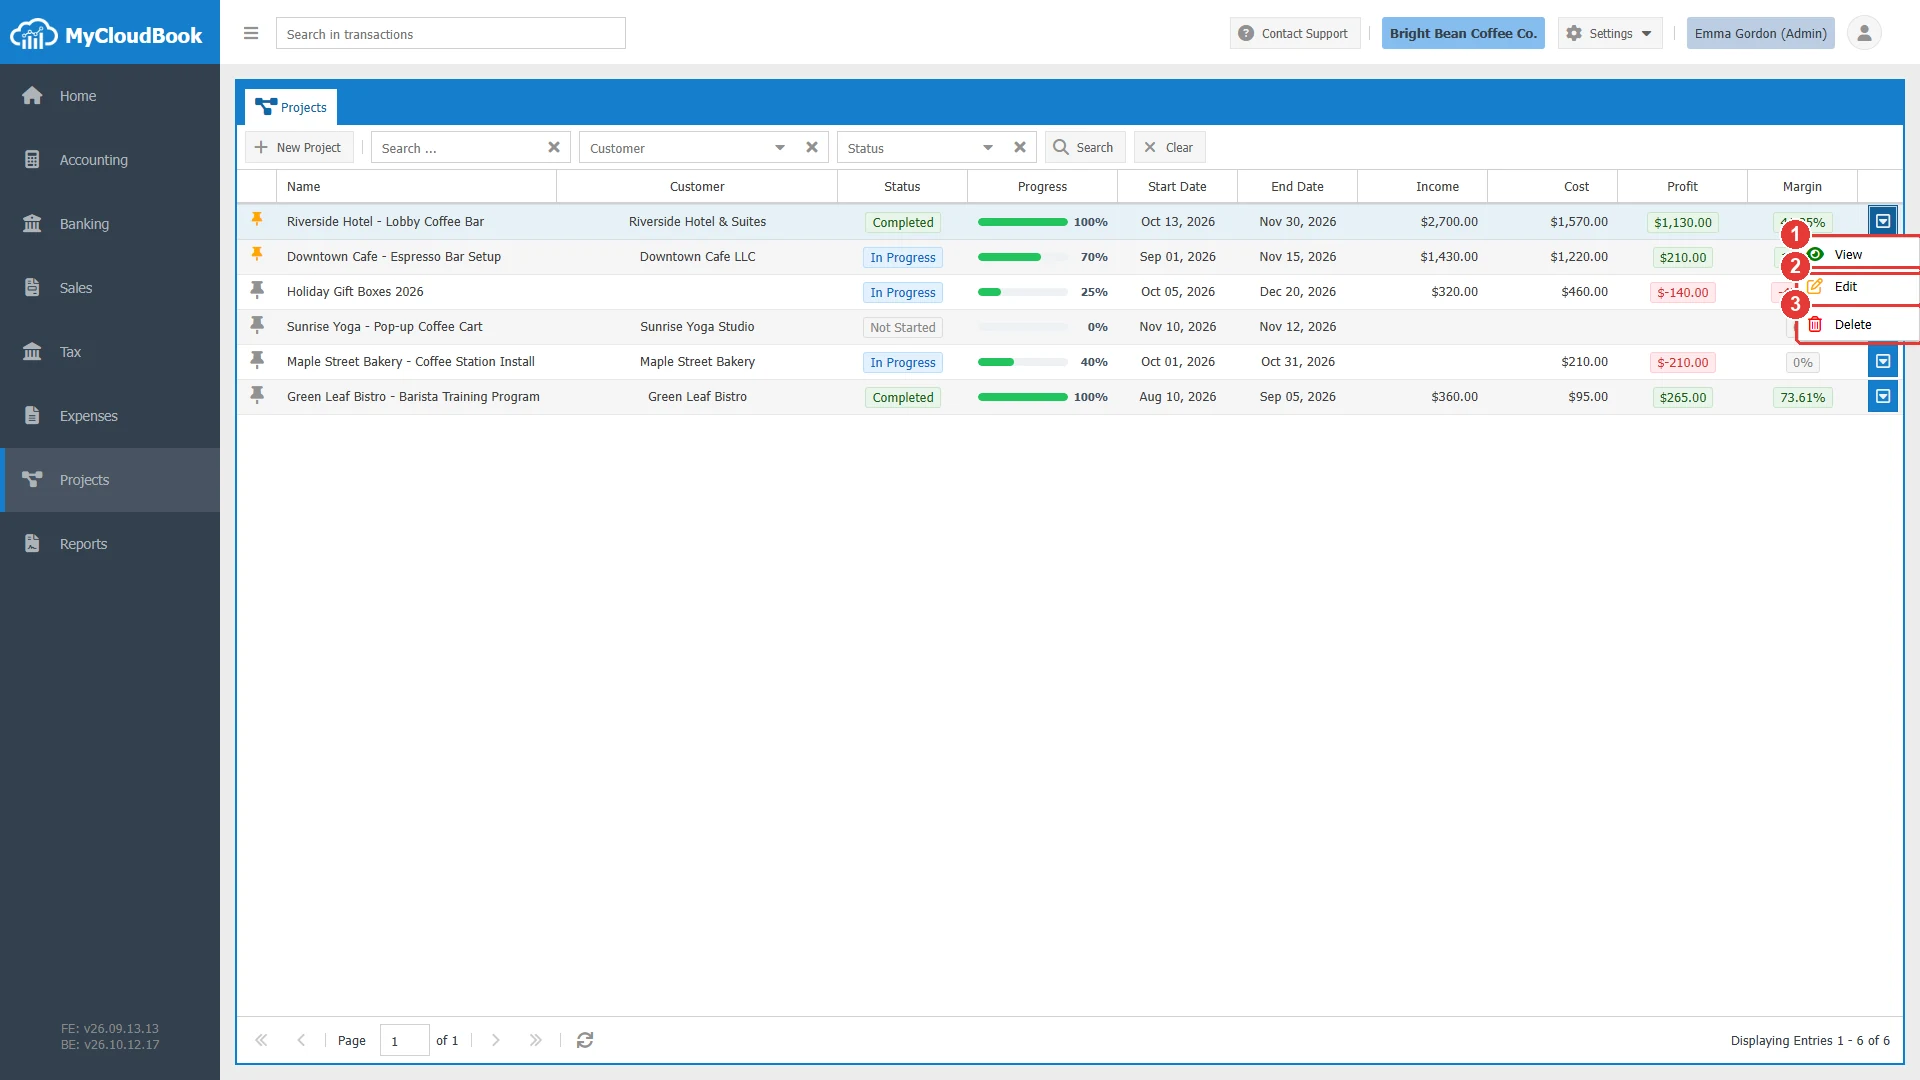
- 1View. Opens the project information screen, as a double click does.
- 2Edit. Opens the Update Project window.
- 3Delete. Deletes the project after a confirmation.
Searching and filtering
The three filters of the toolbar work together: a project must match all of them. A choice in the Customer or the Status filter runs the search at once. The Customer filter lists the active customers.
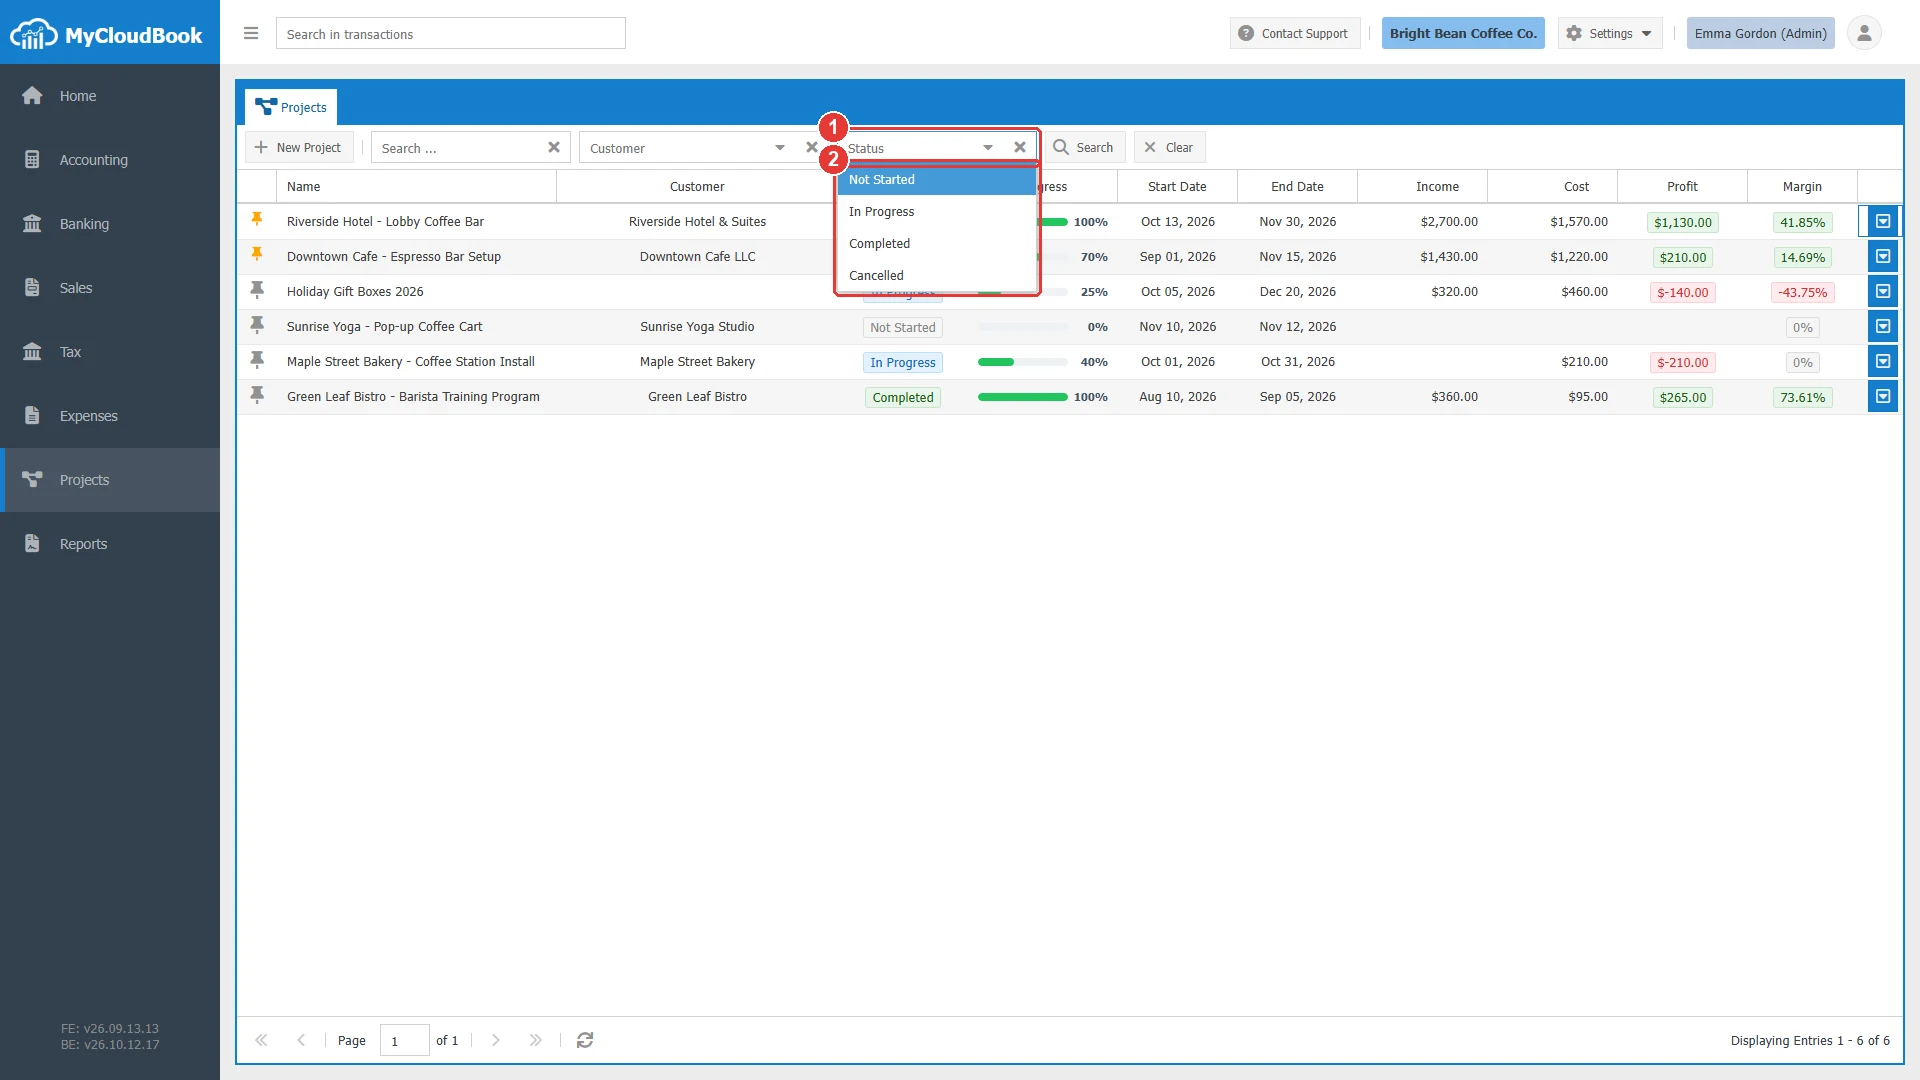
- 1Status. The filter with its clear button.
- 2The four statuses.
For example, the search text coffee bar finds Riverside Hotel - Lobby Coffee Bar and Harbor View - Wedding Coffee Bar. The status In Progress shows only the projects that are running.
Adding a project
The example creates the project Harbor View - Wedding Coffee Bar: a coffee bar with two baristas for a wedding reception of the customer Harbor View Catering on November 20 to 22, 2026.
- In the projects list, click New Project. The Add Project window opens.
- Type the Name of the project. This is the only field that you must type.
- Select the Customer when the project is a job for one customer. Leave it empty for an internal project.
- Keep the Status Not Started, or select the current status.
- Select the Start Date and the End Date, and type the Notes if needed.
- Click Save. The window closes, a confirmation appears, and the project is added to the list.
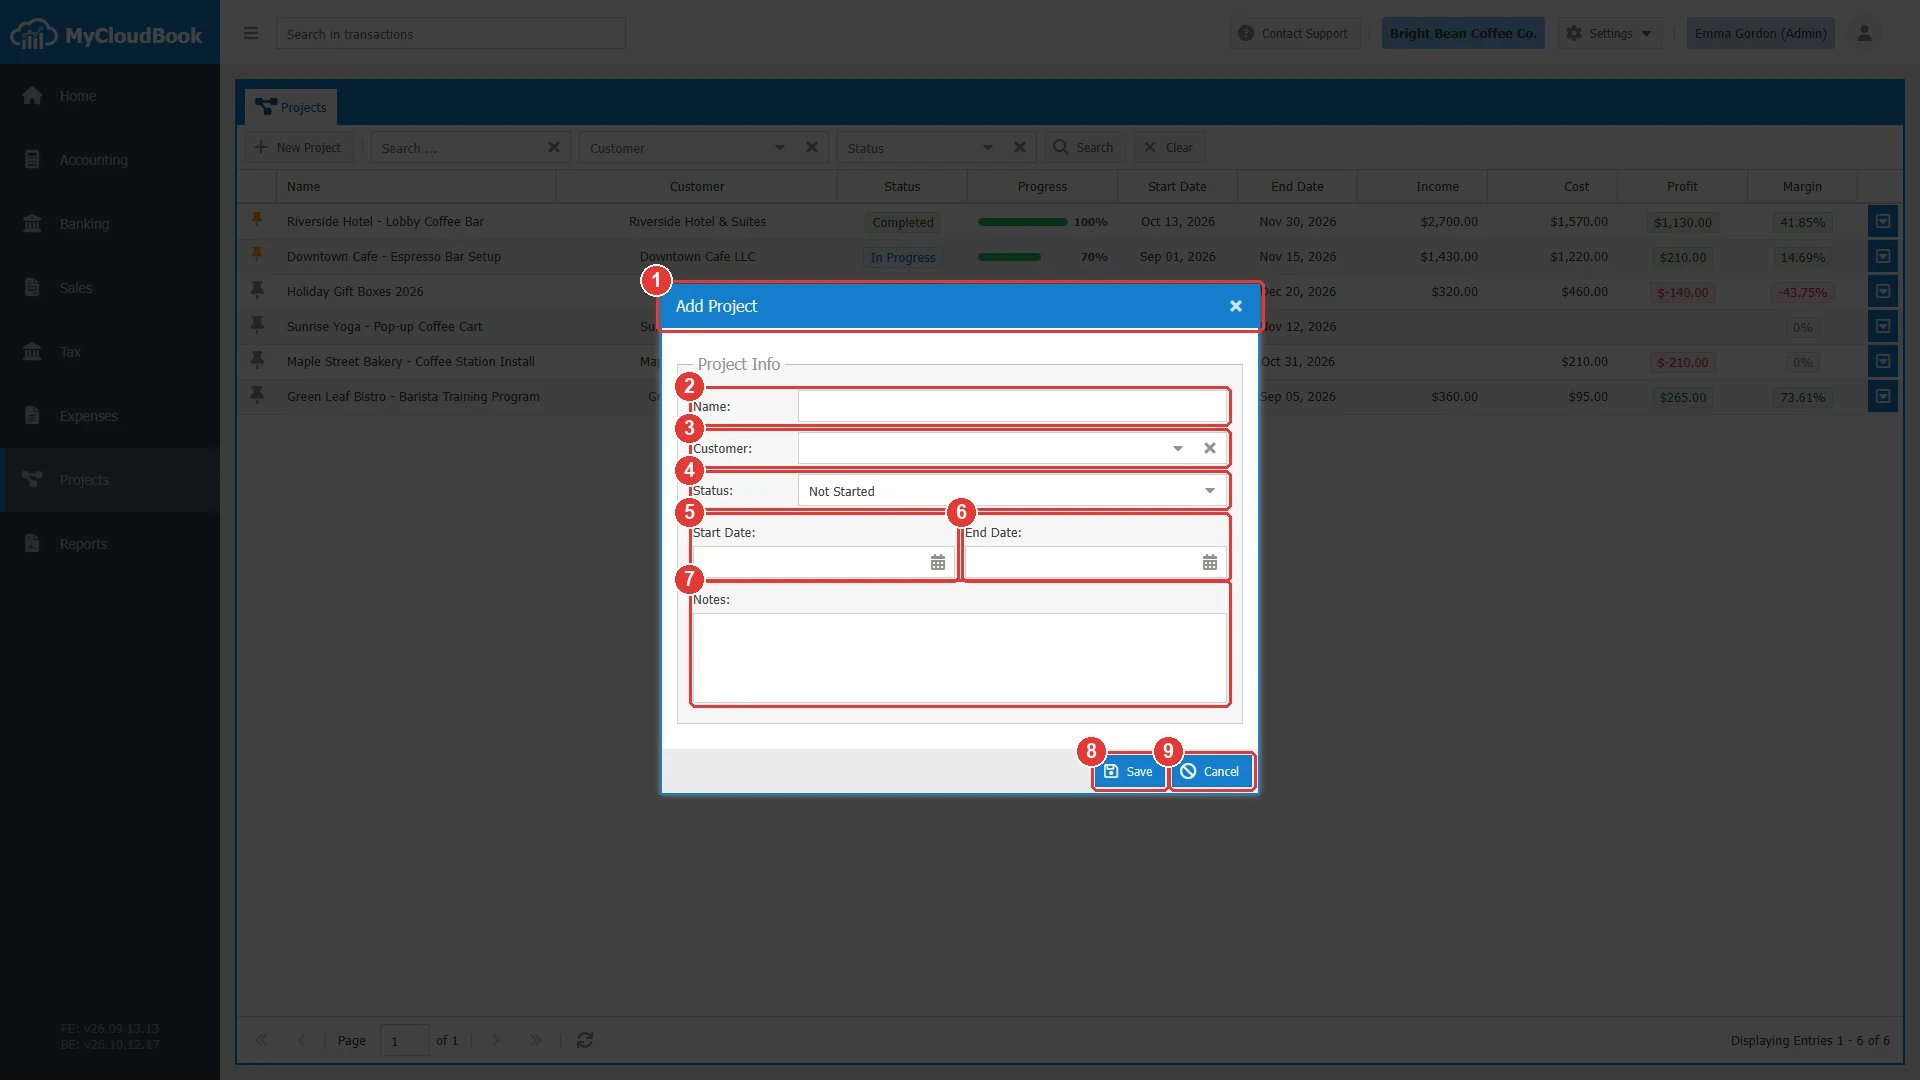
- 1The window title, Add Project.
- 2Name. Required.
- 3Customer. Optional.
- 4Status. Not Started for a new project.
- 5Start Date.
- 6End Date.
- 7Notes. Up to 1000 characters.
- 8Save.
- 9Cancel. Closes the window without a save.
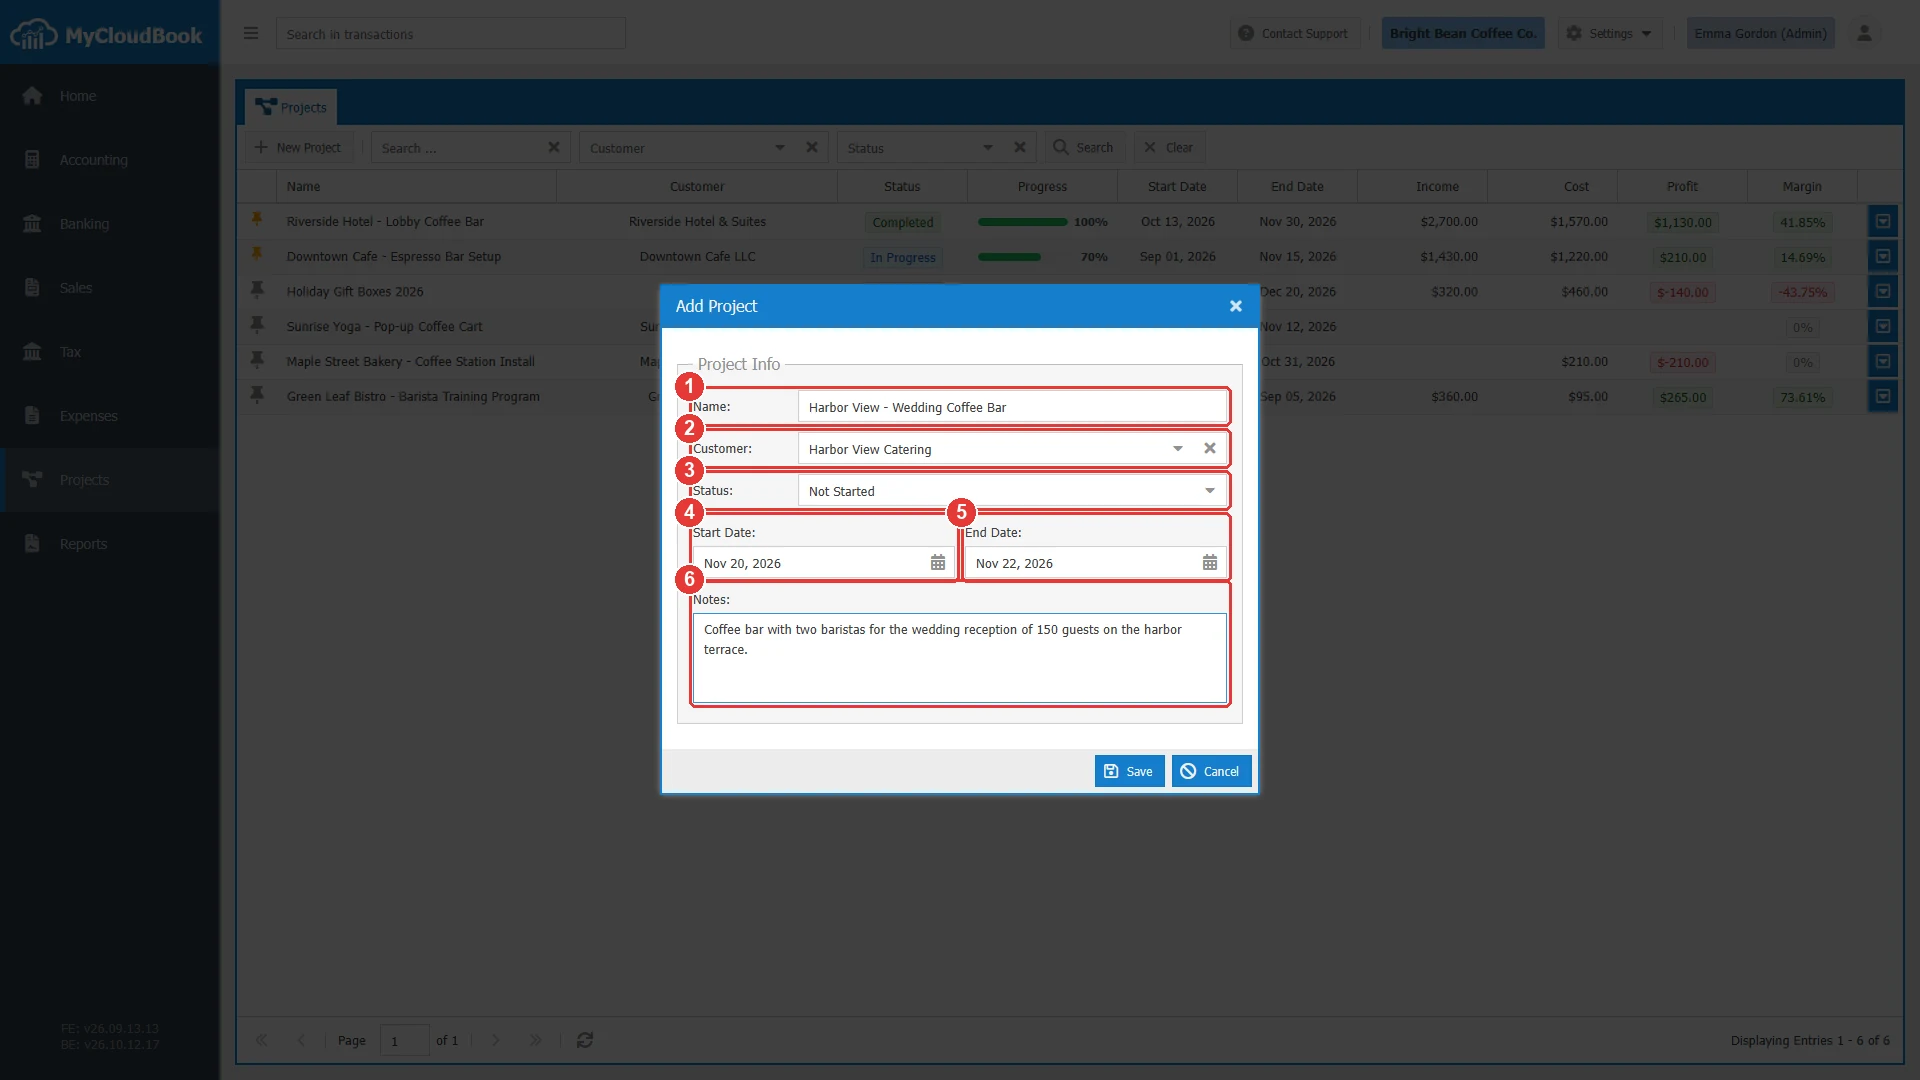
- 1The name of the project.
- 2The customer Harbor View Catering.
- 3The status Not Started.
- 4The start date, November 20, 2026.
- 5The end date, November 22, 2026.
- 6The notes of the project.
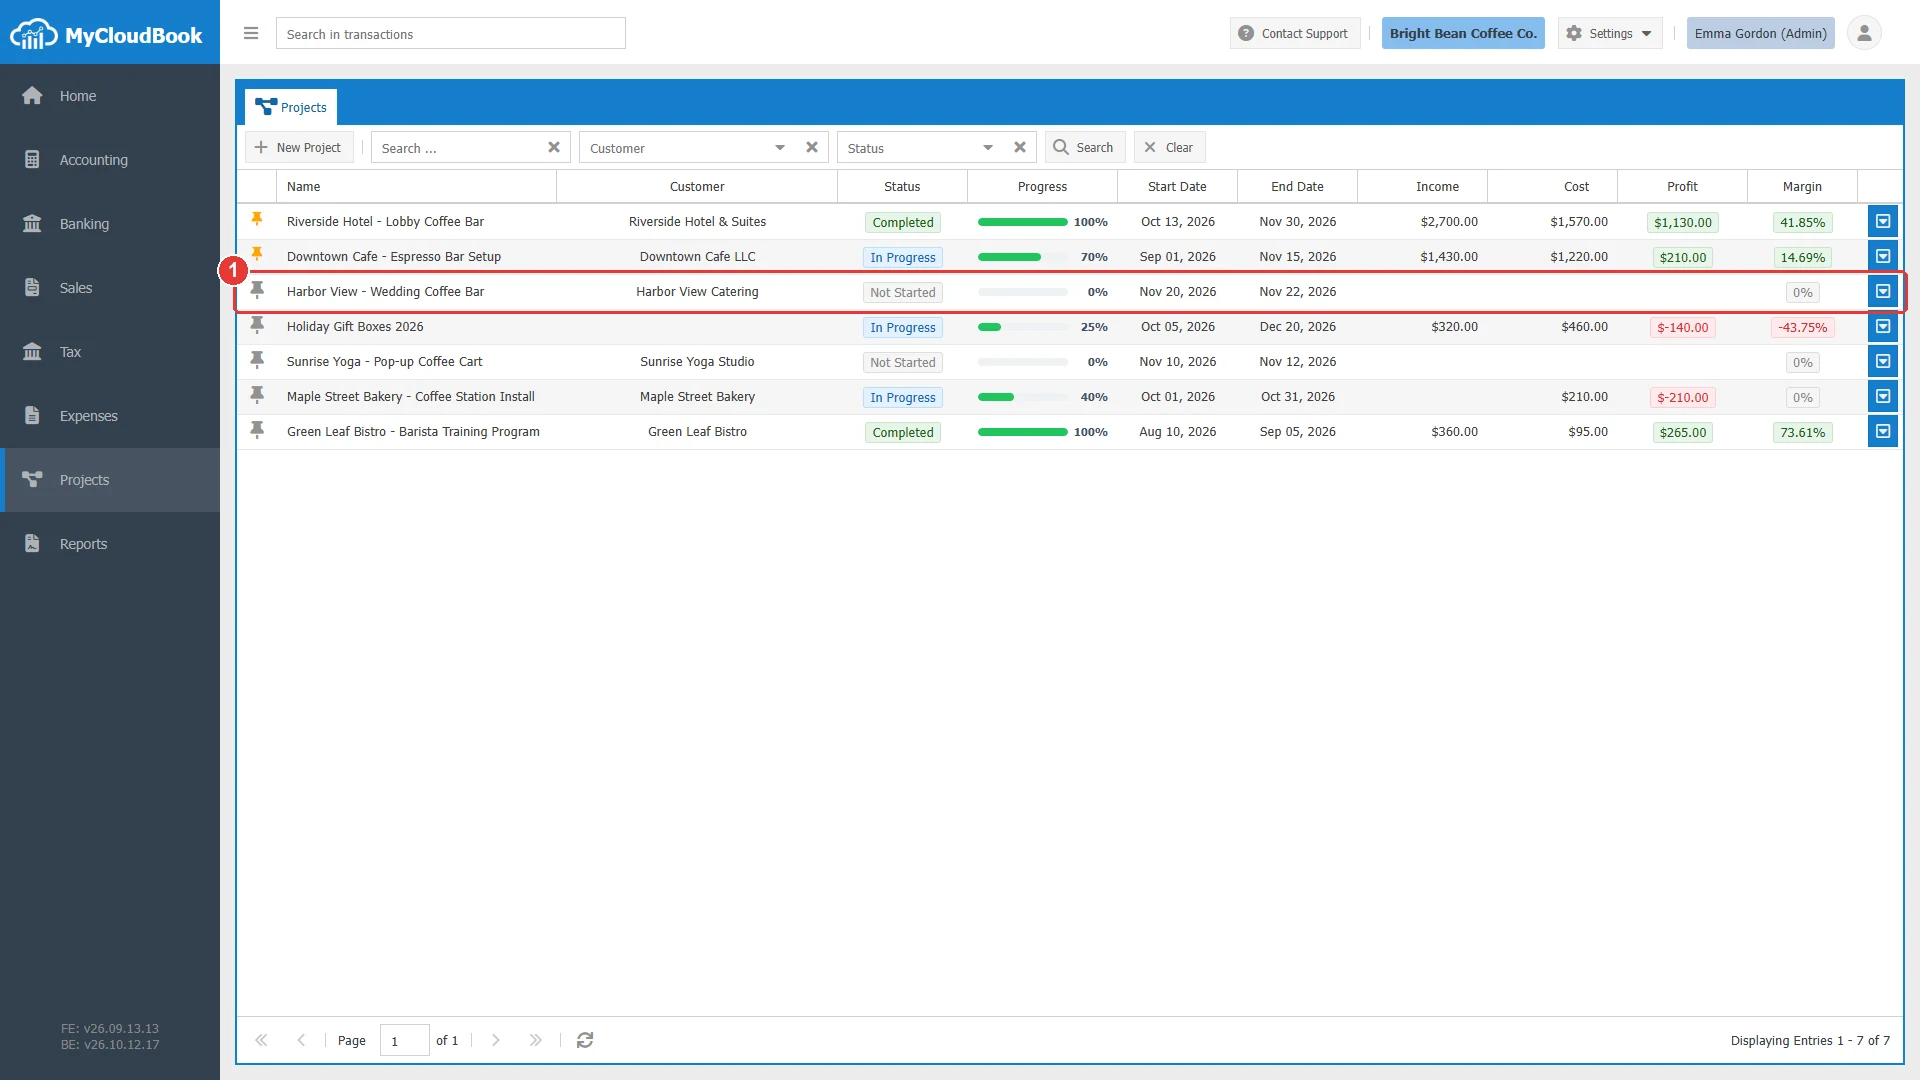
- 1The new project, with the status Not Started and a progress of 0%.
The fields
| Field | Required | Purpose and rules |
|---|---|---|
| Name | Required | The name of the project. Another project of the company cannot have the same name. The letter case does not matter, so Wedding Bar and wedding bar are the same name. |
| Customer | Optional | The customer of the project. The list shows the active customers. When a project has a customer, its sales documents must be for that customer. A project without a customer can hold the sales documents of any customer. |
| Status | Required | Not Started, In Progress, Completed, or Cancelled. The Project Status and Progress guide explains what each status does. |
| Start Date | Optional | The planned start of the project. It is shown in the list and in the information screen. |
| End Date | Optional | The planned end of the project. |
| Notes | Optional | A description of the project, up to 1000 characters. It is shown in the information screen. |
Changing a project
- In the projects list, open the row actions menu of the project and click Edit. On the information screen, the Edit button opens the same window.
- The Update Project window opens with the values of the project.
- Change the values and click Save. The list and the open information screen show the new values.
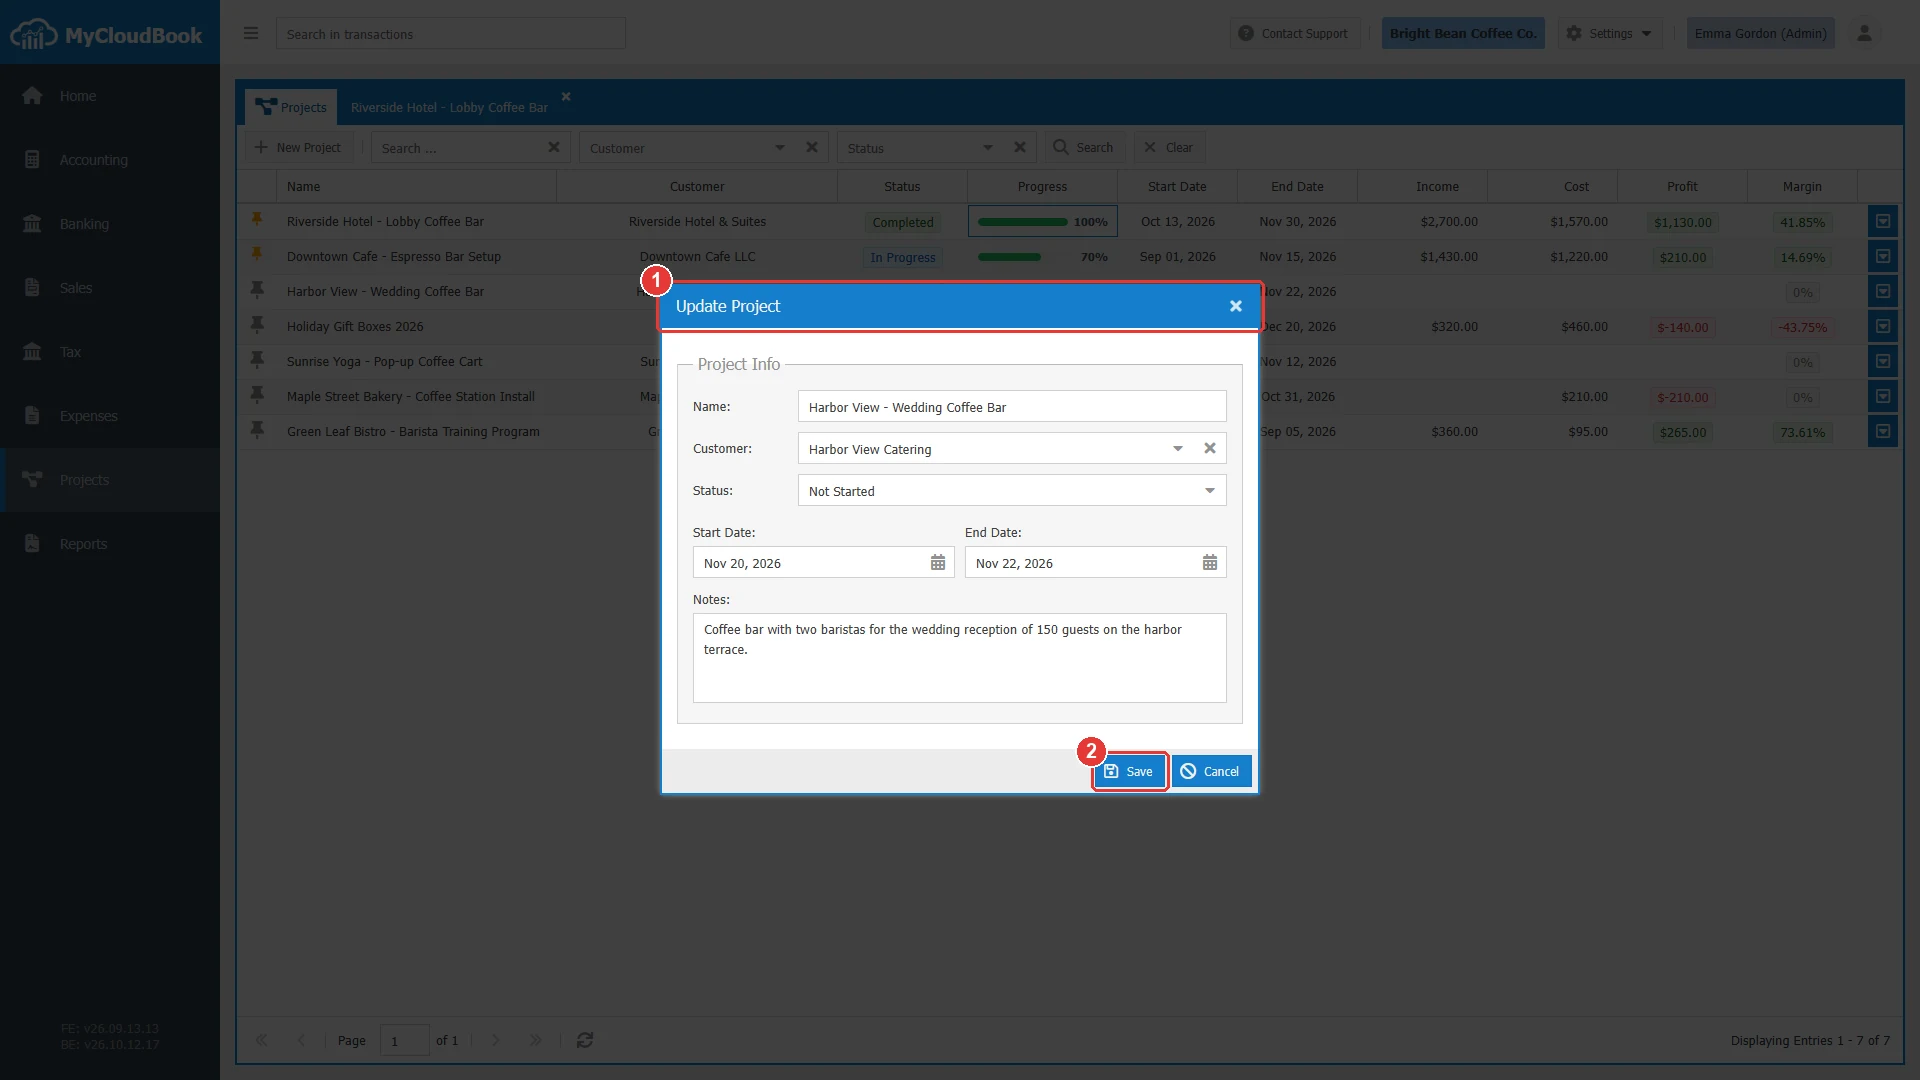
- 1The window title, Update Project.
- 2Save.
The customer of a project can change only when no sales document of the project belongs to another customer. The progress of a project is not part of this window: it is set in the Update Progress window of the information screen.
Pinning a project
A pinned project comes first in the projects list and in the Project lists of the documents. Pin the projects that you use every day.
- In the projects list, click the pin icon at the start of the row.
- On the information screen, click the pin button in the header of the Project Information panel.
A confirmation such as Project 'Harbor View - Wedding Coffee Bar': pinned. appears. Click the icon again to unpin the project.
Deleting a project
- In the projects list, open the row actions menu of the project and click Delete. The Edit menu of the information screen has the same item.
- MyCloudBook asks Are you sure you want to Delete the Project : with the name of the project.
- Click Yes. The message The project 'NAME' Deleted Successfully. appears, and an open tab of the project closes.
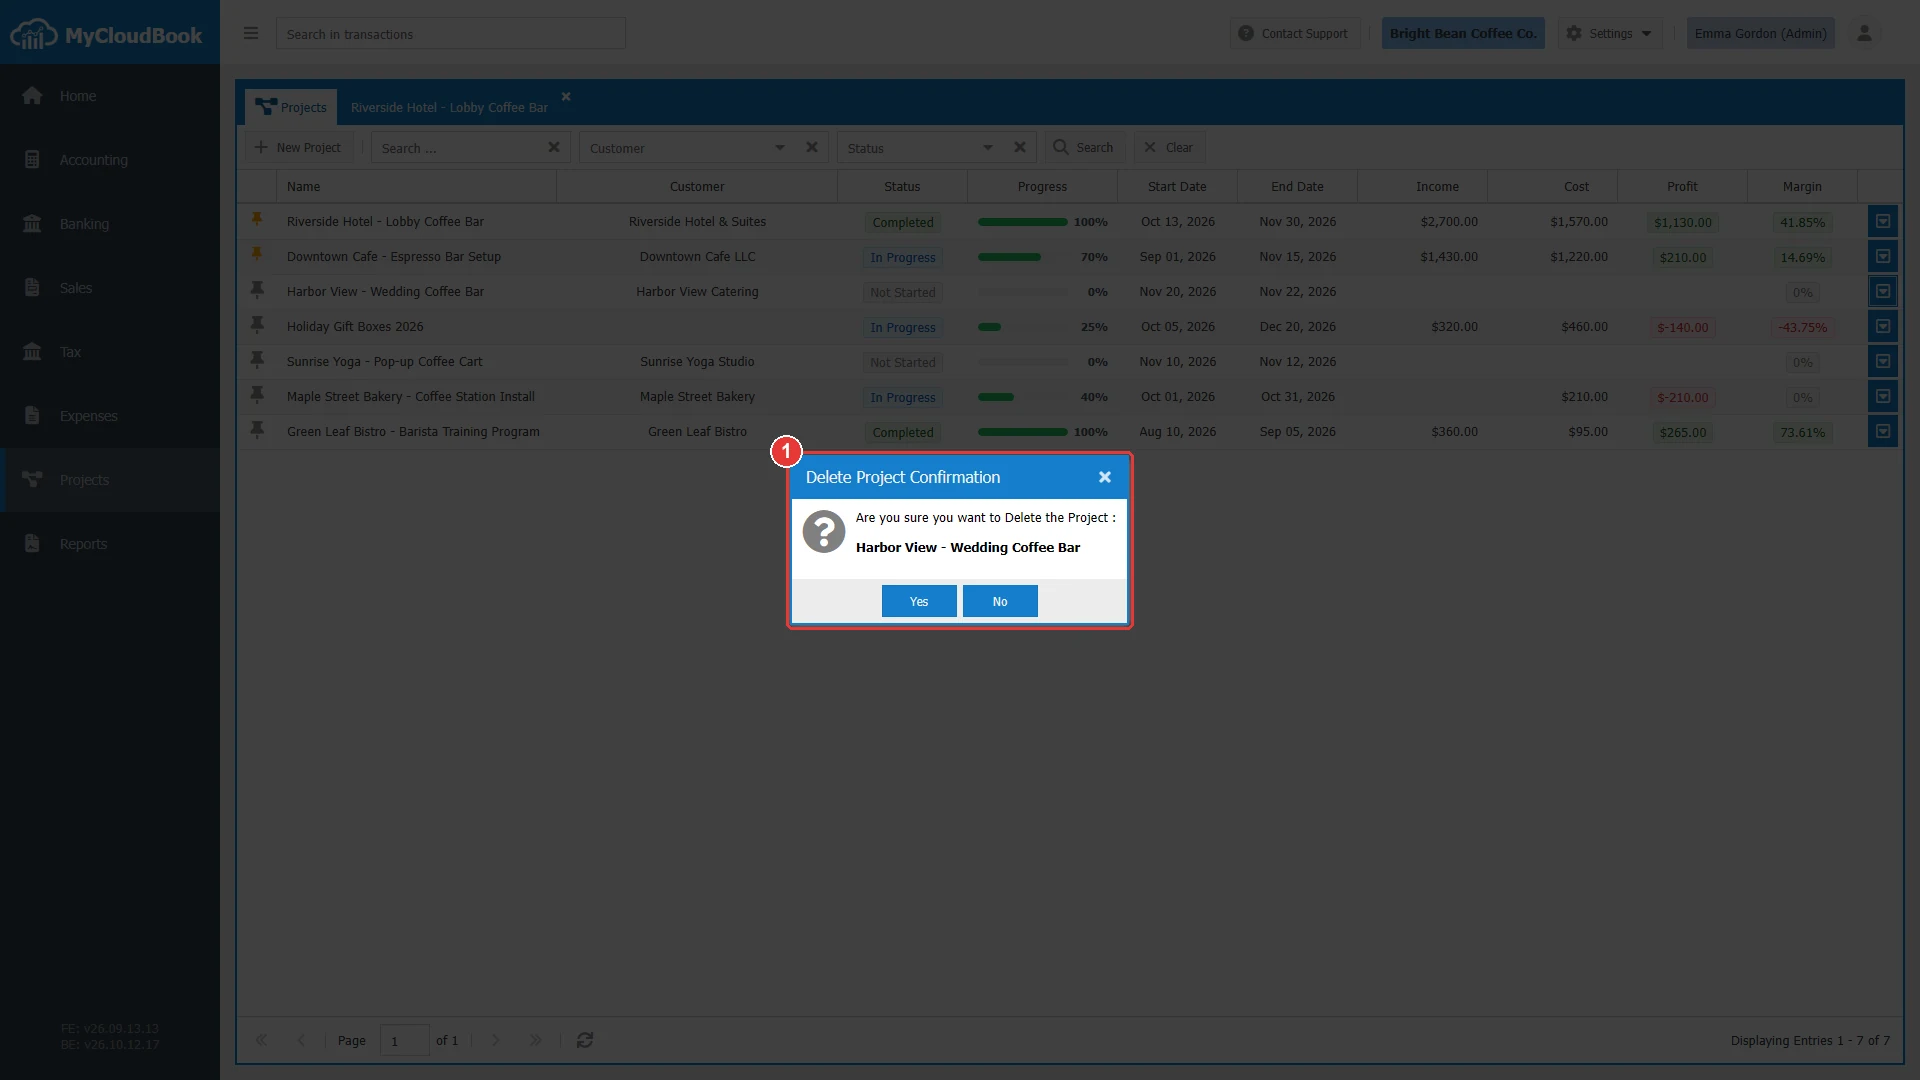
- 1The question with the name of the project.
A project that holds documents cannot be deleted. The message names one document of the project. Delete that document or move it to another project first. When the documents must stay, keep the project and set its status to Completed or Cancelled.
Messages and their meaning
Questions and answers
How do I turn on projects in MyCloudBook?
An administrator opens Settings, then Preferences. In the General tab, the administrator selects Track Projects Profitability, clicks Save, and confirms the refresh of the page. The Projects item then appears in the left navigation.
Does a project need a customer?
No. A project of a customer holds only the sales documents of that customer. A project without a customer, for example an internal project, can hold the sales documents of any customer.
How are the Income and Cost of a project computed?
From the posted documents that carry the project: invoices and receipts for the income, bills and expenses for the costs, and the cost of the stock products that the invoices of the project sold. Sales tax is not income. Estimates, orders, and drafts do not change the figures.
Why can I not delete a project?
A project that holds documents cannot be deleted. Delete the documents or move them to another project, or keep the project and set its status to Completed or Cancelled.
Can one bill belong to several projects?
Yes. A purchase document carries the project on each line, so each line of a bill can belong to another project.