AI Importer
This guide explains the AI Importer of MyCloudBook: how to create many accounts, customers, suppliers, or products at once from a file, and how to review the records before the import.
Overview
The AI Importer creates many records at once from a file that the company already has, for example a customer list from another program. It imports four kinds of records: the chart of accounts, customers, suppliers, and products and services. The work has three steps:
- Upload: the user chooses the kind of records and uploads the file. MyCloudBook sends the file to an outside artificial intelligence (AI) service, which reads the records from it. This takes about two to three minutes.
- Review: the records appear in a table. The user corrects them, deletes the rows that are not needed, and saves. MyCloudBook checks the list at every save.
- Import: when the list has no error, the user imports it. MyCloudBook creates all the records together, or none of them.
Only the uploaded file is sent to the outside AI service. Nothing is created in the company before the import.
How to open the AI Importer
- In the top bar, click Settings. The button is between the name of the company and the name of the user.
- In the menu, click AI Importer. The AI Importer tab opens on the Home page.
The Settings menu is shown to the users with the Admin role. The other users do not see the menu.
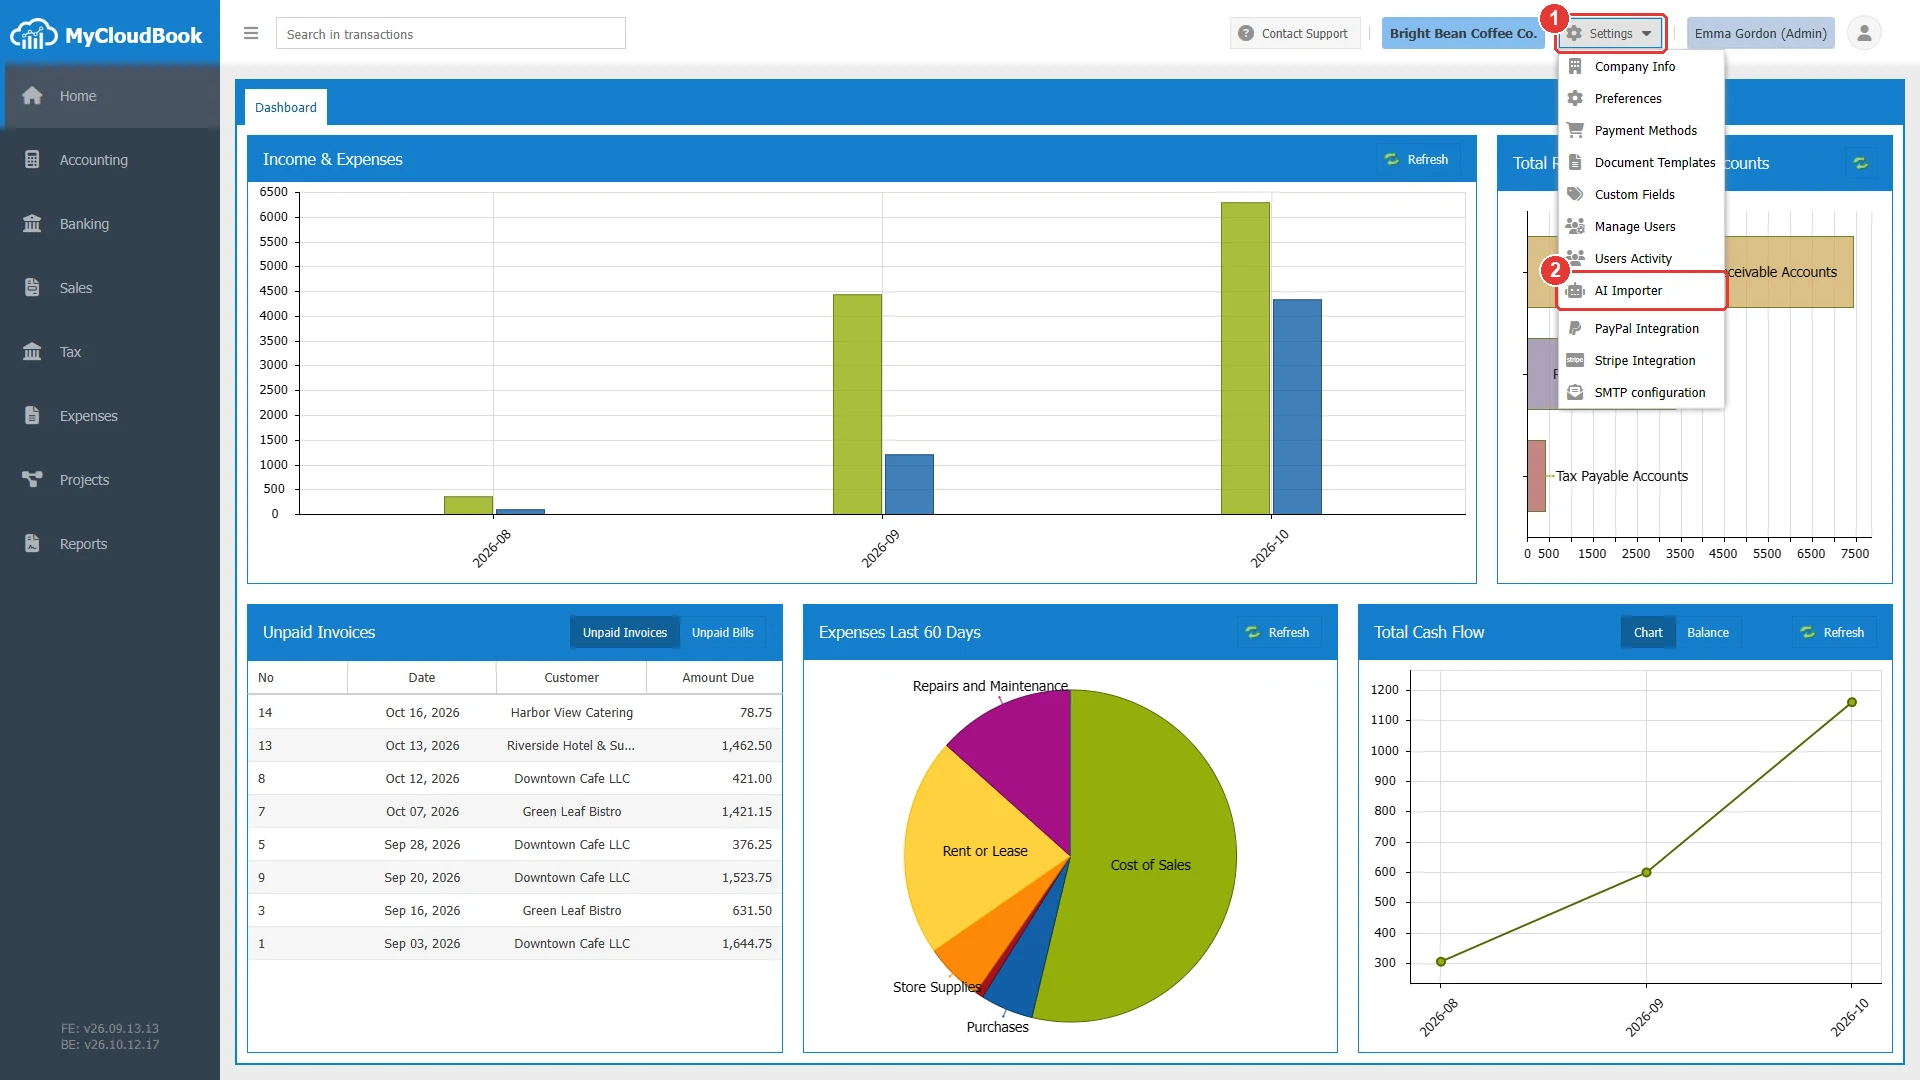
- 1Settings. Opens the menu of the company settings.
- 2AI Importer.
Uploading a file
- In the AI Importer tab, click Upload File.
- Click the card of the kind of records. The window shows the columns that the file must have.
- Click Browse... and choose the file.
- To upload files of other kinds at the same time, click their cards and choose a file for each card.
- Click Upload. The window closes, and the list shows the files with the status Pending.
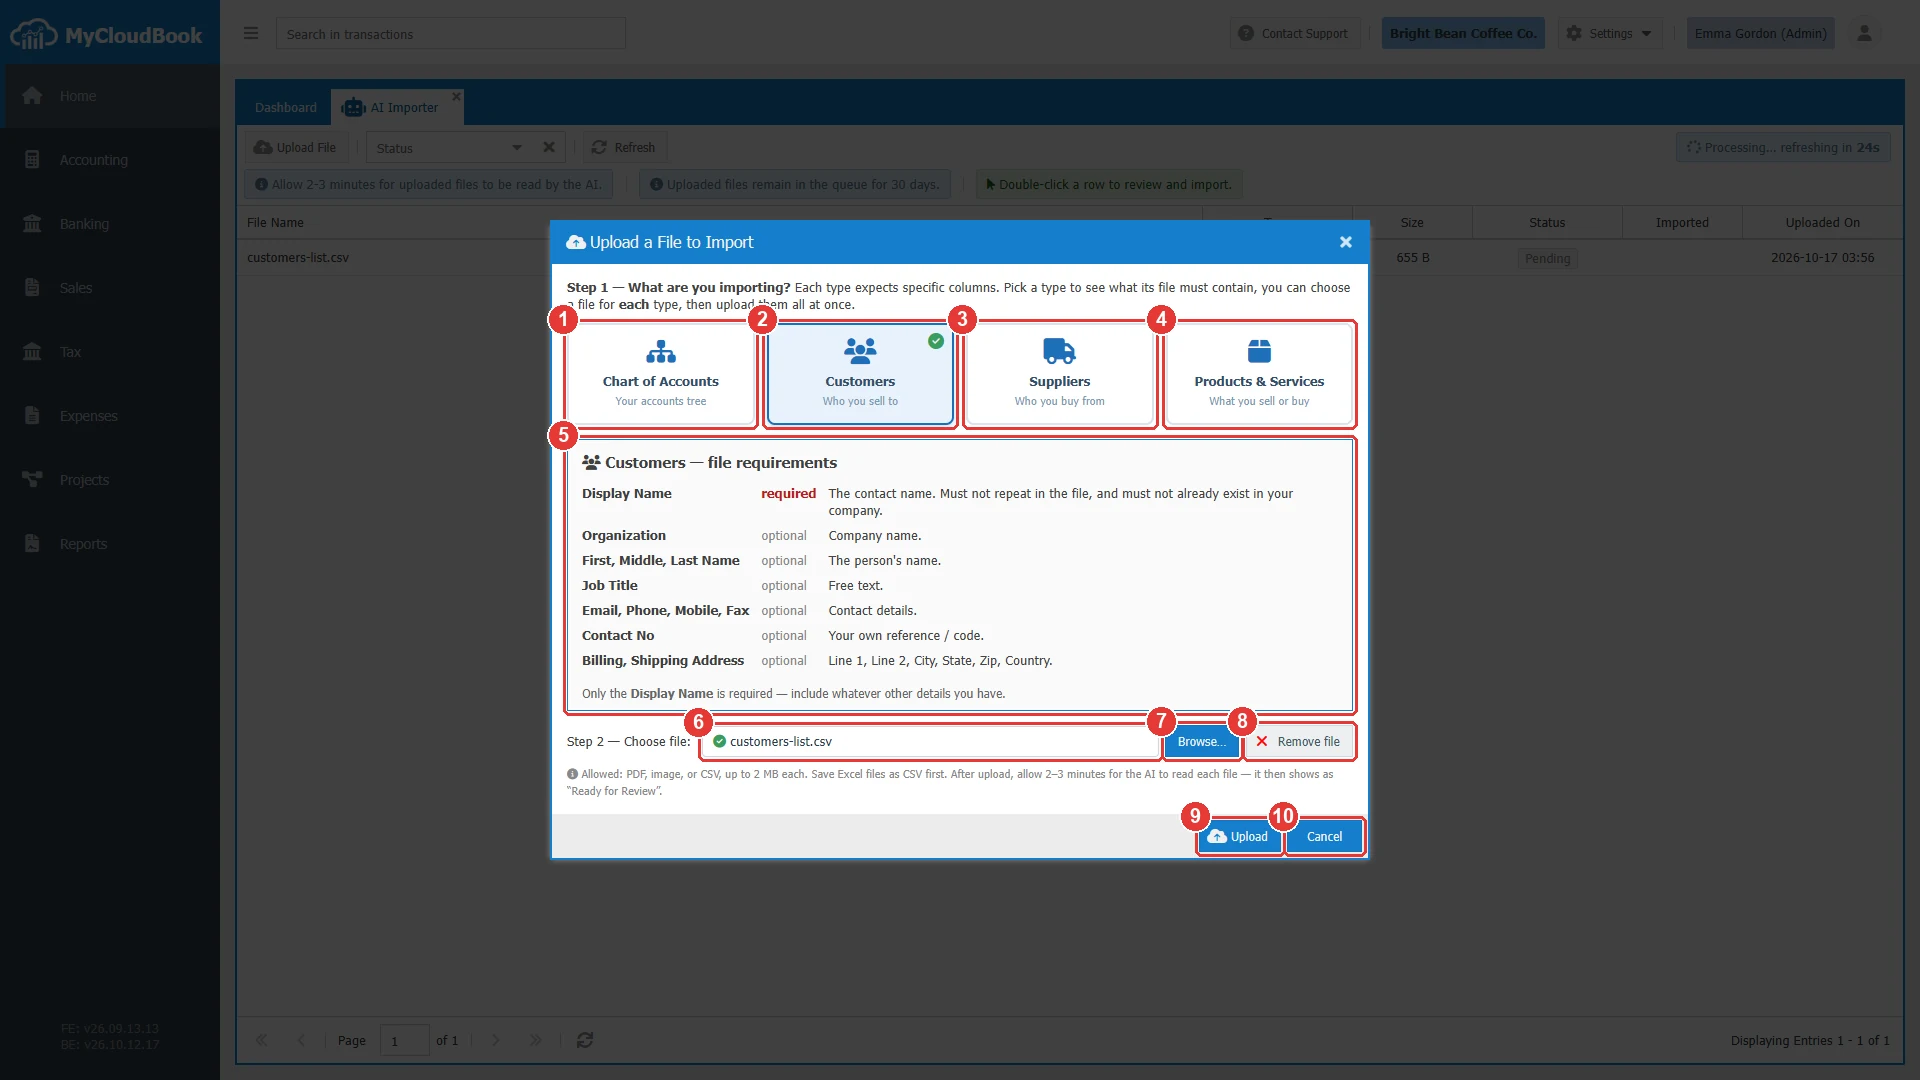
- 1Chart of Accounts.
- 2Customers, selected. The green check shows that a file is chosen for the card.
- 3Suppliers.
- 4Products & Services.
- 5The file requirements of the selected card: the columns, and which of them are required.
- 6The file that is chosen for the selected card.
- 7Browse.... Chooses the file for the selected card.
- 8Remove file. Removes the file of the selected card.
- 9Upload. Uploads the chosen files.
- 10Cancel.
| Rule | Details |
|---|---|
| File types | A Portable Document Format (PDF) file, a picture (JPEG, PNG, GIF, or WebP), or a comma-separated values (CSV) file. Save an Excel file as CSV first. |
| File size | Up to 2 MB for each file. |
| One file for each card | One upload can send one file for each of the four kinds of records. |
| The same file twice | A file with the same content cannot be uploaded again while it still waits for the AI. |
| Daily and monthly limits | Each company can send a limited number of files to the AI each day and each month. The message of the limit shows the number. |
The file requirements
The upload window shows the requirements of each kind of records. The file must hold the required data. The other data is optional.
| Kind of records | Required data and rules |
|---|---|
| Chart of Accounts | Account Name (unique, up to 50 characters) and Type (Assets, Liabilities, Equity, Income, or Expenses). Optional: the Account No, the Parent Account name, Is Main, the Description, and the Note. An account number has only digits, and it must be unique. A sub account number starts with the number of its parent. A top-level number starts with the type number: 1 for Assets to 5 for Expenses. The parent must be a main account of the file or of the company. |
| Customers and Suppliers | Display Name: it must not repeat in the file, and it must not exist in the company. Optional: the Organization, the names of the person, the Job Title, the Email, the Phone, the Mobile, the Fax, the Contact No, and the billing and shipping addresses. A supplier receives one address. |
| Products & Services | Name (it must not repeat in the file or exist in the company) and Type (Inventory, NonInventory, or Service). Optional: the SKU, the prices, For Sale, For Purchase, the descriptions, the opening quantity and its date for inventory items, and the sales, purchase, and inventory asset accounts. An account must match an account of the company by number or name. An empty account column uses the default account of Preferences. Inventory items are always for sale and for purchase. |
The list of the uploaded files
The list shows the uploaded files of the last 30 days, the newest first. While a file is Pending or Processing, the list refreshes itself every 30 seconds, and a counter shows the next refresh.
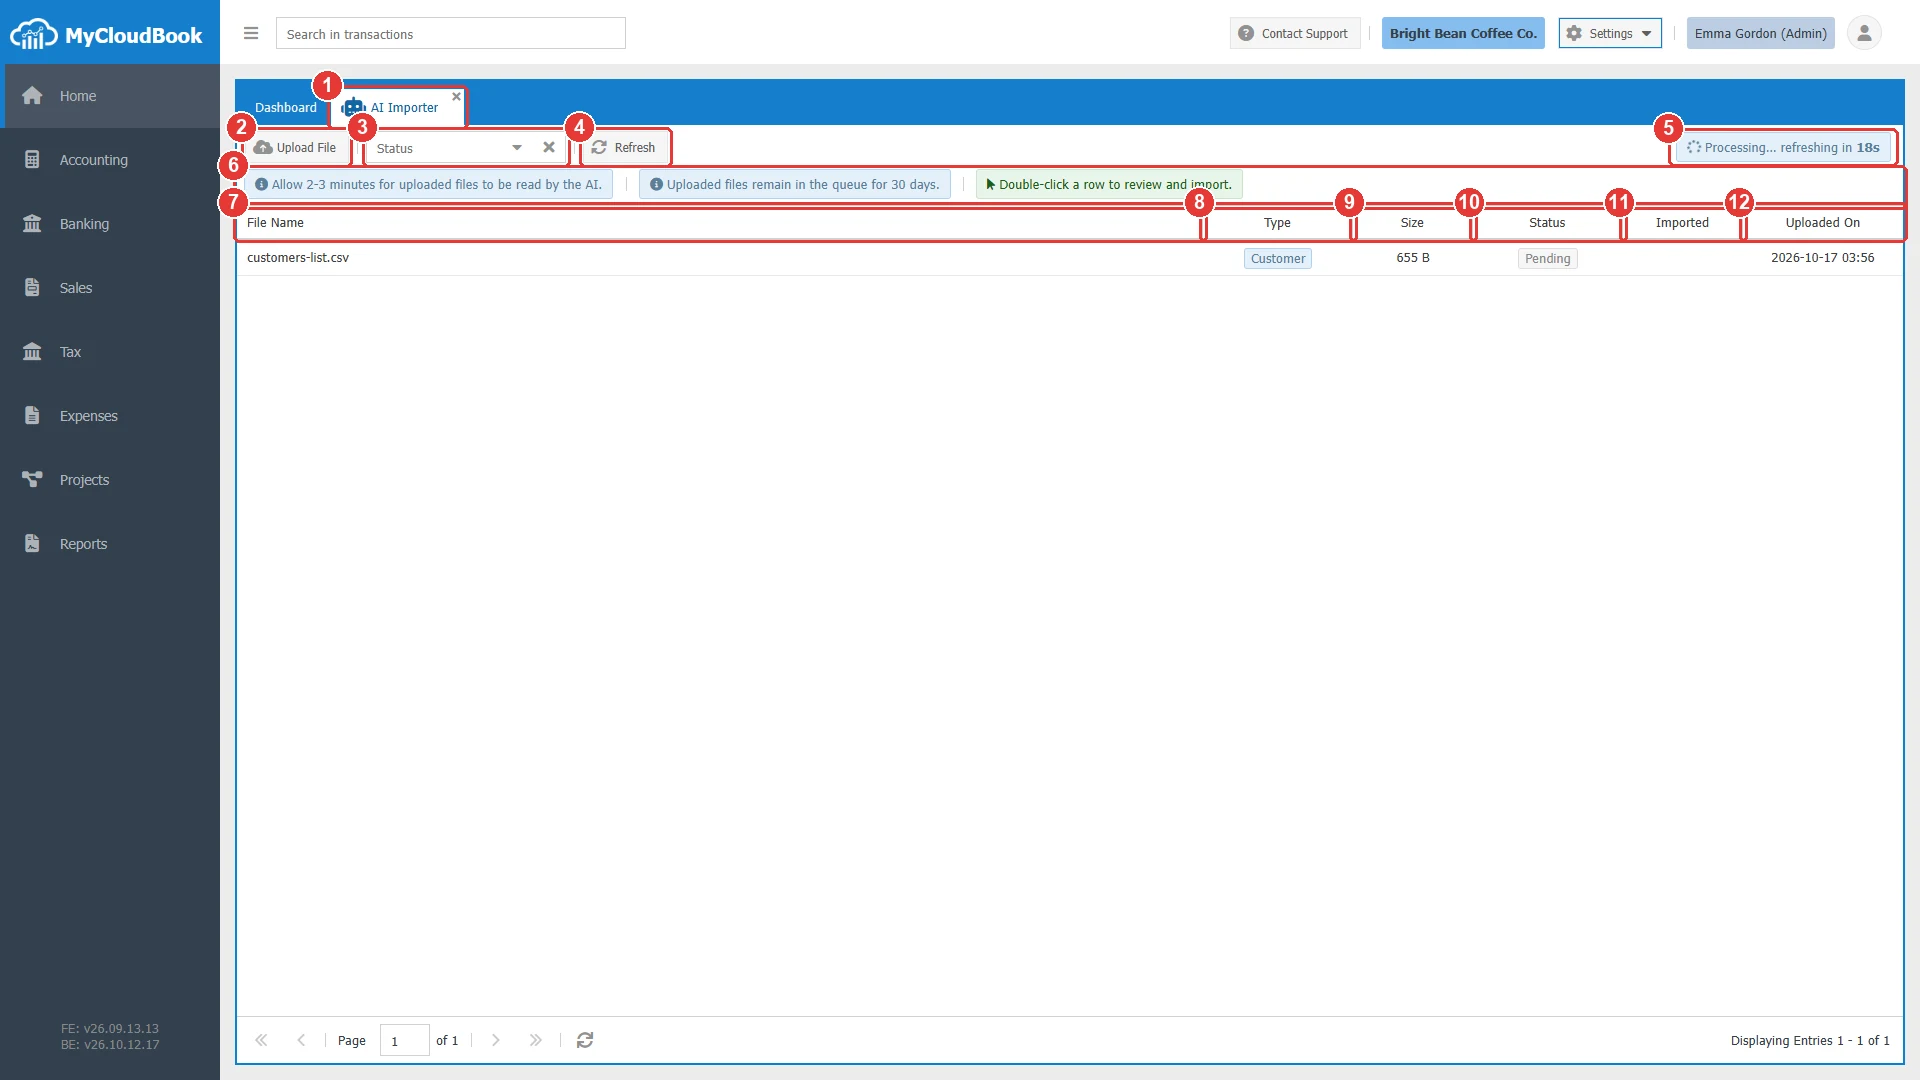
- 1The AI Importer tab.
- 2Upload File. Opens the upload window.
- 3Status. Shows only the files of one status. The x clears the filter.
- 4Refresh. Loads the list again.
- 5The automatic refresh, with the seconds until the next refresh.
- 6The hints of the tab.
- 7File Name. The name of the uploaded file.
- 8Type. The kind of records.
- 9Size. The size of the file.
- 10Status. The state of the file.
- 11Imported. The number of records that were created, after the import.
- 12Uploaded On. The date and the time of the upload.
| Status | Meaning |
|---|---|
| Pending | The file waits for the AI. |
| Processing | The AI reads the file now. |
| Ready For Review | The records were read. Double click the row to review them. |
| Imported | The records were created. The review opens in read-only mode. |
| Failed | The AI could not read the file. Upload the file again, or upload a clearer copy. |
| File Not Found | The stored file is missing. Upload the file again. |
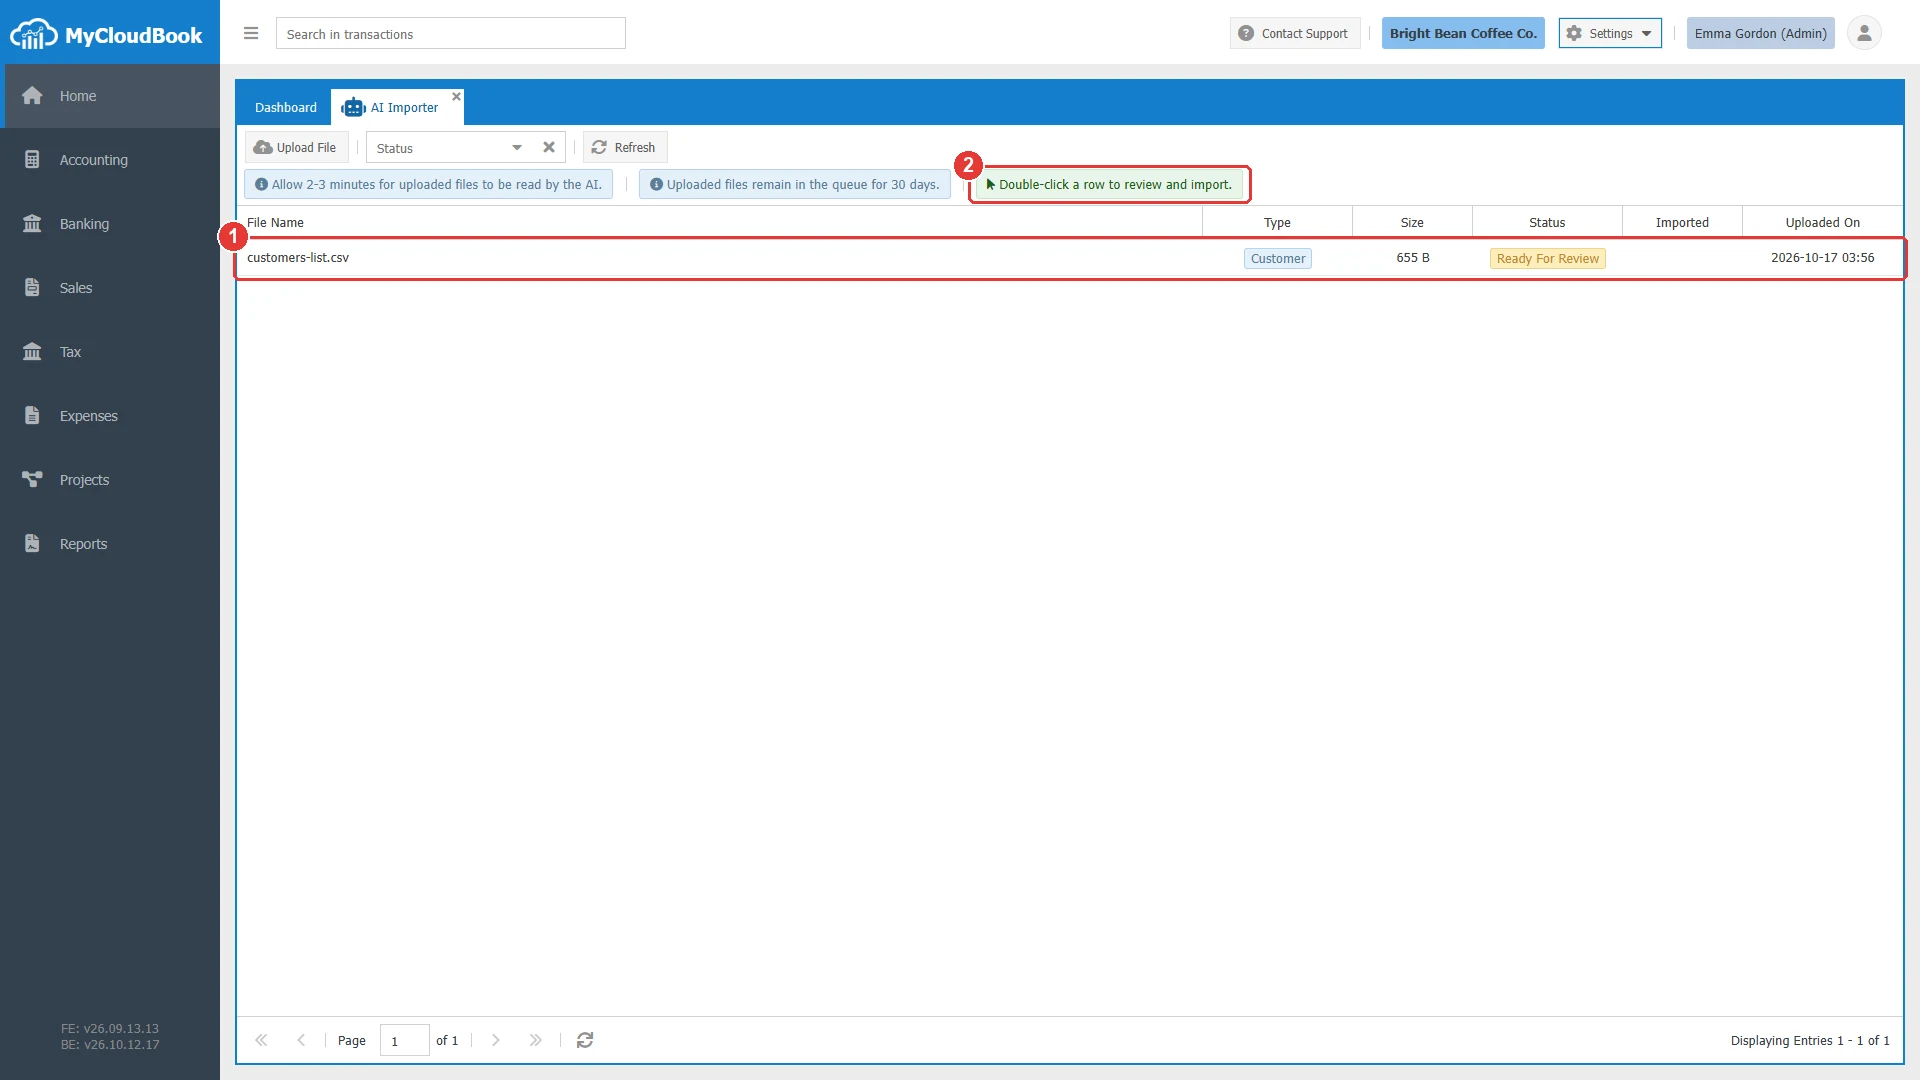
- 1The file, with the status Ready For Review.
- 2The hint: a double click on a row opens the review.
Reviewing the records
A double click on a row in the status Ready For Review or Imported opens the review. The review is a new tab, named after the file. The table shows the records that the AI read. A double click on a cell changes its value.
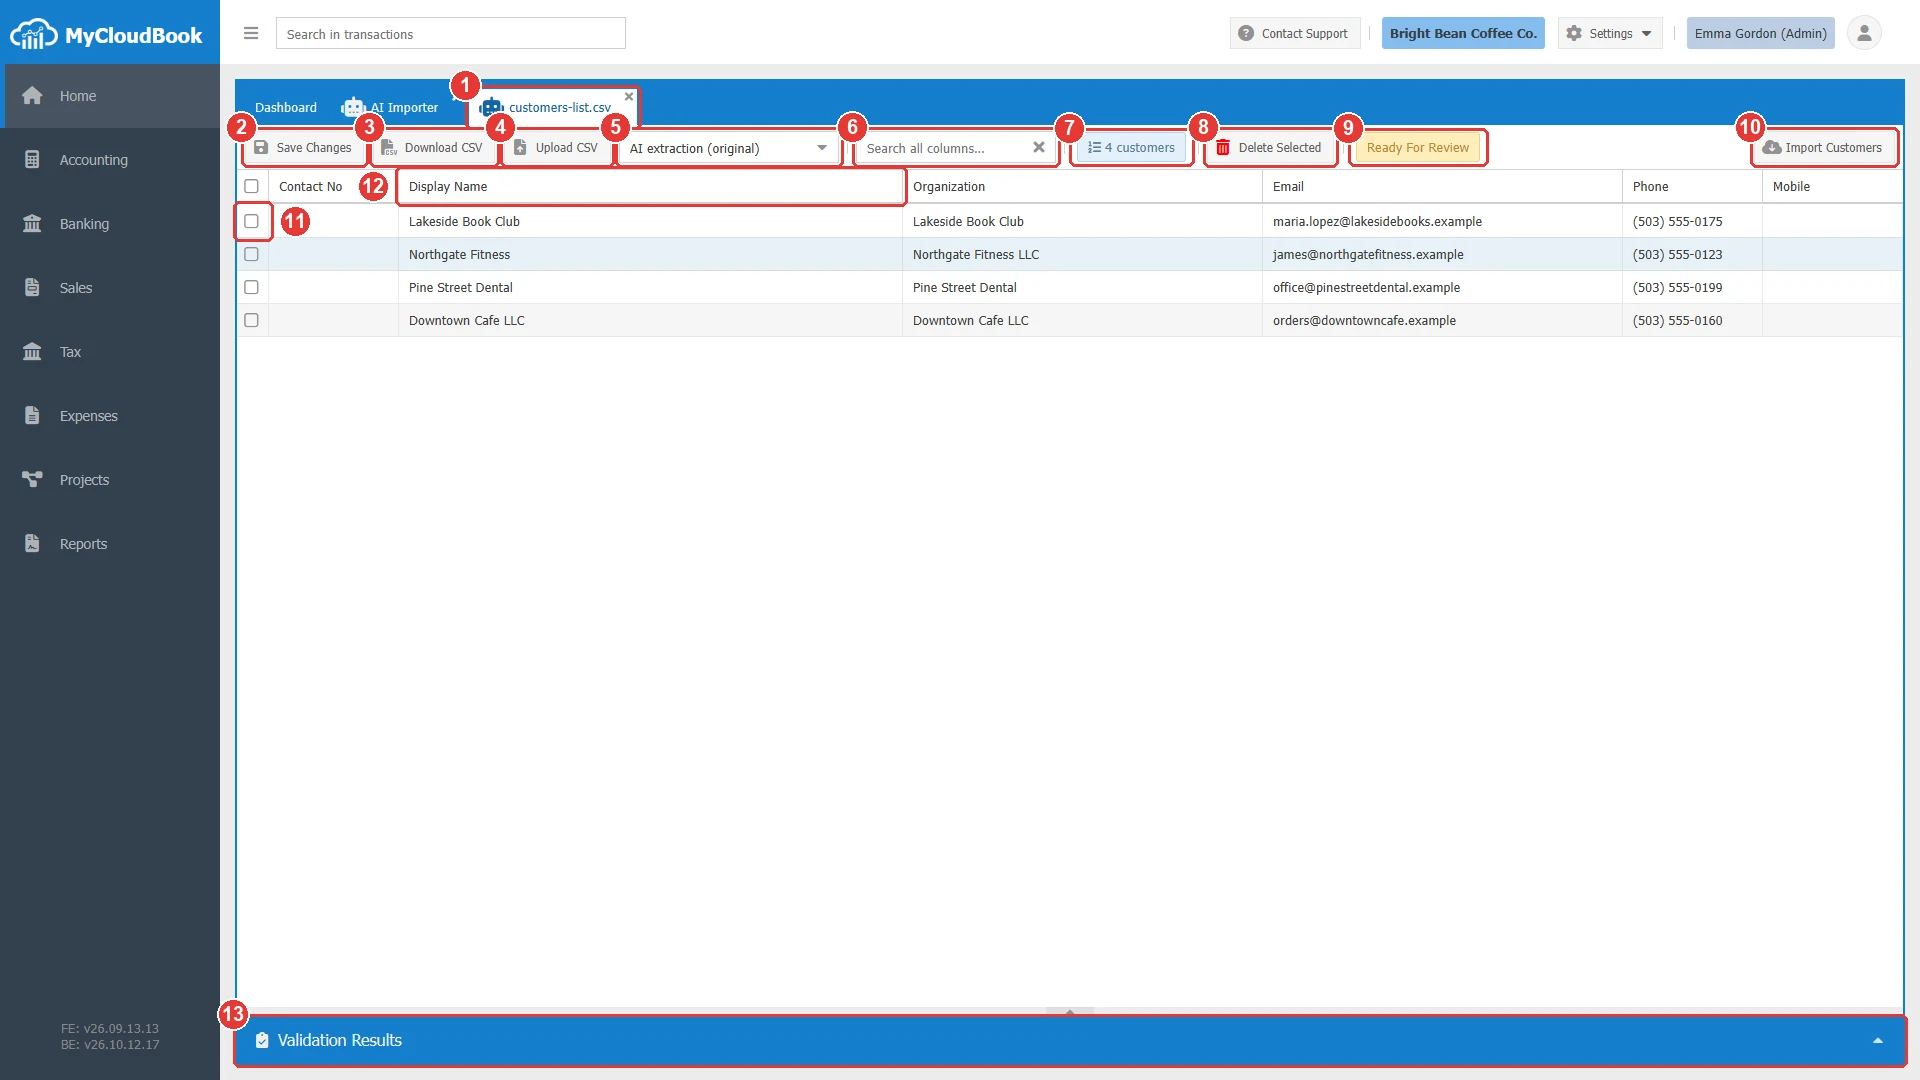
- 1The review tab, named after the file.
- 2Save Changes. Saves the table as a new version and checks it.
- 3Download CSV. Downloads the version that is shown as a CSV file.
- 4Upload CSV. Uploads a corrected CSV file as a new version.
- 5The version history. The first version is the AI extraction.
- 6Search all columns.... Shows only the rows that contain the text.
- 7The number of rows of the list.
- 8Delete Selected. Deletes the checked rows after a question.
- 9The status of the file.
- 10Import Customers. The name of the button follows the kind of records.
- 11The check box of a row, for Delete Selected.
- 12Display Name. A double click on a cell changes the value.
- 13Validation Results. The panel with the result of the check. A click opens or closes it.
Checking and correcting the list
Click Save Changes. MyCloudBook saves the table as a new version when it has changed, and checks every row. The Validation Results panel opens with the result. In the example, one customer of the file exists in the company already.
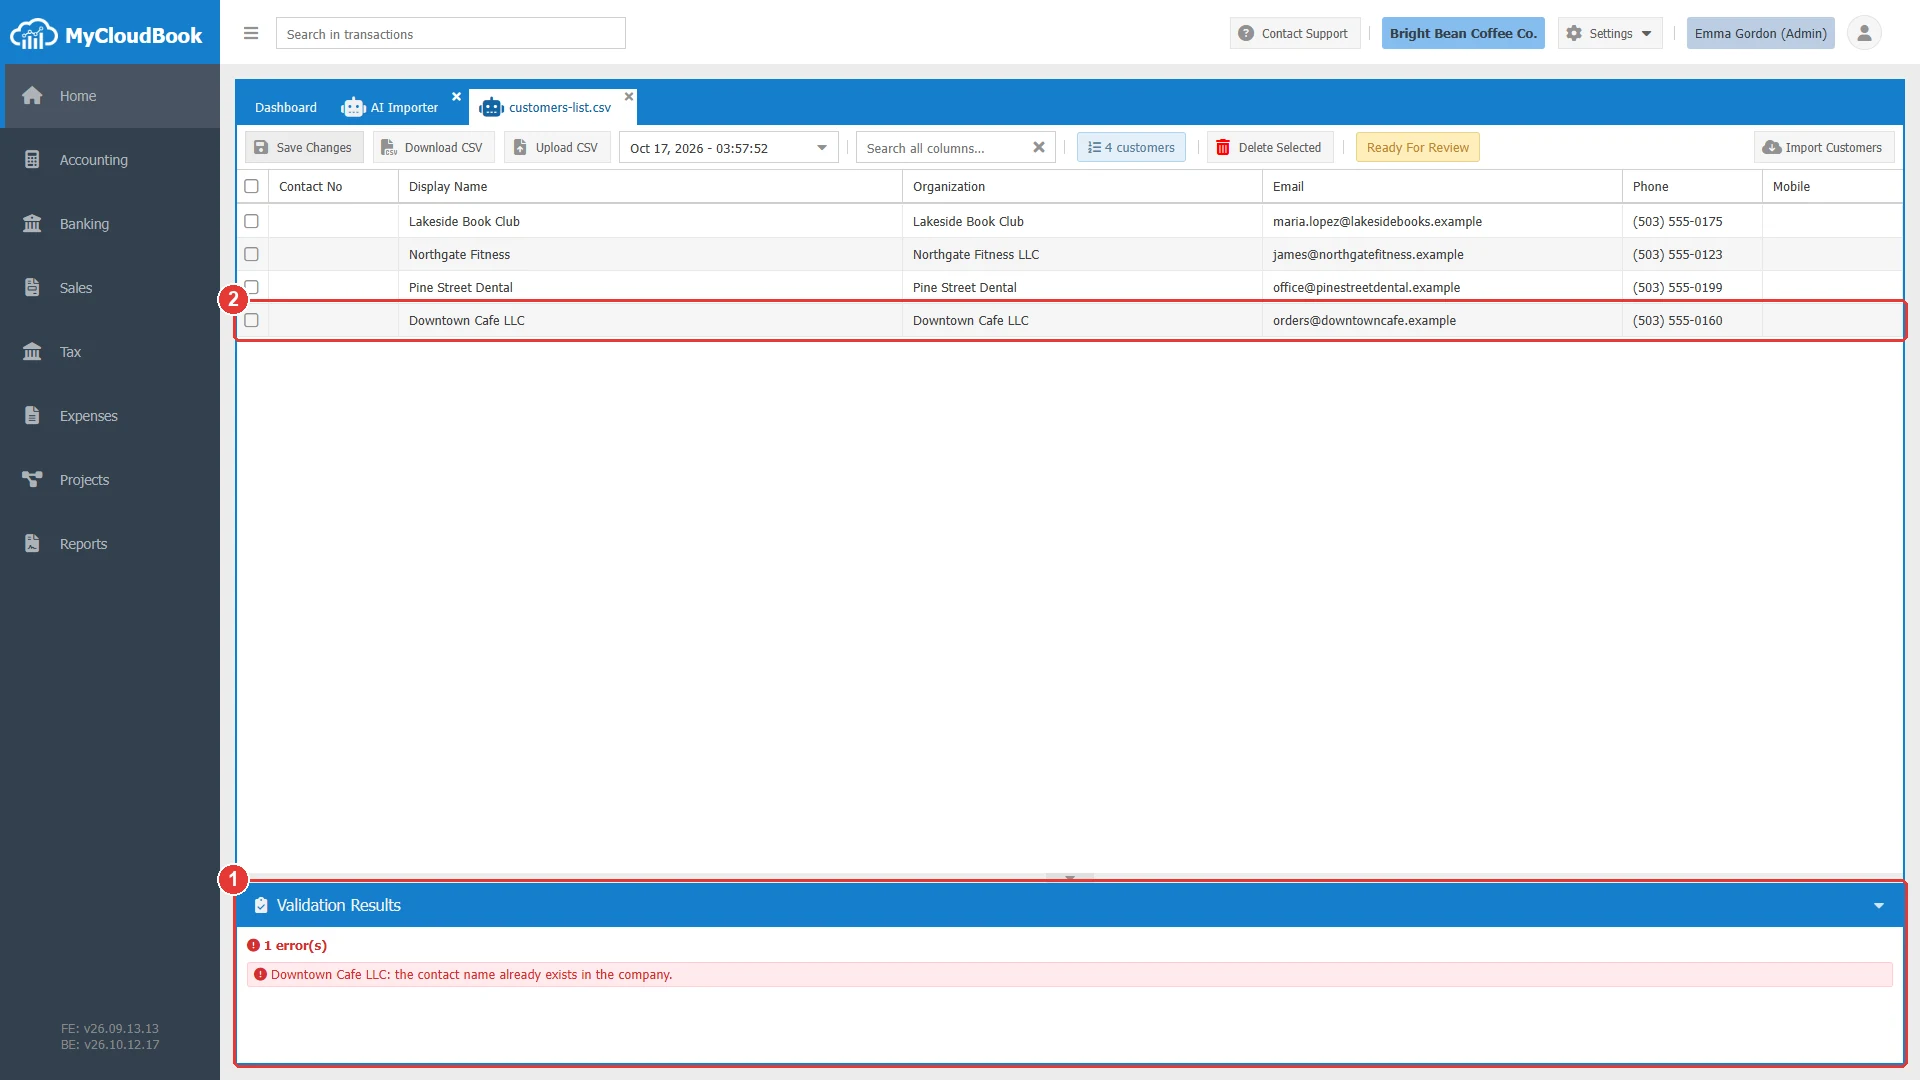
- 1The errors of the list. Each message names the record, or the line of a record without a name.
- 2The row of the error.
To remove the row, check its box, click Delete Selected, and answer Yes. Then click Save Changes again.
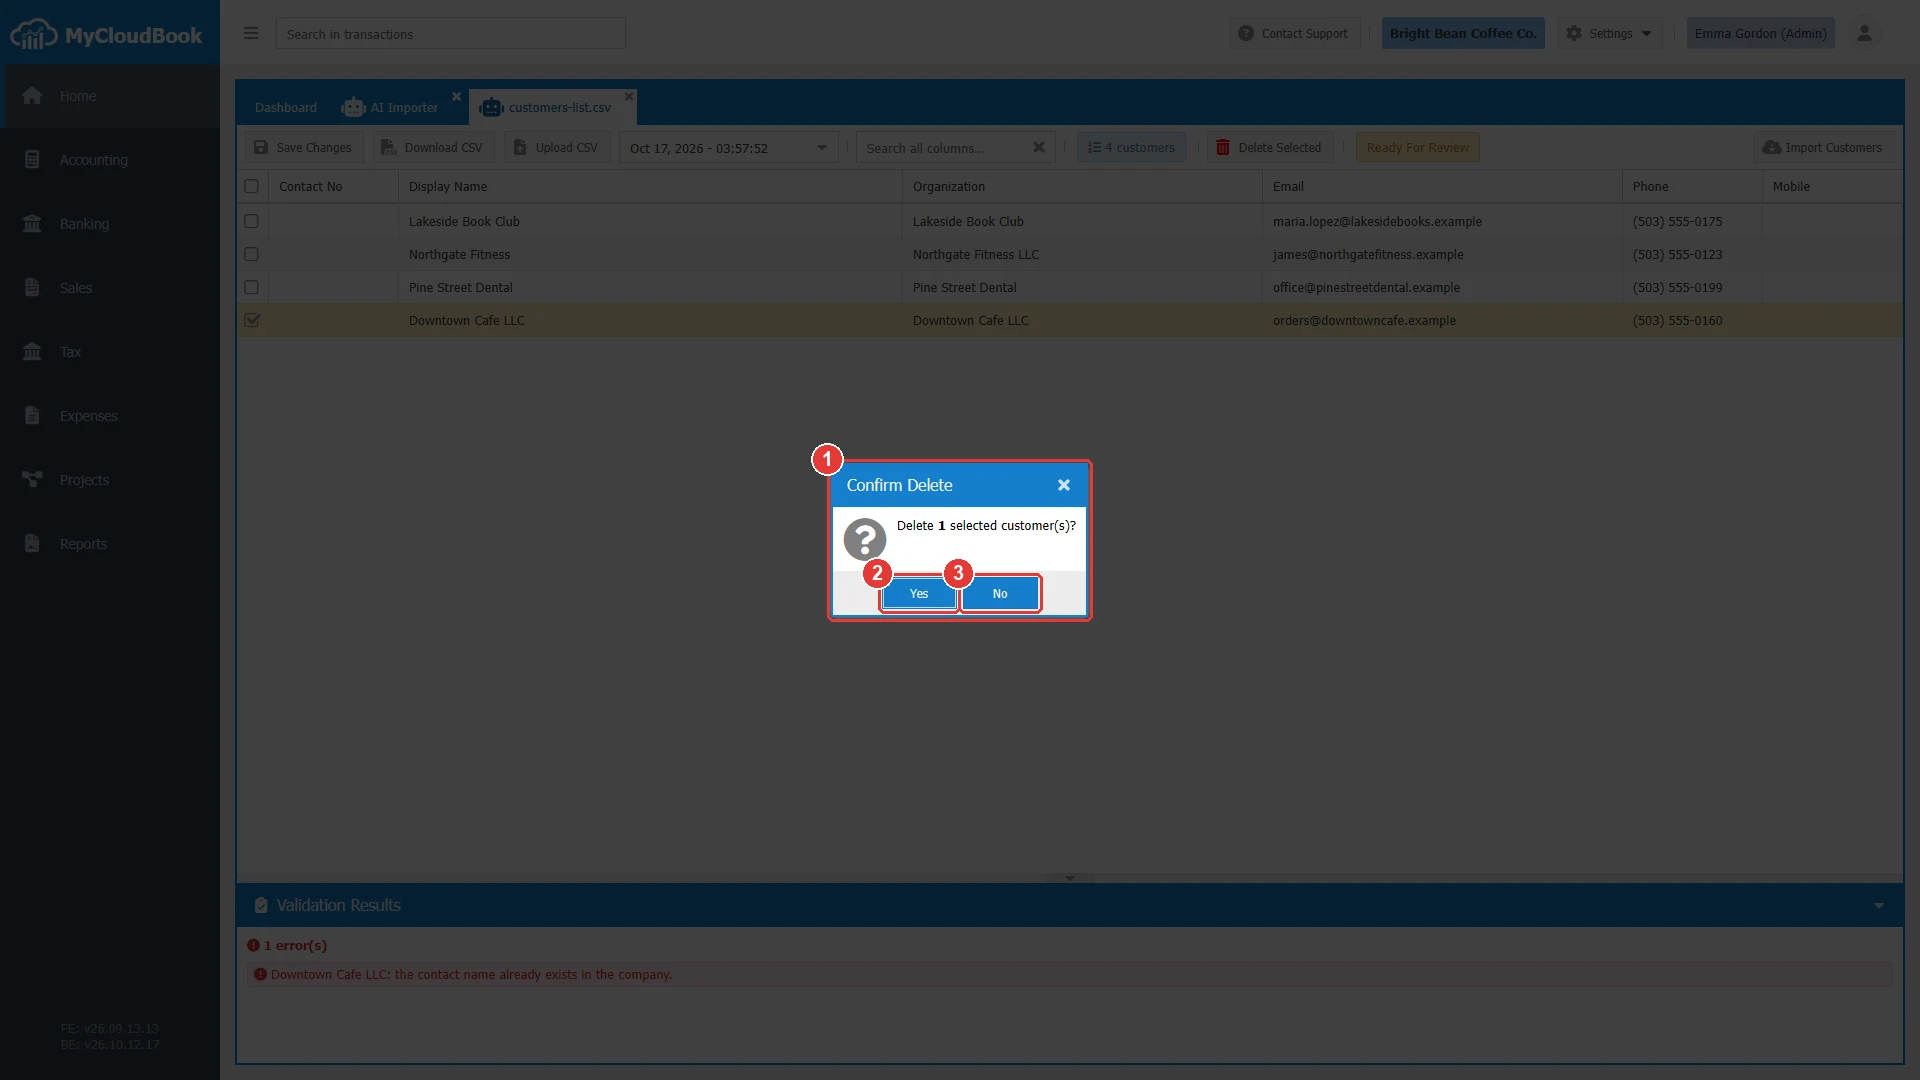
- 1The question with the number of rows.
- 2Yes. Deletes the rows from the table.
- 3No. Keeps the rows.
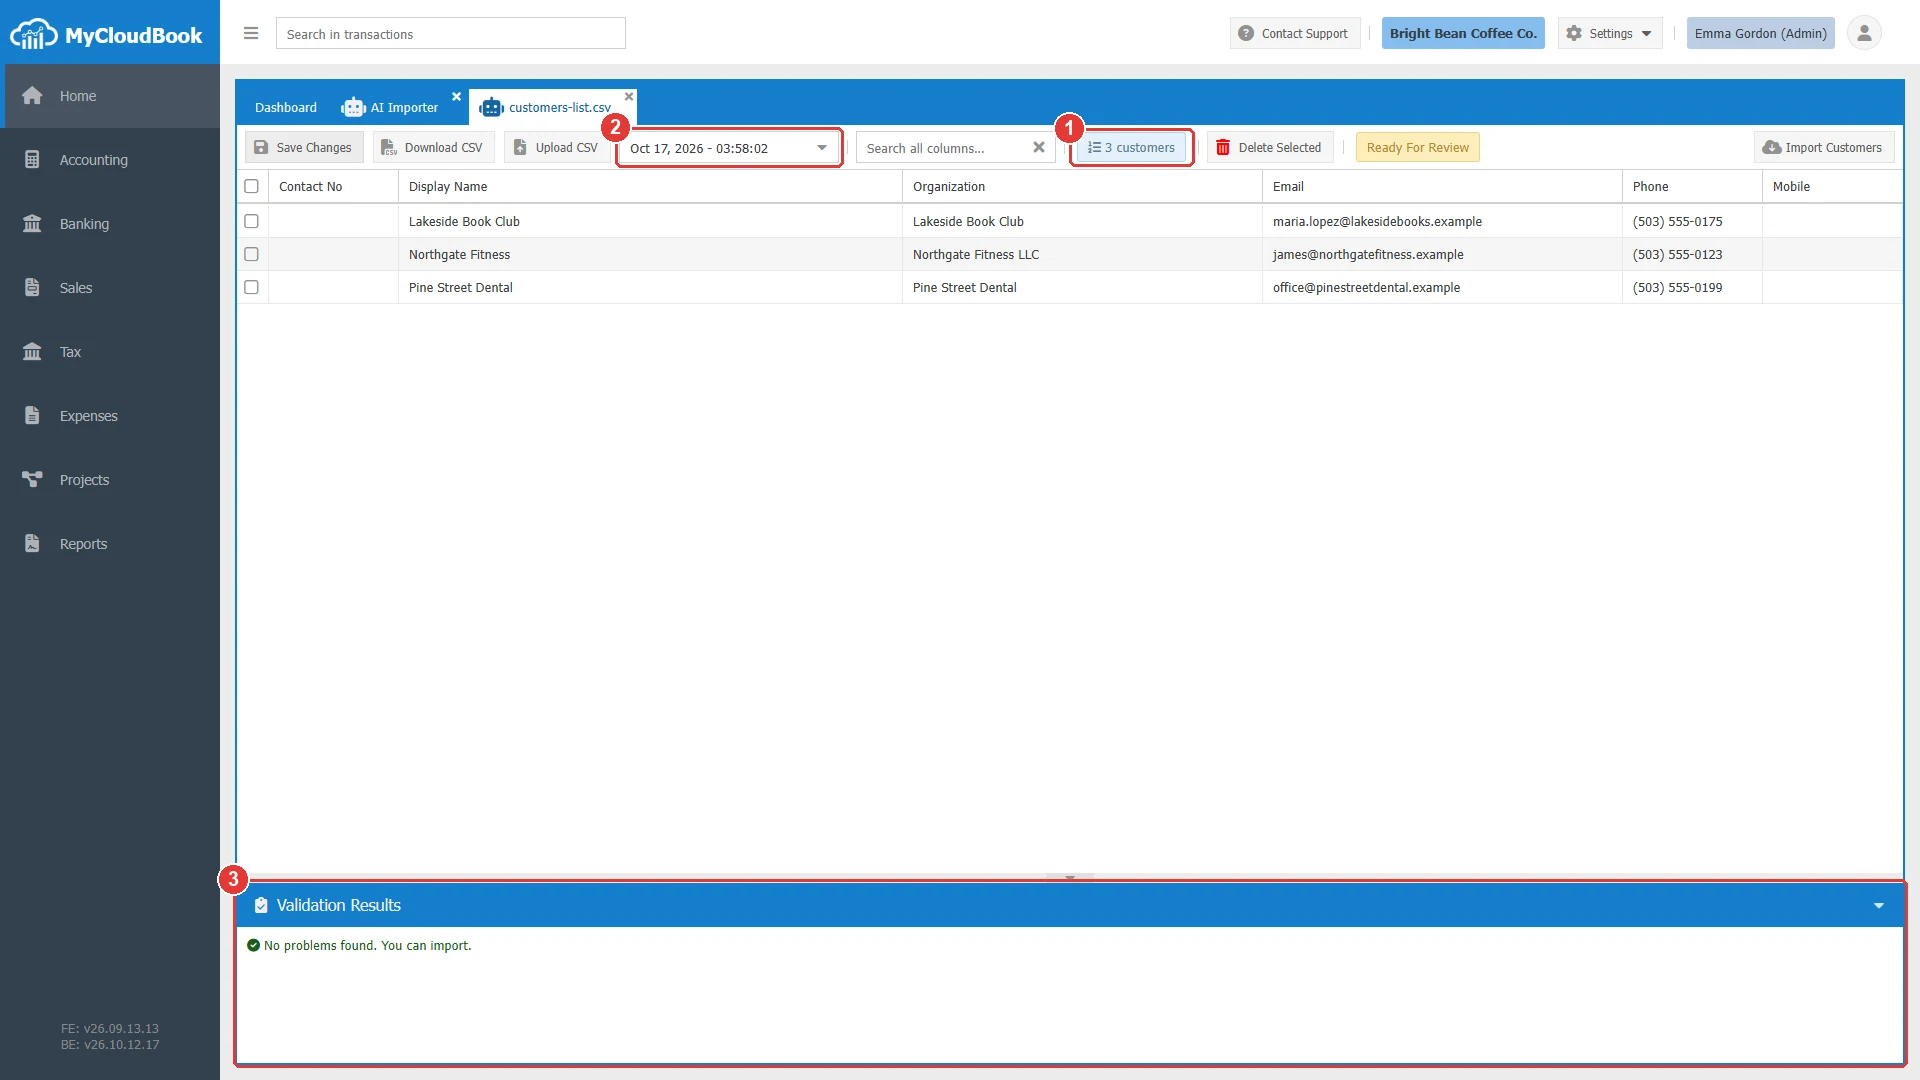
- 1Three customers are left.
- 2The saved version, with its date and time.
- 3No problems found. You can import.
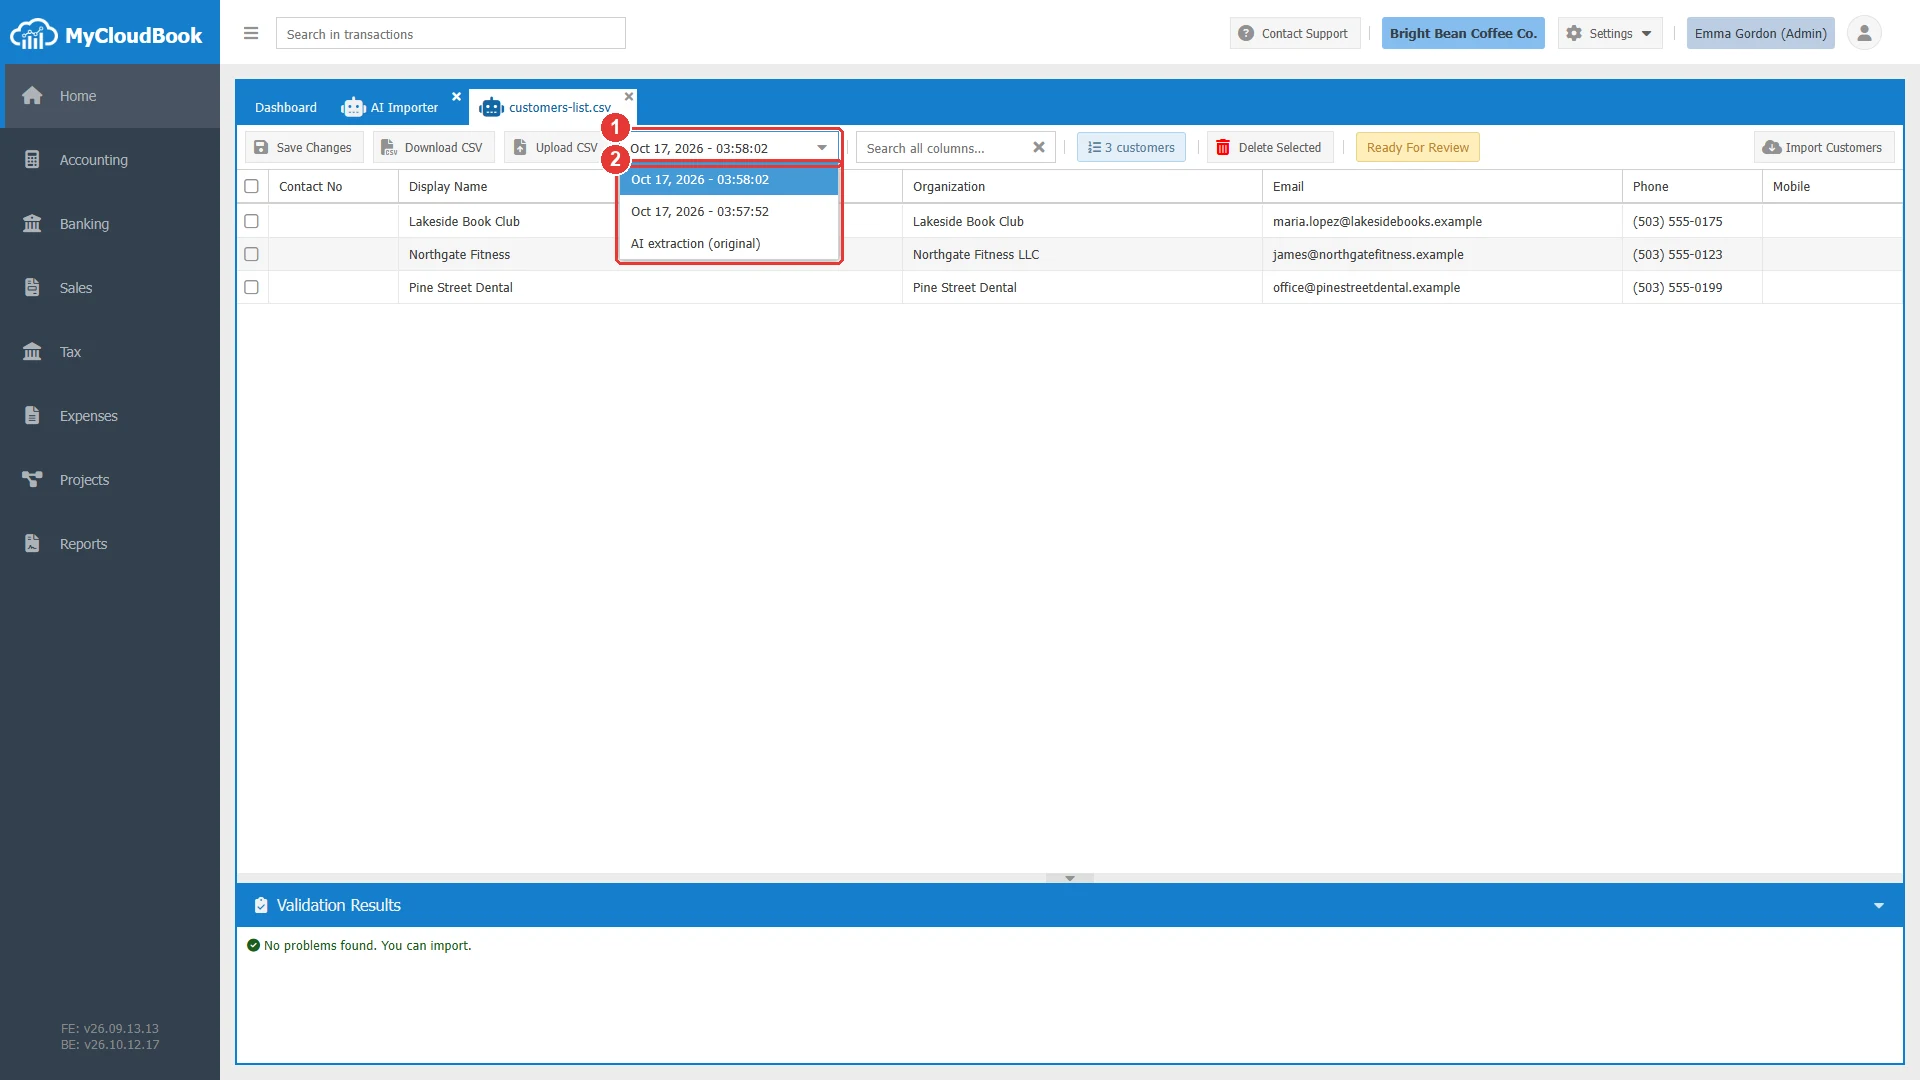
- 1The version history.
- 2The saved versions, the newest first, and the AI extraction. A click shows that version in the table.
| Tool | Use |
|---|---|
| Version history | Every save that changes the table adds a version. Choose a version to see it, download it, or import it. |
| Download CSV and Upload CSV | Download the version as a CSV file, correct it in a spreadsheet program, and upload it again. Keep the columns of the downloaded file in the same order. |
| Search all columns | Shows only the matching rows. A save and an import still use all the rows. |
Importing the records
- Choose the version to import in the version history. The latest version is shown when the tab opens.
- Click the import button, for example Import Customers.
- Read the question and click Yes.
MyCloudBook saves the table, checks it again, and creates the records. When any row has an error, nothing is created, and the Validation Results panel shows the errors. After the import, the status is Imported, the Imported column shows the number of records, and the review becomes read-only.
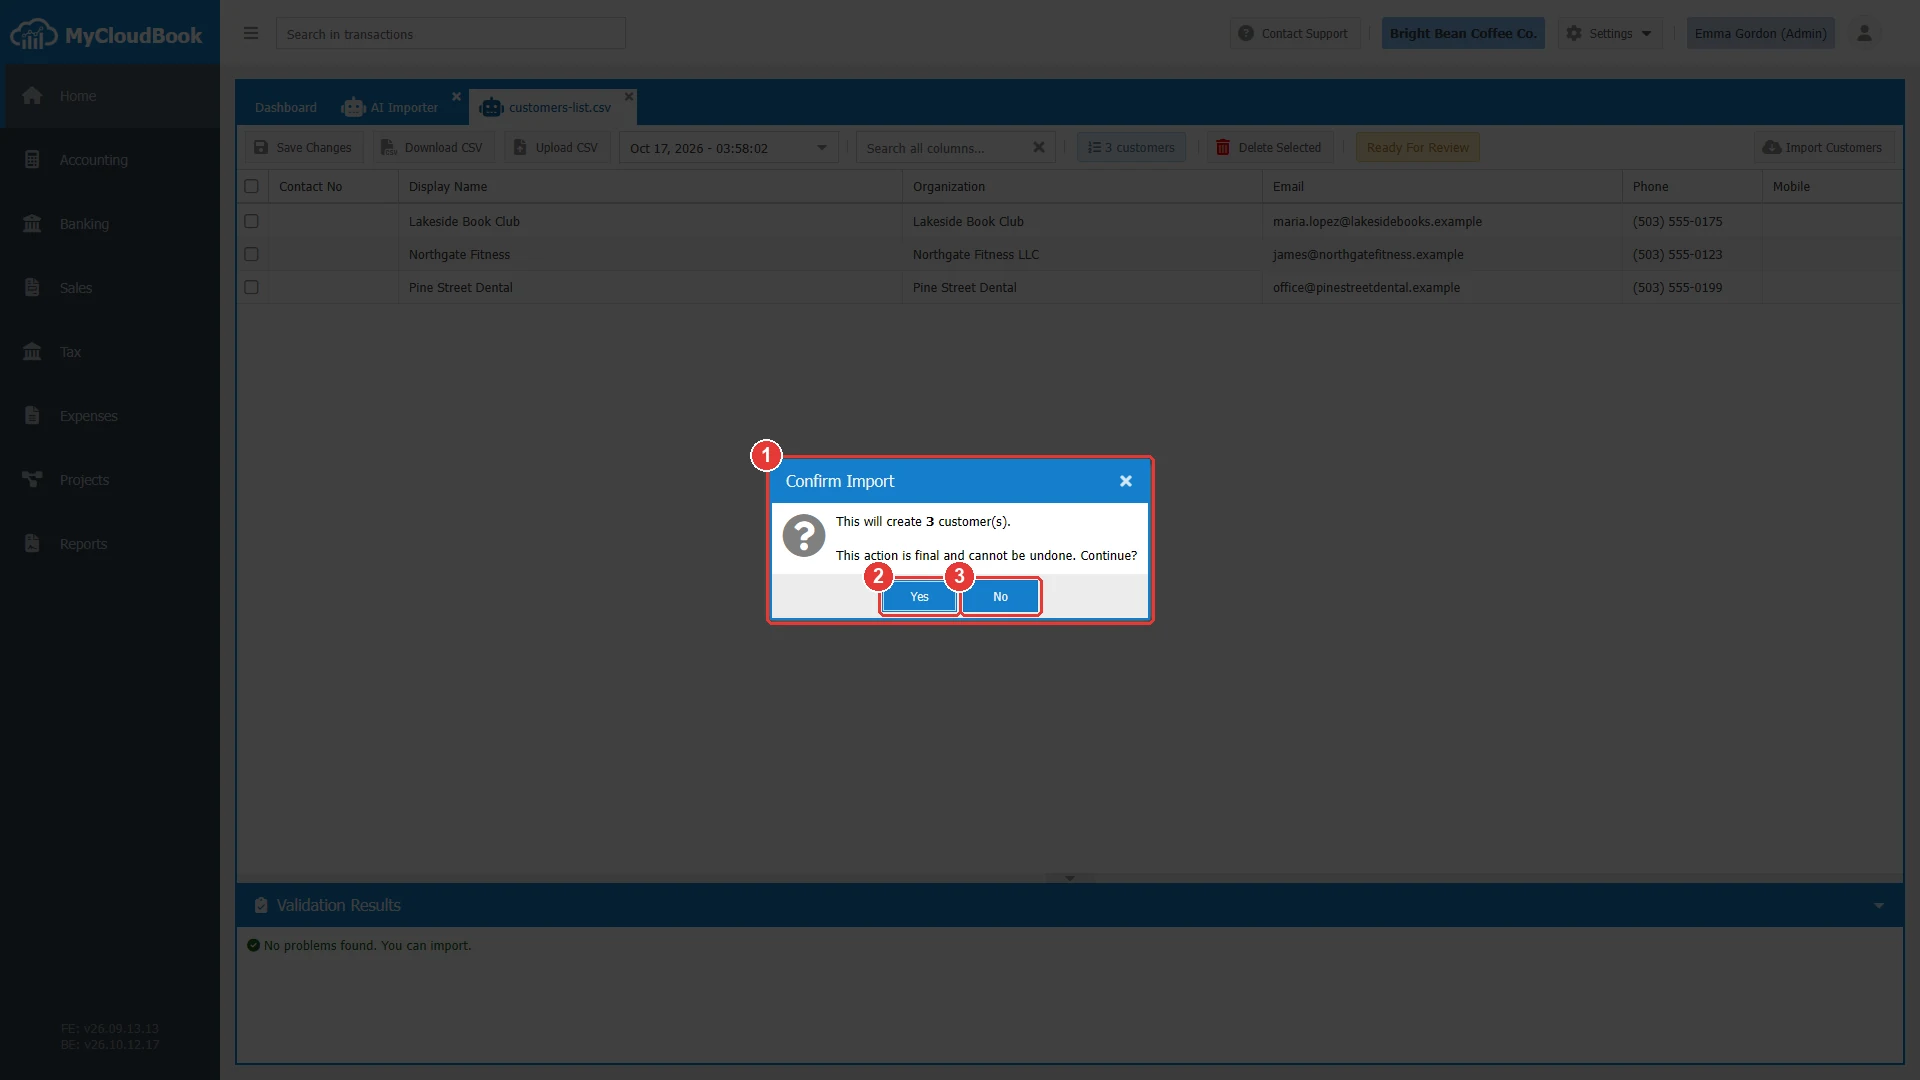
- 1The question with the number of records.
- 2Yes. Saves, checks, and creates the records.
- 3No. Returns to the review.
| Kind of records | What the import creates |
|---|---|
| Chart of Accounts | The accounts in the main currency. A parent account is created before its sub accounts. An account number that is empty is assigned by MyCloudBook. |
| Customers | Active customers with the person, the billing address, and the shipping address. |
| Suppliers | Active suppliers with the person and one address. |
| Products & Services | The products and services with their prices and accounts. An inventory item receives its opening quantity on its date. |
Messages and their meaning
Questions and answers
Which records can the AI Importer create?
Accounts of the chart of accounts, customers, suppliers, and products and services.
Which files can I upload?
A PDF file, a picture, or a CSV file, up to 2 MB each. An Excel file must be saved as CSV first.
Is my file sent outside MyCloudBook?
Yes. The uploaded file is sent to an outside AI service, which reads the records from it. Nothing else of the company is sent.
How long does the reading take?
Usually two to three minutes. The list refreshes itself every 30 seconds while a file waits.
What should I check before I import?
Check the Validation Results and the rows. The import creates all the records at once. After the import, each record is changed in its own screen, for example a customer in Customers.
What happens with a row that has an error?
The import does not start while any row has an error. Correct the row or delete it, and save again.