Customers
This guide explains the Customers screens of MyCloudBook: the customers list, every field of a customer, the customer information screen with its balance and statement, and the rules for making a customer inactive or deleting it.
Overview
A customer is a person or a company that buys from your company. MyCloudBook keeps one record per customer with the name, the primary contact person, the billing address, and the shipping address. Every sales document, such as an invoice, a receipt, an estimate, or a receipt voucher, names a customer.
The balance of a customer is the amount that the customer owes. MyCloudBook does not store this balance in the customer record. It computes the balance from the posts on the Accounts Receivable account that carry the customer. An unpaid invoice raises the balance, and a receipt voucher or a credit note lowers it. The Journal guide explains how a manual journal entry can also post to a customer.
The Customers screens are:
- the customers list, the first tab of the Sales page;
- the Add Customer window, which also serves to change a customer (Update Customer);
- the customer information screen, with the balance, the statement, the documents, the attachments, and the notes of one customer.
How to open the screen
- In the left navigation, click Sales.
- The Customers tab is the first tab of the Sales page. It opens by default.
The Sales page has the tabs Customers, Invoices & Receipts, Payments & Refunds, and Products & Services. A fifth tab, Subscriptions, appears when the subscription services are enabled in the settings of the company.
The customers list
The list shows one row per customer, in the alphabetical order of the display name, with up to one hundred customers per page. The first figure shows the list with every part marked.
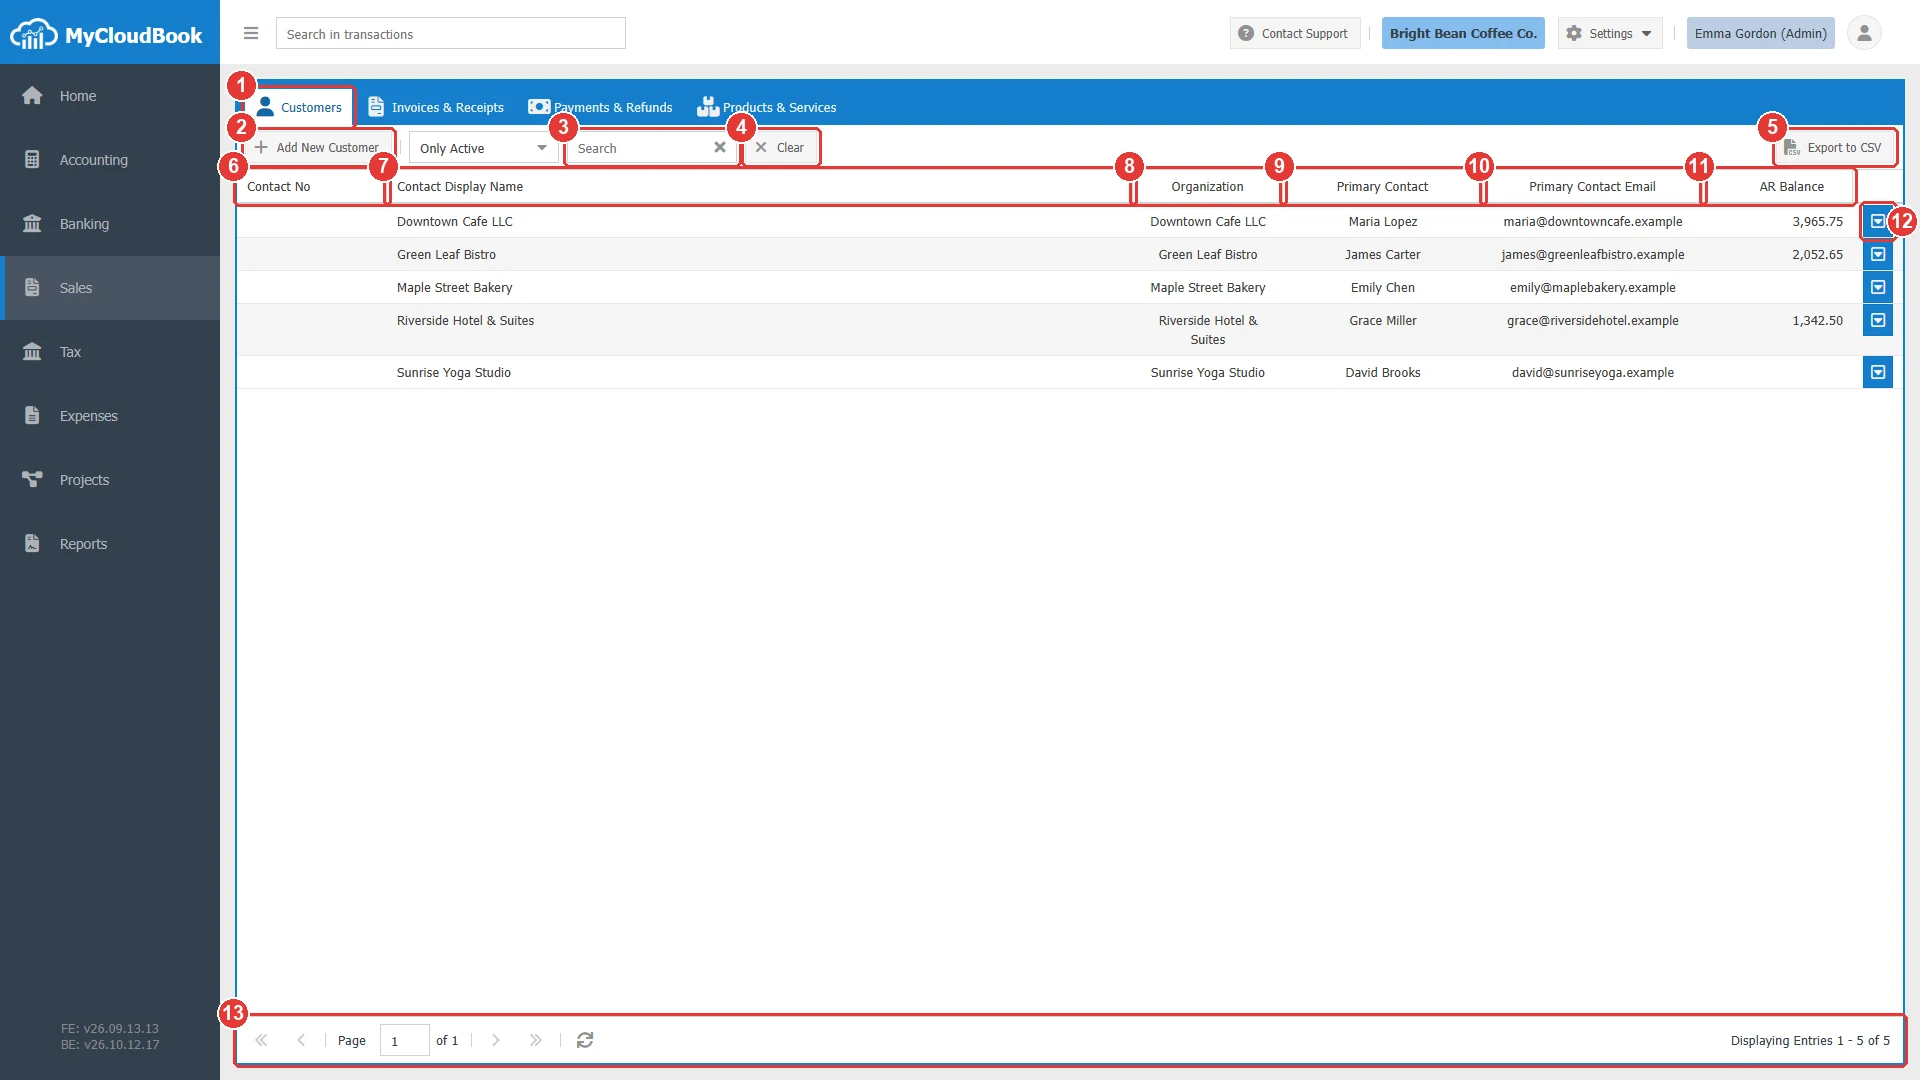
- 1Customers tab.
- 2Add New Customer. Opens the Add Customer window.
- 3Search. Finds the customers by name, number, organization, contact person, email, telephone, or address. Press Enter to search.
- 4Clear. Removes the search and sets the status filter back to Only Active.
- 5Export to CSV. Downloads the customers of the current filter as a CSV file.
- 6Contact No. The customer number.
- 7Contact Display Name. The name of the customer.
- 8Organization. The organization name.
- 9Primary Contact. The first, middle, and last name of the contact person.
- 10Primary Contact Email. The email of the contact person.
- 11AR Balance. The amount that the customer owes. An empty cell means a zero balance.
- 12The row actions button. It opens a menu with Edit and Delete.
- 13The paging toolbar.
The status filter at the left of the search field has three values: Only Active (the default), Only Inactive, and Show All. A double click on a row opens the customer information screen.
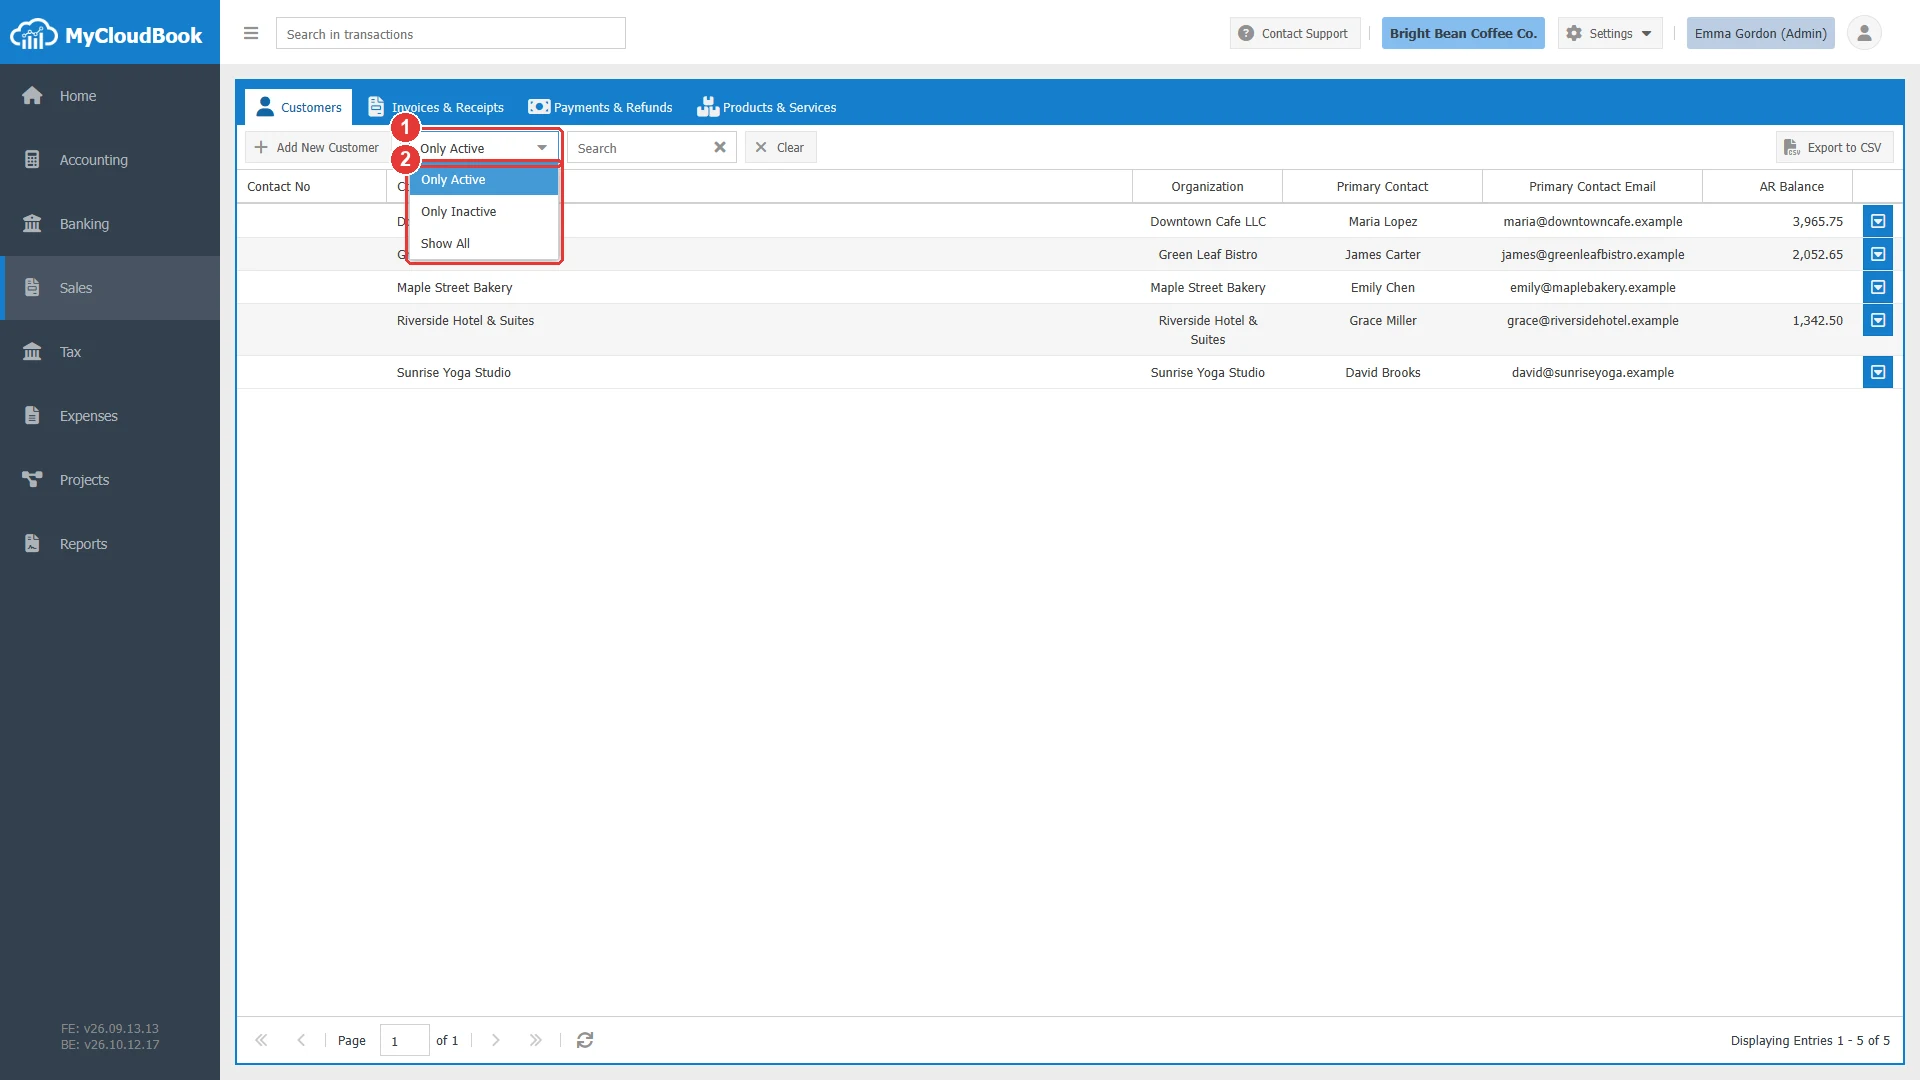
- 1The status filter.
- 2The three values of the filter.
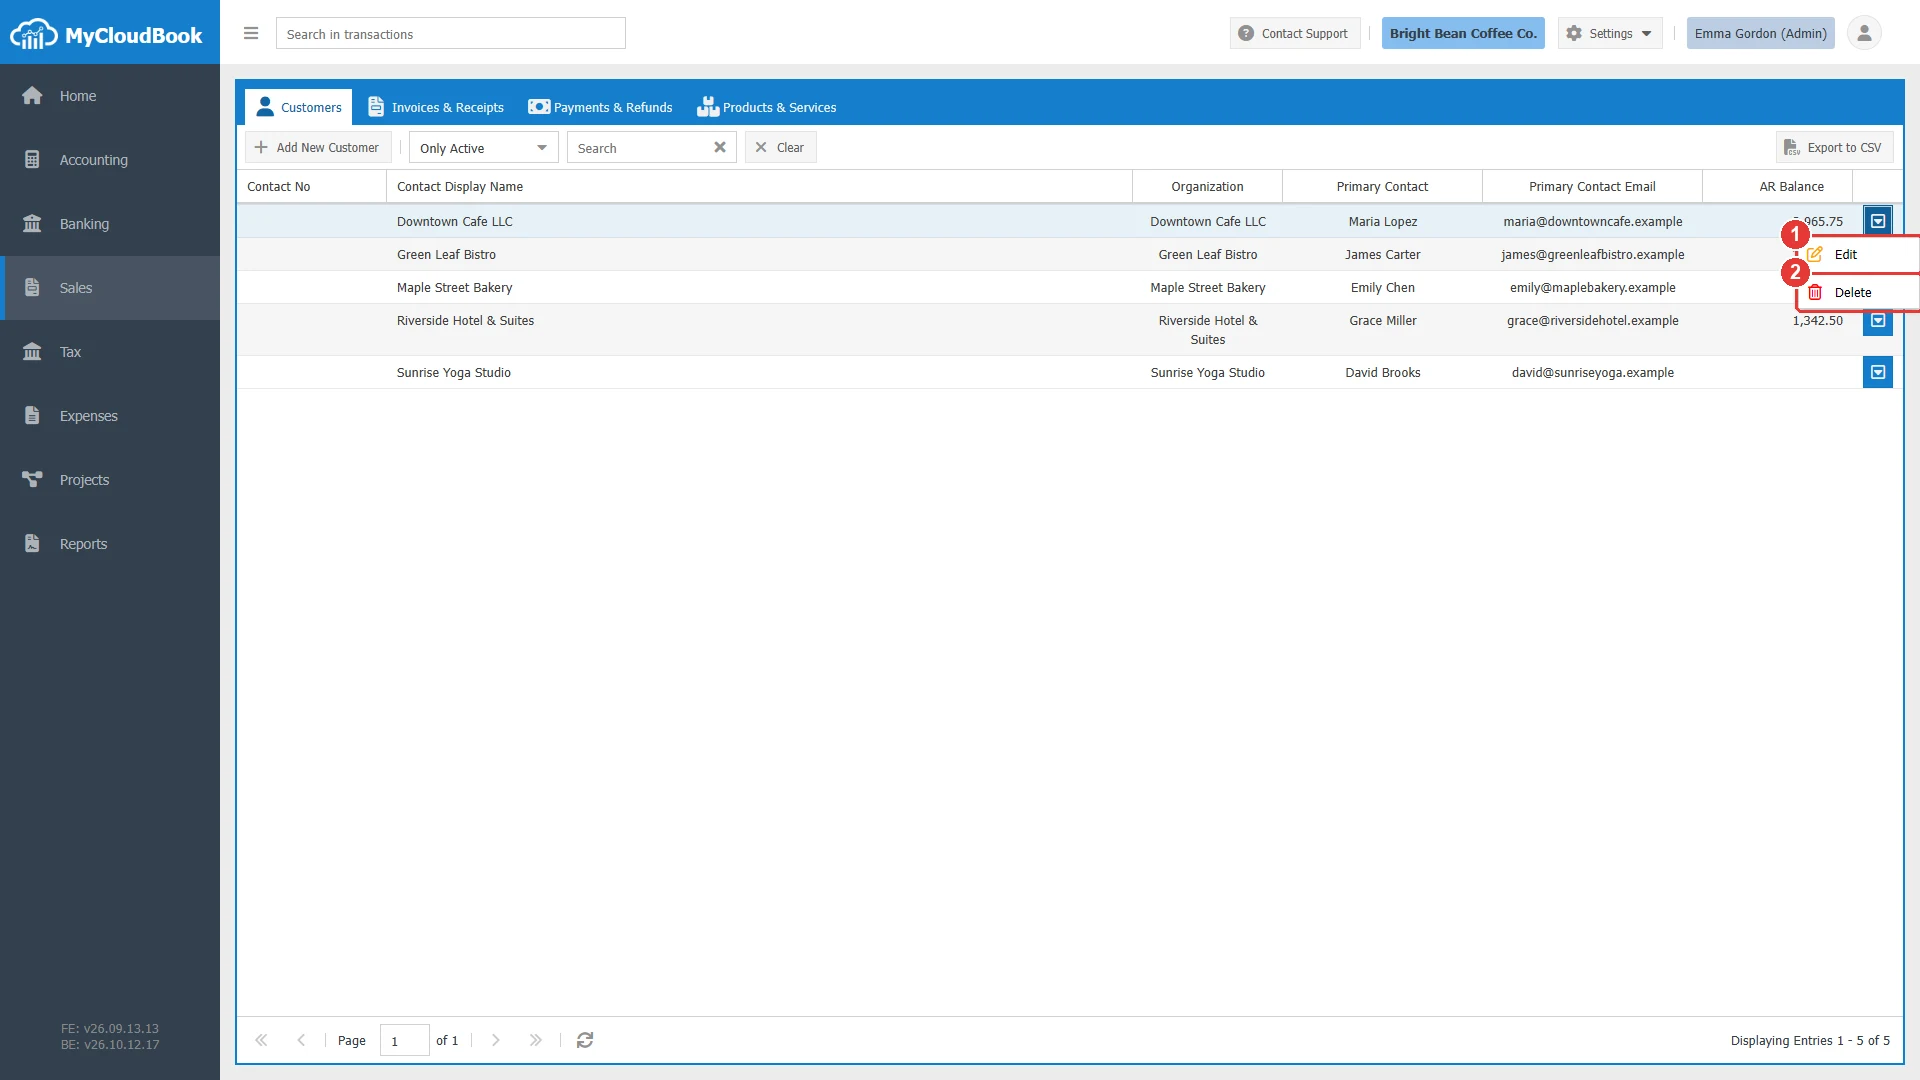
- 1Edit. Opens the Update Customer window.
- 2Delete. Deletes the customer after a confirmation.
Adding a customer
- In the customers list, click Add New Customer. The Add Customer window opens.
- Type the Display Name. This is the only required field. Type a Customer No and an Organization Name if you use them.
- In the Primary Contact Person tab, type the name, the job title, the emails, and the telephone numbers of the contact person.
- In the Billing & Shipping Address tab, type the billing address and the shipping address.
- Click Save. The window closes, a confirmation appears, and the customer is added to the list.
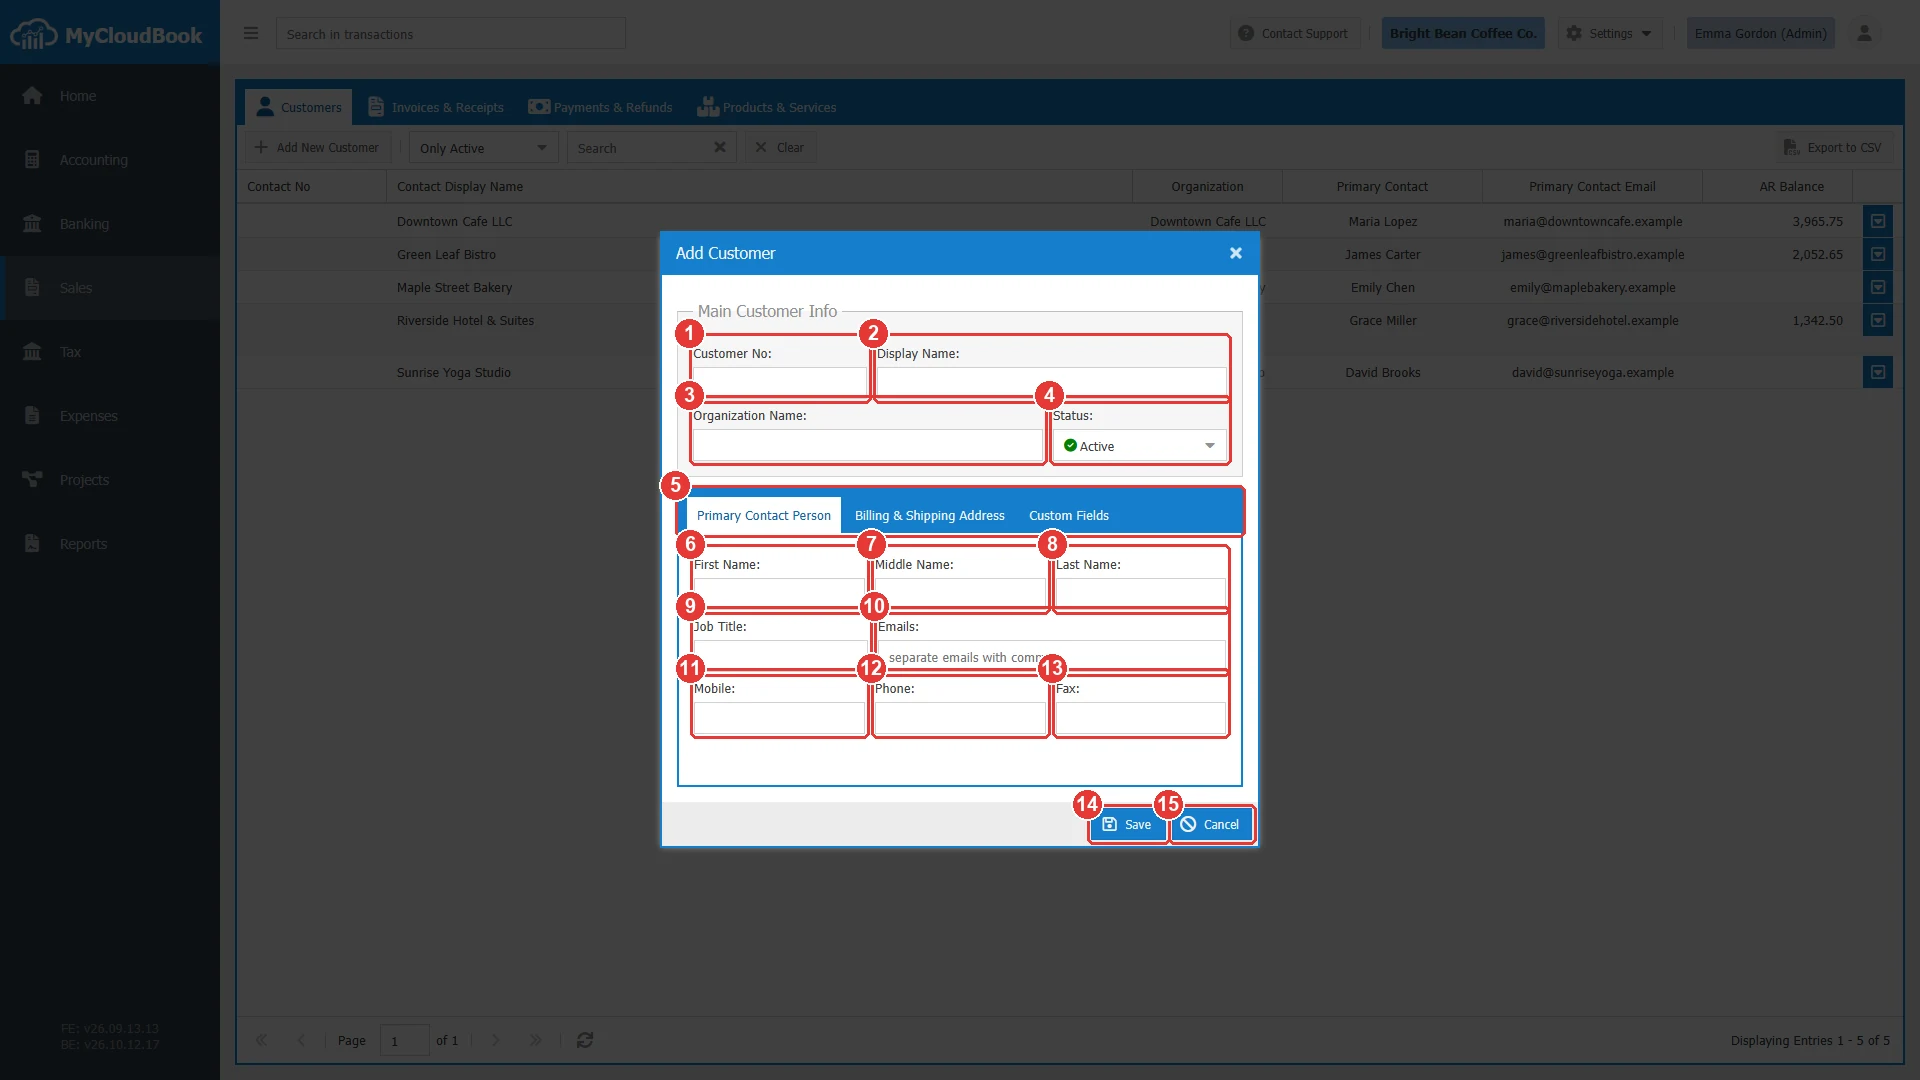
- 1Customer No. An optional customer number.
- 2Display Name. The name of the customer. Required.
- 3Organization Name. The legal name of the organization.
- 4Status. Active or Inactive.
- 5The tabs Primary Contact Person, Billing & Shipping Address, and Custom Fields.
- 6First Name.
- 7Middle Name.
- 8Last Name.
- 9Job Title.
- 10Emails. One or more emails, separated by commas.
- 11Mobile.
- 12Phone.
- 13Fax.
- 14Save. Checks the fields and saves the customer.
- 15Cancel. Closes the window without saving.
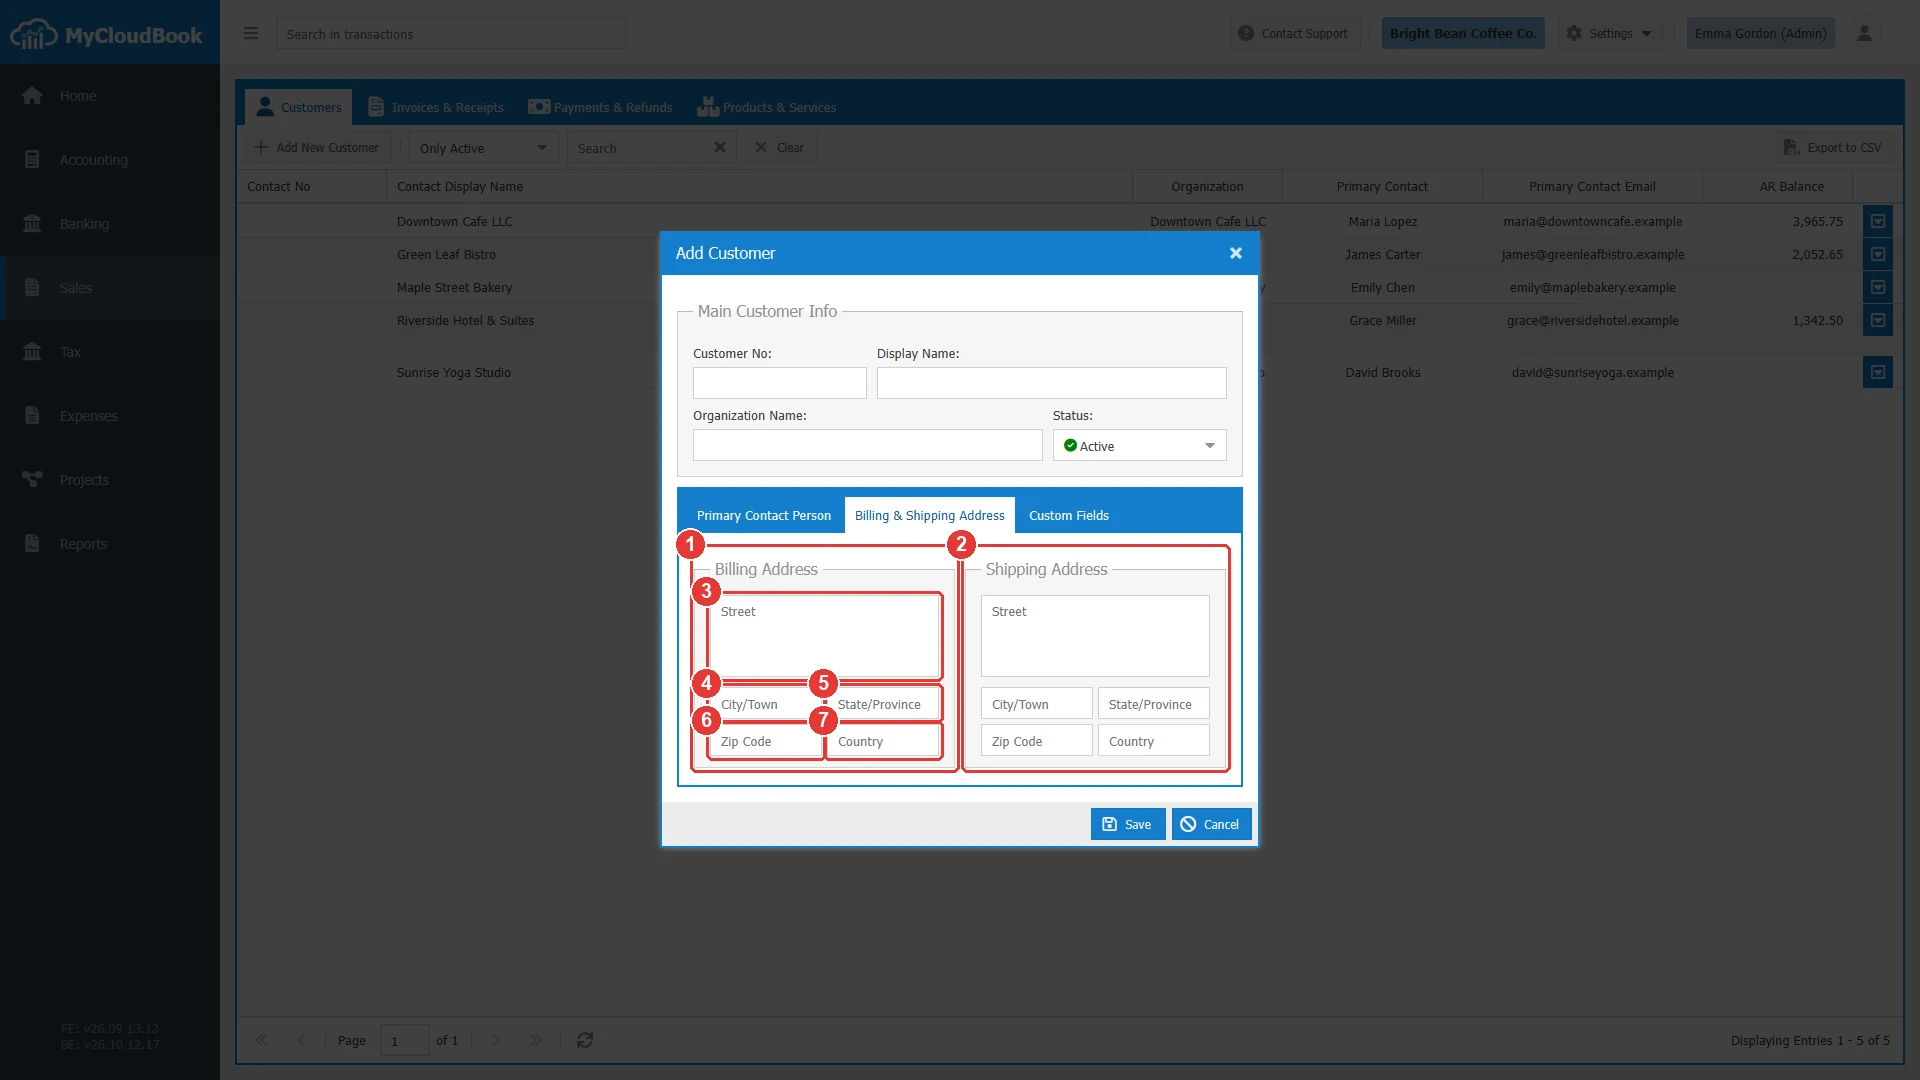
- 1Billing Address. The address printed on the invoices.
- 2Shipping Address. The address where the goods are delivered.
- 3Street. The street and the building number. The field accepts several lines.
- 4City/Town.
- 5State/Province.
- 6Zip Code.
- 7Country.
The Custom Fields tab shows the custom fields that the company defined for customers in Settings, Custom Fields. A custom field can be a text, a number, a date, or a list of values. The tab is empty when the company has no custom fields for customers.
The fields
| Field | Required | Purpose and rules |
|---|---|---|
| Customer No | Optional | A number or a code that identifies the customer, for example C-006. When it is given, it must be unique among all the customers and suppliers of the company. Up to 50 characters. |
| Display Name | Required | The name that appears in the lists, on the documents, and in the reports. It must be unique among the customers of the company. A supplier can have the same name as a customer. Up to 100 characters. |
| Organization Name | Optional | The legal name of the organization. Up to 100 characters. |
| Status | Required | Active (the default) or Inactive. An inactive customer stays in the books with all its documents. It is hidden from the customers list while the filter is Only Active. |
| First Name Middle Name Last Name | Optional | The name of the primary contact person. Up to 100 characters each. |
| Job Title | Optional | The position of the contact person. Up to 100 characters. |
| Emails | Optional | Up to five emails, separated by commas. Each email must have a valid format. The emails are proposed when a document is sent to the customer. All the emails together can have up to 100 characters. |
| Mobile Phone Fax | Optional | The telephone numbers of the contact person. Up to 200 characters each. |
| Billing Address | Optional | Street, City/Town, State/Province, Zip Code, and Country. The address is printed on the invoices and the other sales documents. |
| Shipping Address | Optional | The same fields as the billing address. It is printed as the delivery address. |
| Custom fields | Optional | The fields that the company defined for customers. A text value is limited to 255 characters, a number field accepts only numbers, a date field only dates, and a list field only the values of its list. |
Example
The example adds the customer Harbor View Catering, a catering company that buys coffee equipment and training.
- Click Add New Customer.
- Type C-006 in Customer No, Harbor View Catering in Display Name, and Harbor View Catering Ltd. in Organization Name.
- In the Primary Contact Person tab, type Olivia and Grant as the first and last name, Owner as the job title, the email, and the telephone numbers.
- In the Billing & Shipping Address tab, type the same address in both parts.
- Click Save.
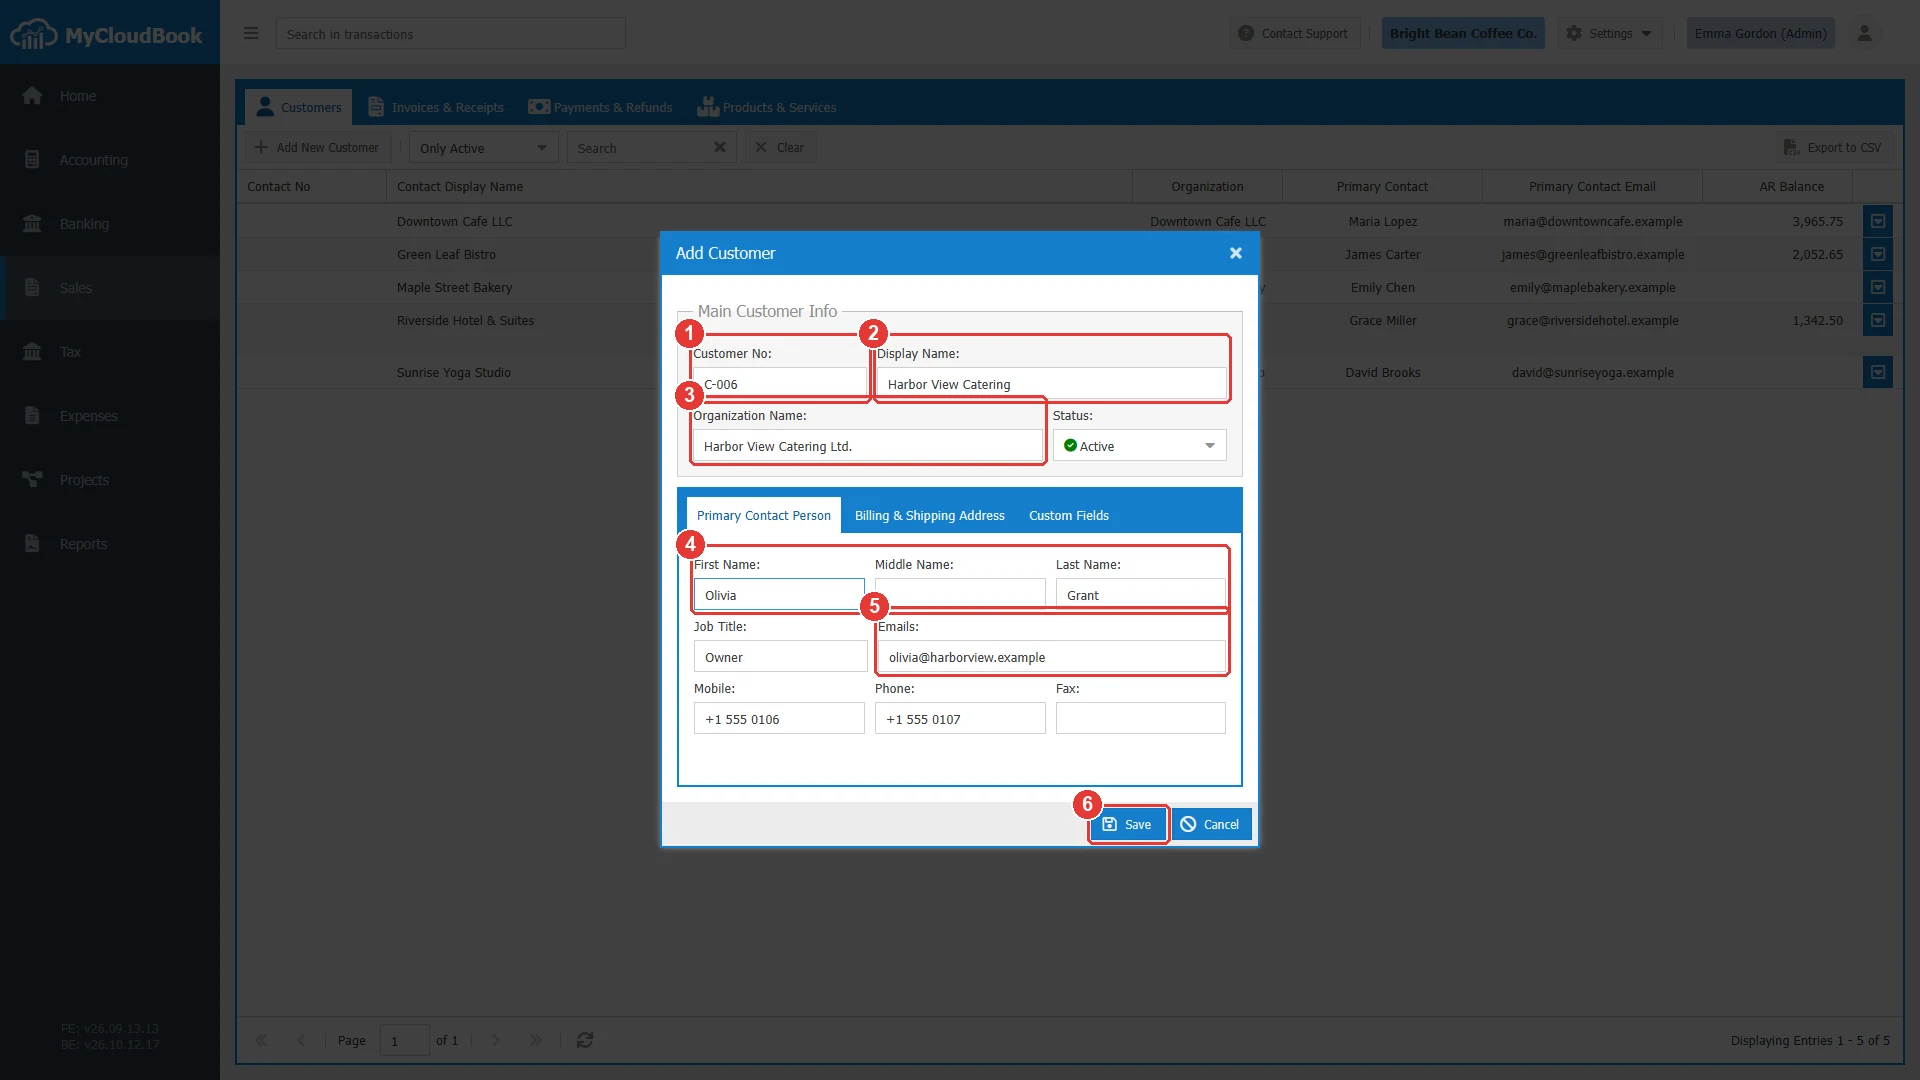
- 1The customer number.
- 2The display name.
- 3The organization.
- 4The primary contact person.
- 5The emails.
- 6Save.
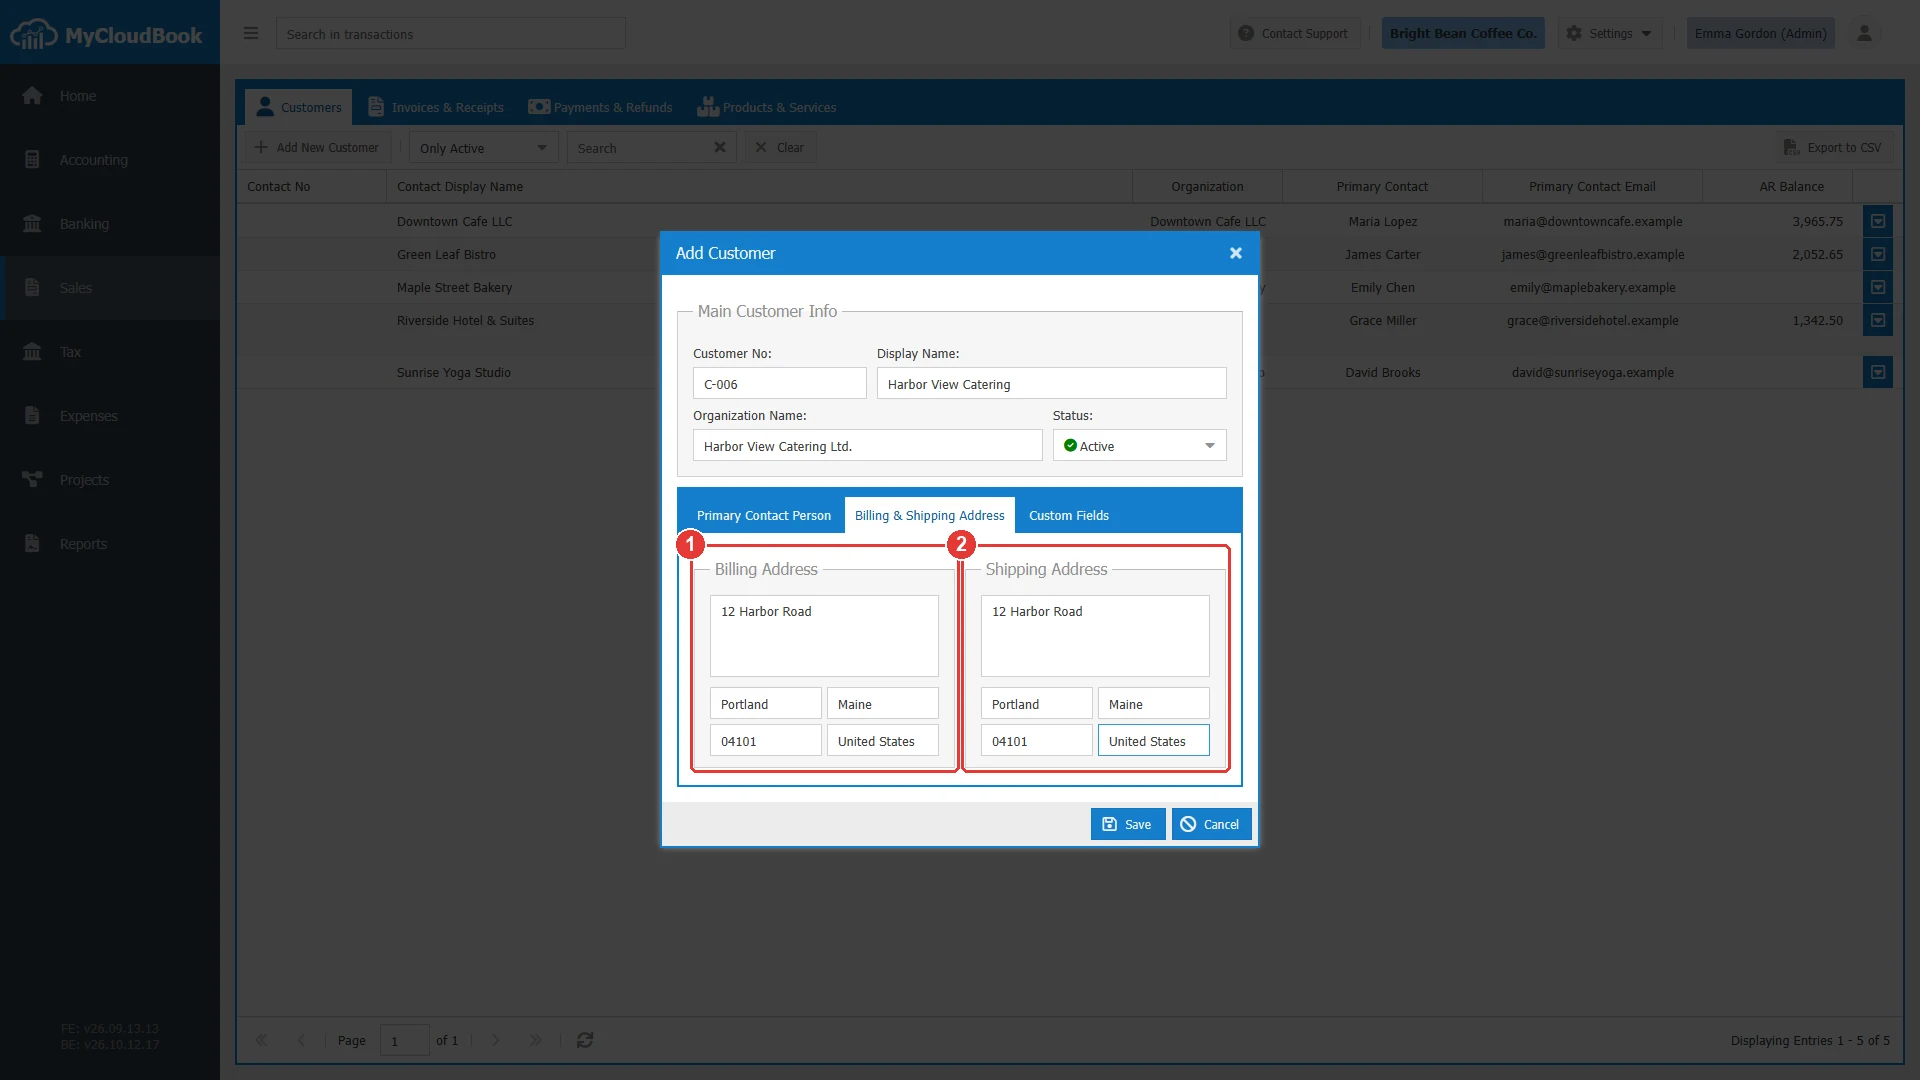
- 1The billing address.
- 2The shipping address.
After the save, the confirmation Contact 'Harbor View Catering' Saved Successfully. appears, and the customer is listed with its number.
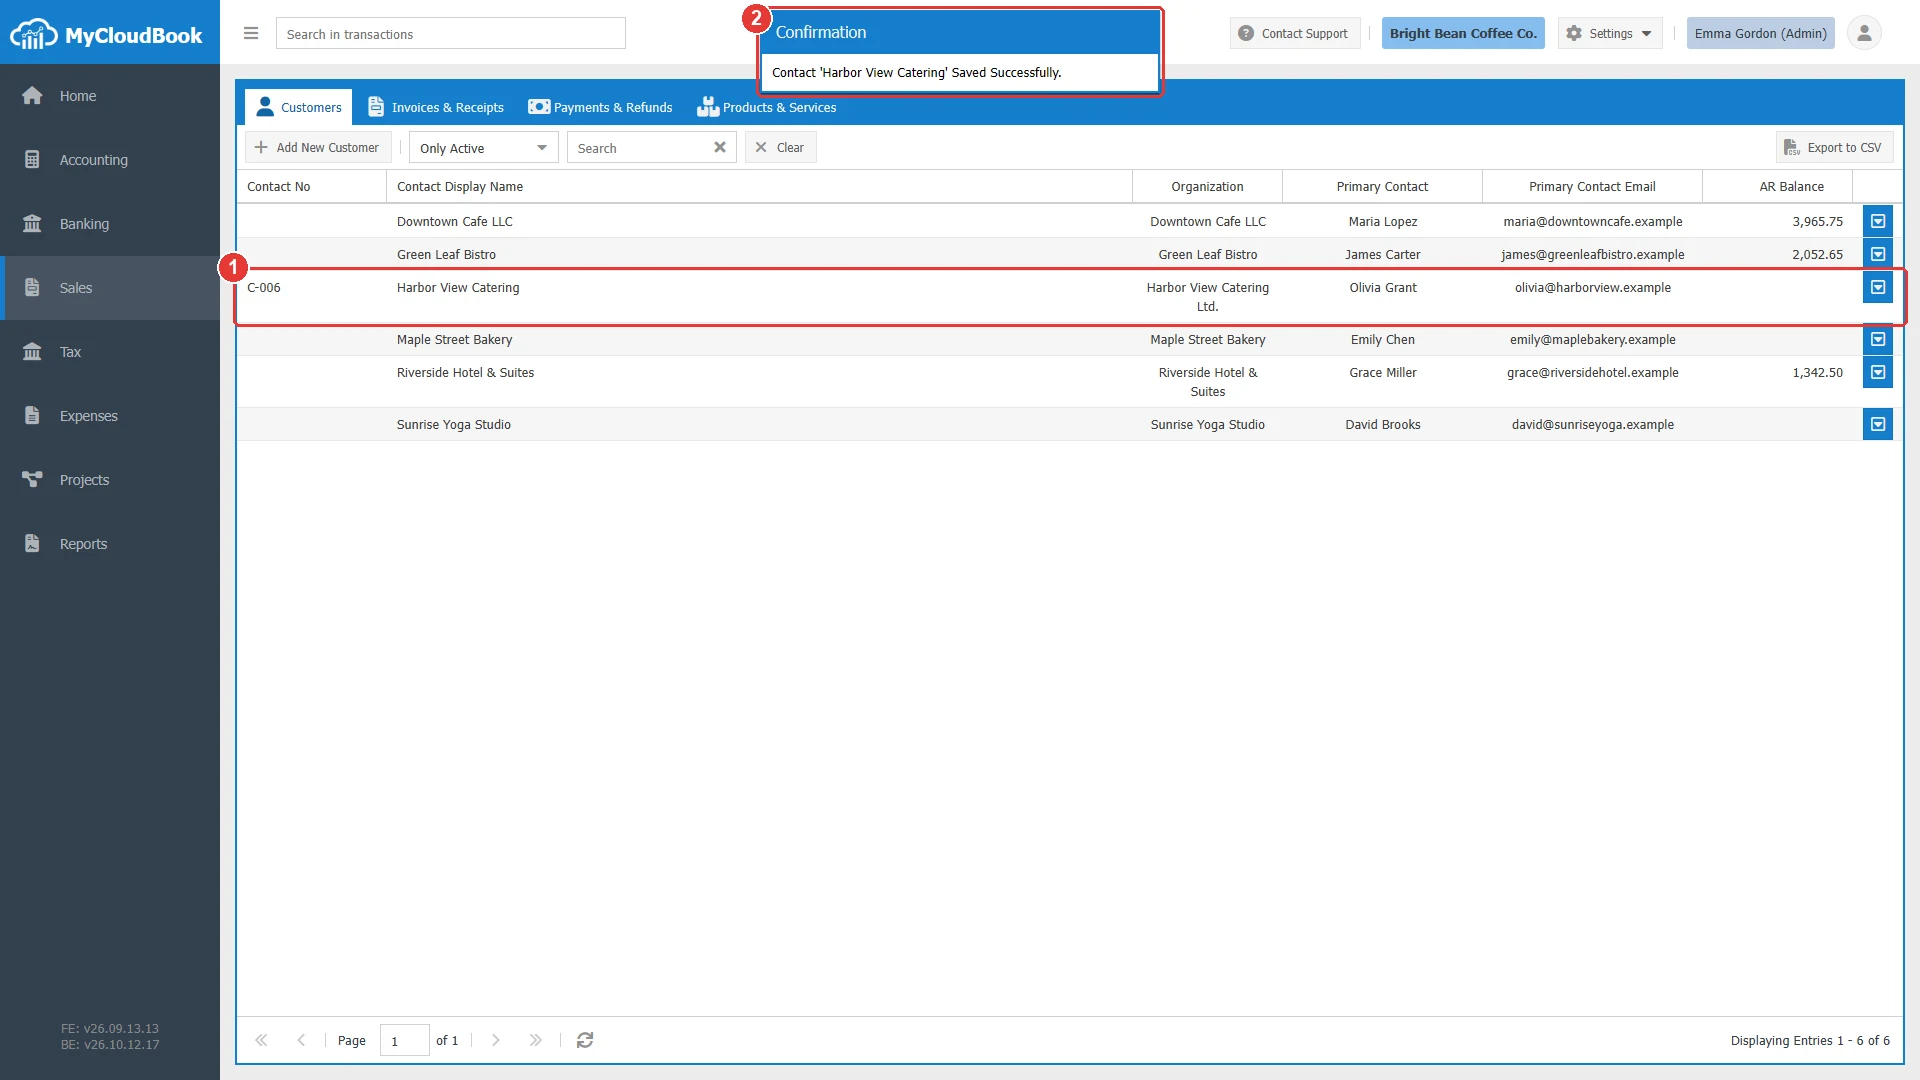
- 1The new customer in the list.
- 2The confirmation.
The checks
When the Display Name is empty, the field is marked in red and the message Some fields are not valid! appears. When another customer already has the same display name, the server refuses the save.
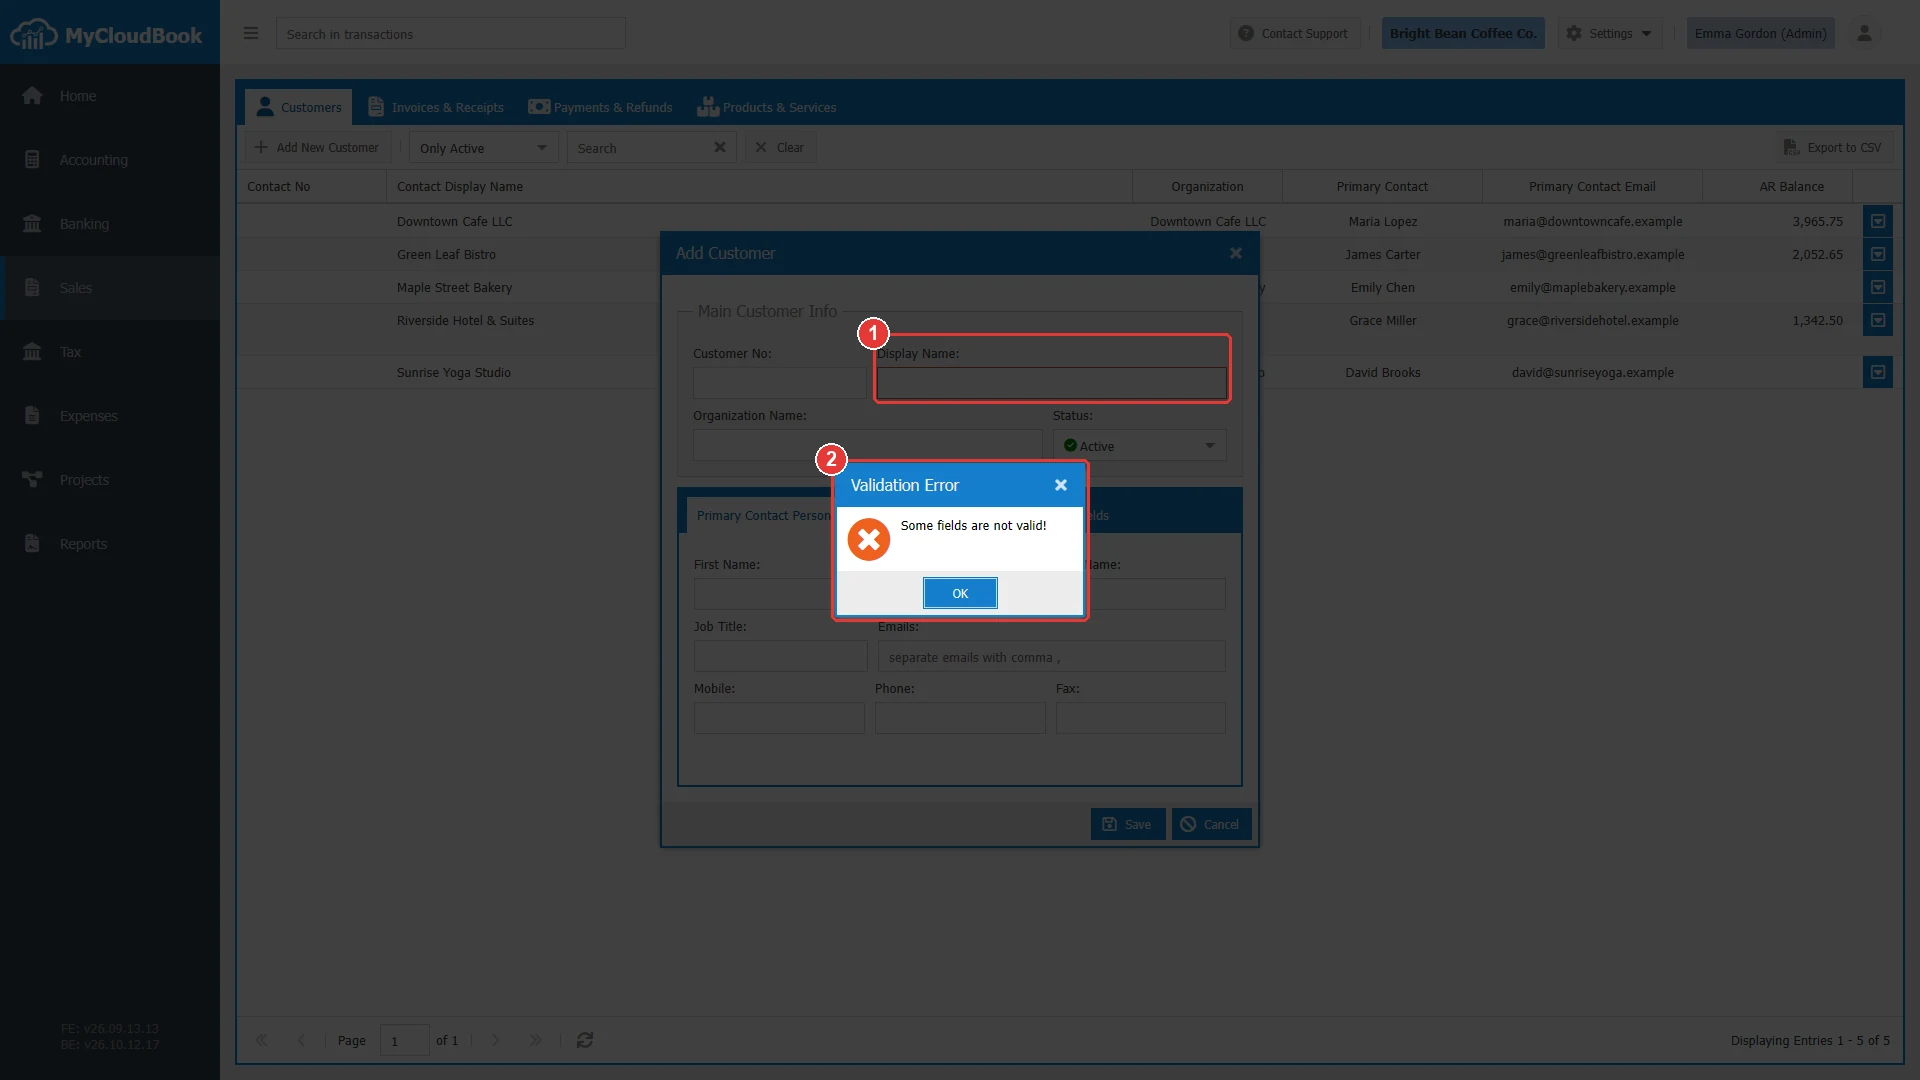
- 1The required field is marked in red.
- 2The message.
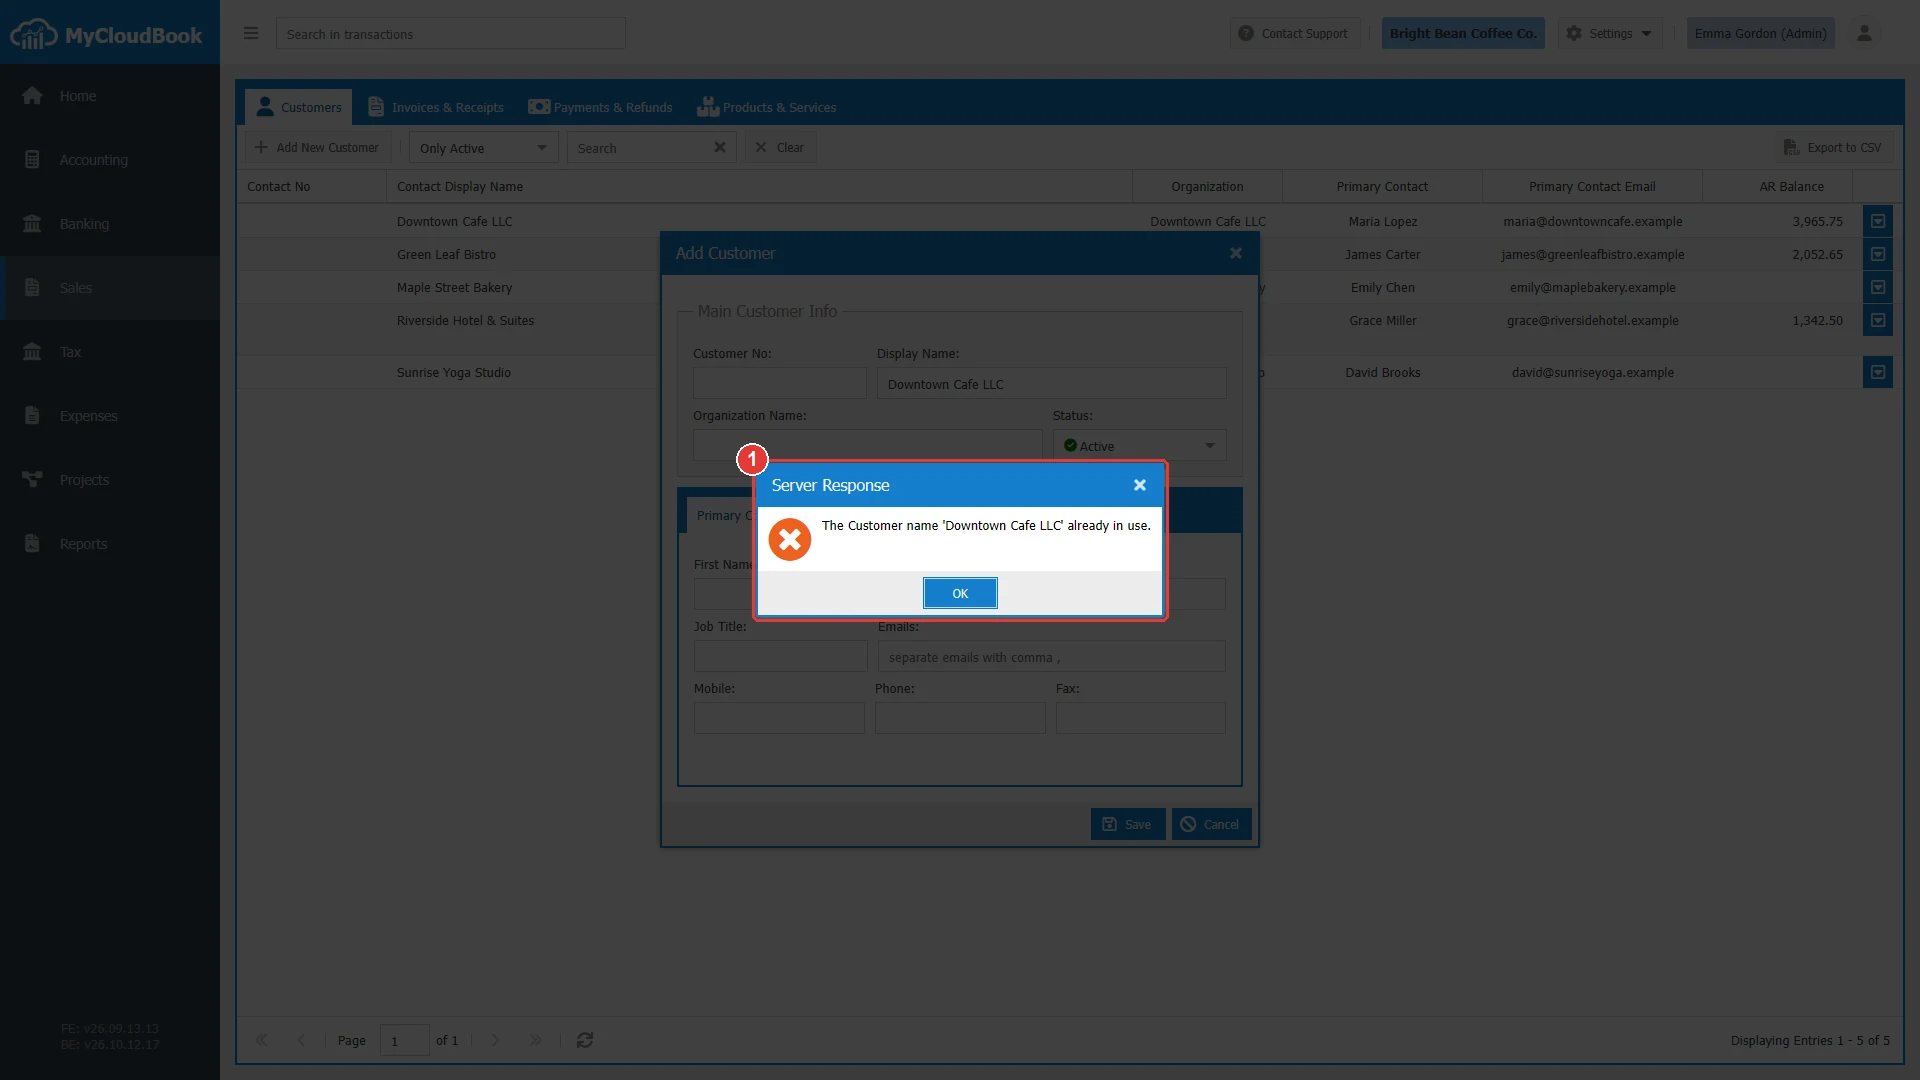
- 1The message from the server.
The customer information screen
A double click on a customer in the list opens the customer information screen in a new tab of the Sales page. The tab has the name of the customer. The left part shows the customer, and the right part holds four tabs.
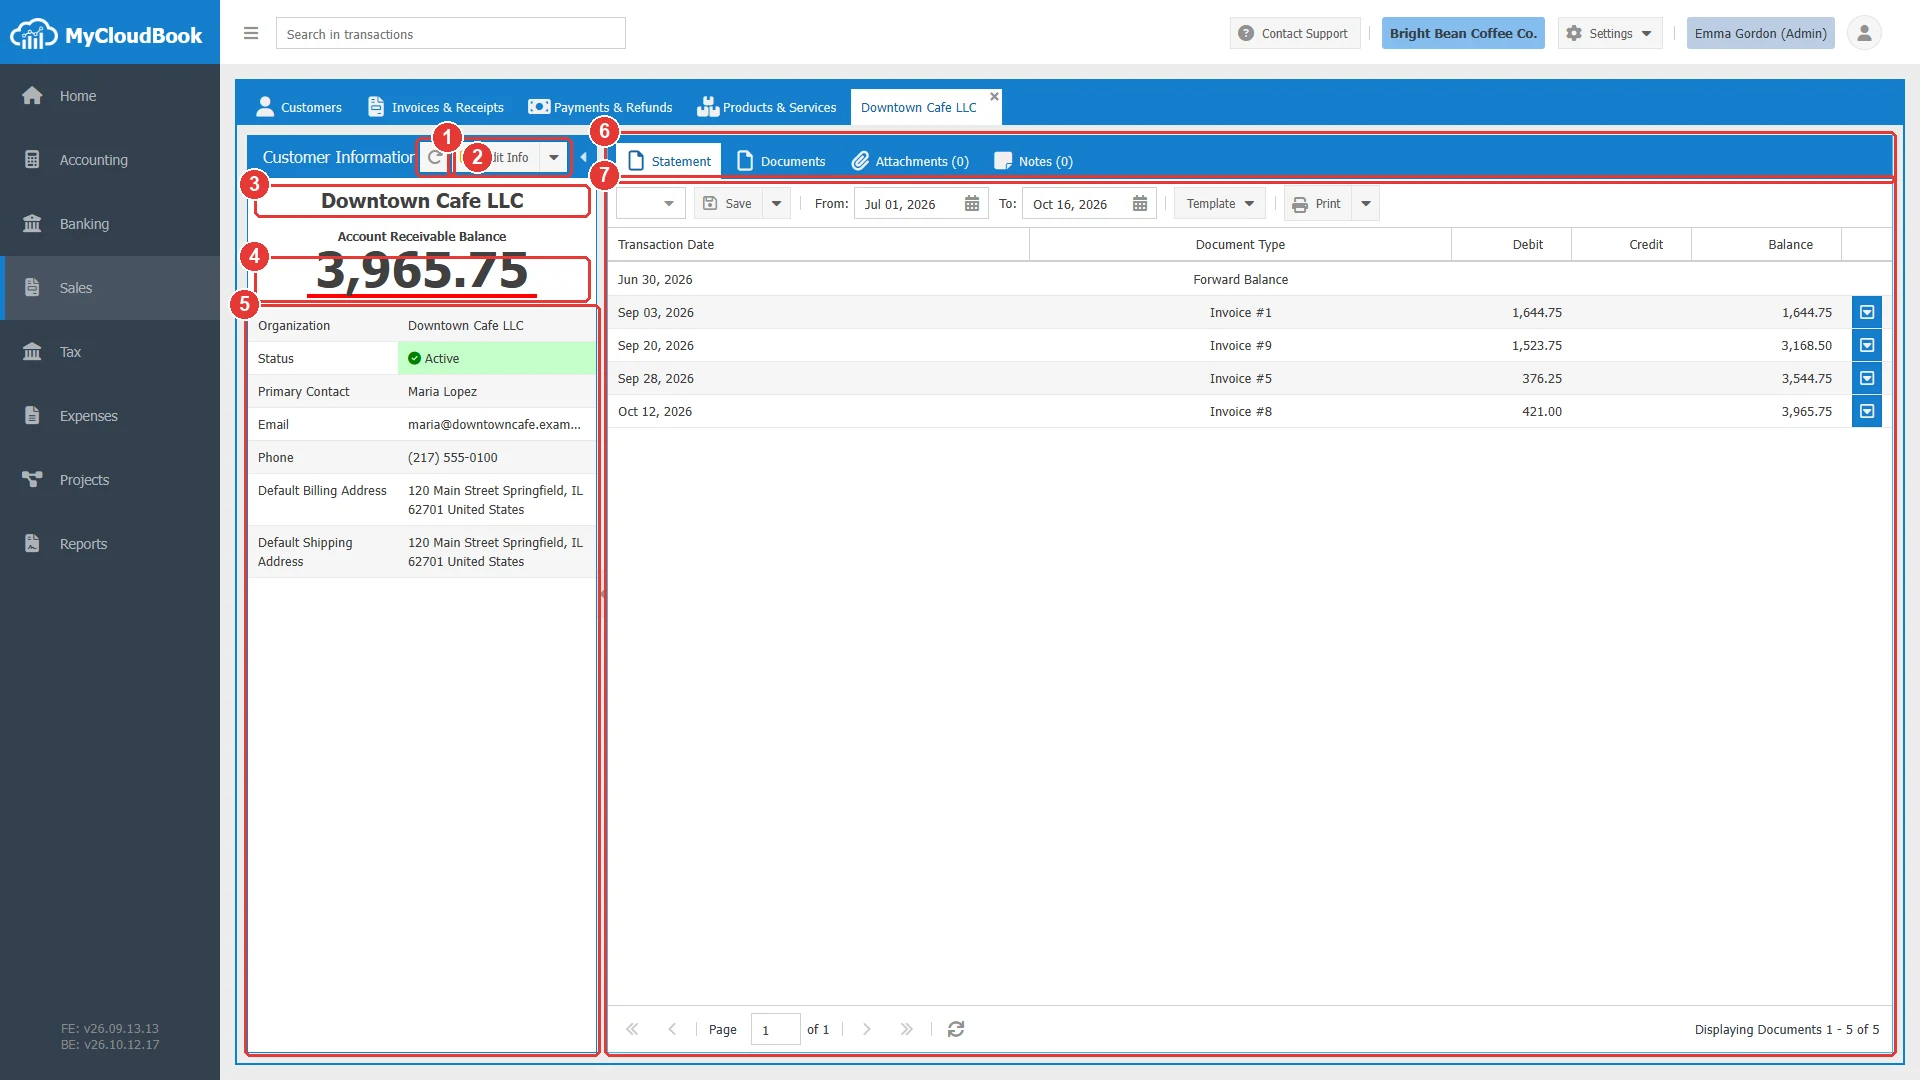
- 1The reload button. It reads the customer again.
- 2Edit Info. Opens the Update Customer window. The arrow of the button opens a menu with Delete.
- 3The display name and, when there is one, the customer number.
- 4The Account Receivable Balance: the amount that the customer owes. The line under the amount is red for a positive balance, green for a negative balance, and black for zero.
- 5The details: organization, status, primary contact, email, telephone, and the addresses.
- 6The tabs Statement, Documents, Attachments, and Notes.
- 7The statement of the customer.
The Statement tab
The Statement tab shows the movements of the customer on the Accounts Receivable account between two dates. The first row, Forward Balance, is the balance on the day before the From date. Every other row is one document, with its debit or credit and the running balance. Documents that do not post to Accounts Receivable, such as a receipt paid at once, do not appear.
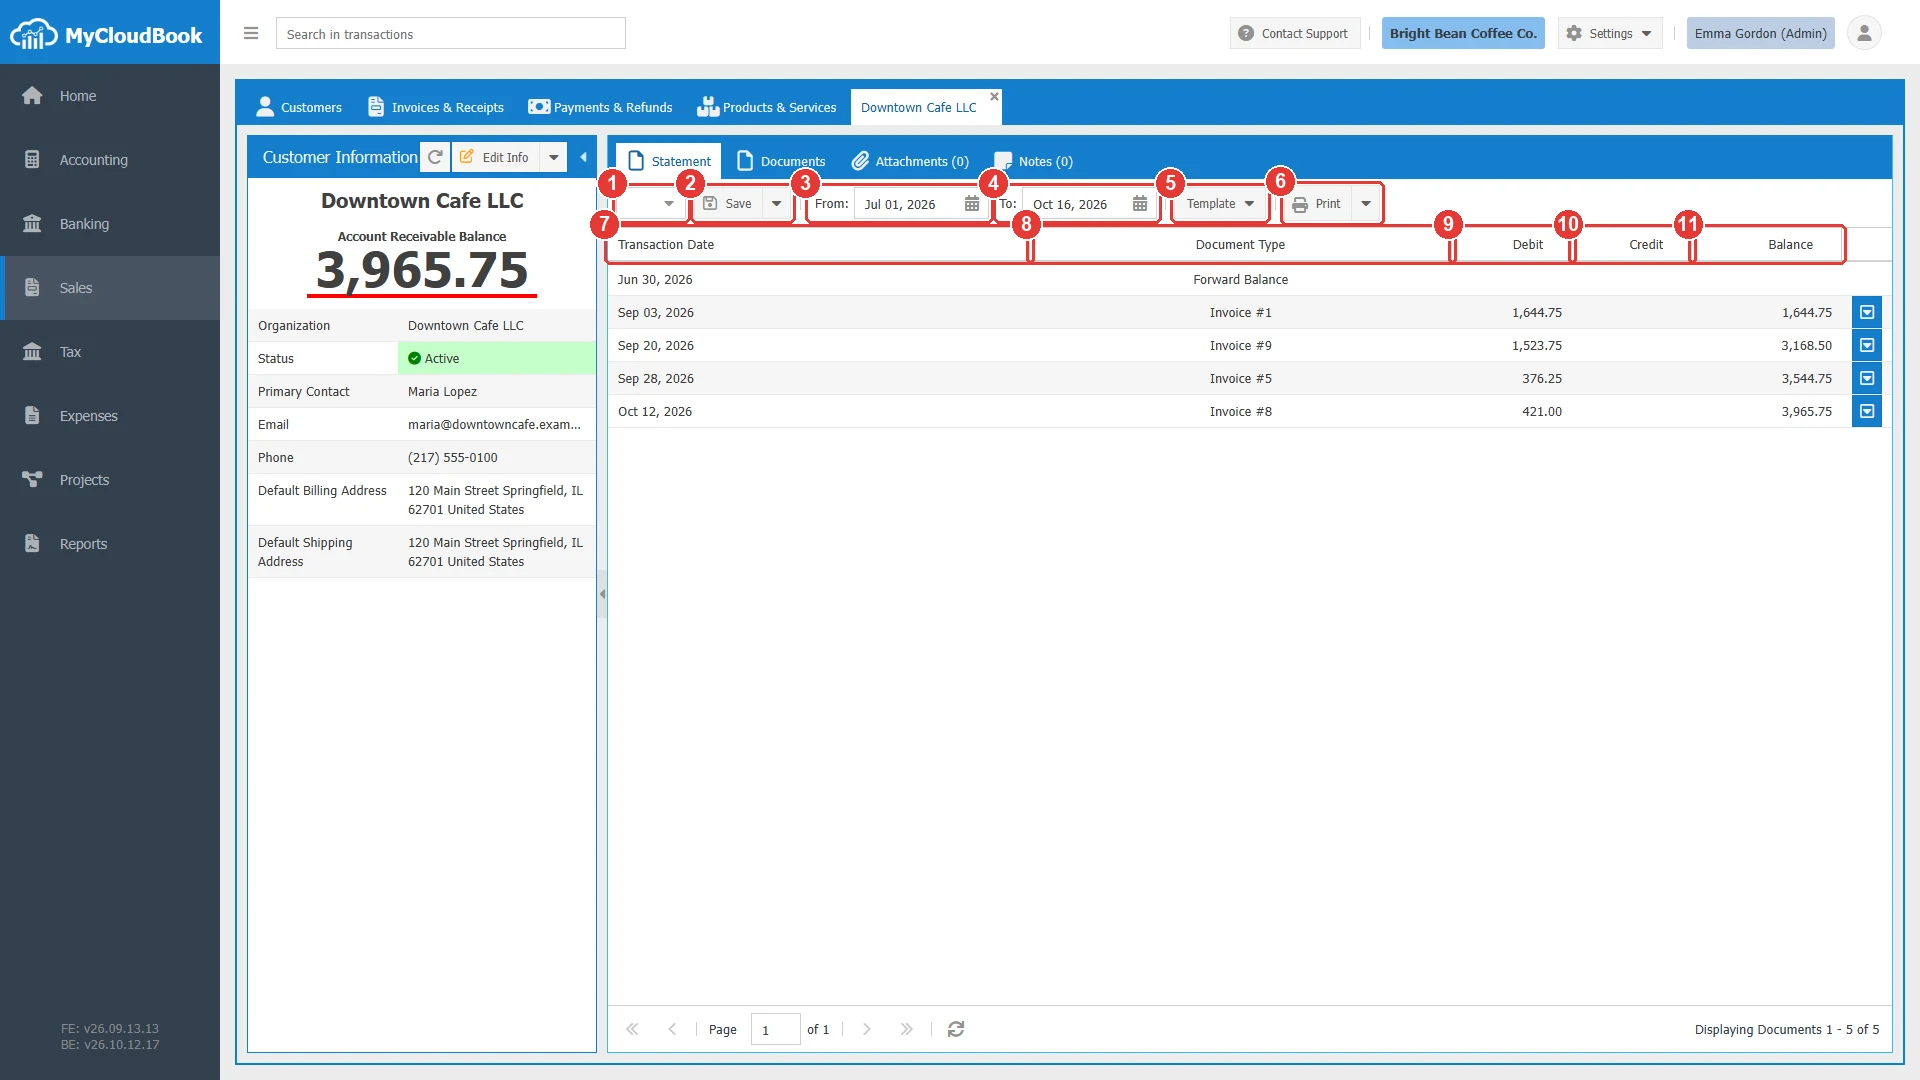
- 1The list of the saved statements of the customer.
- 2Save. Saves the dates and the template of the selected statement. The arrow opens Create New Statement and Delete Statement.
- 3From. The first date. It starts on the first day of the month three months ago.
- 4To. The last date. It starts with today.
- 5Template. The document template of the printed statement.
- 6Print. Saves the statement and opens it as a PDF. The arrow opens Send, which sends it by email.
- 7Transaction Date.
- 8Document Type. The type and the number of the document.
- 9Debit. The amount that raised the balance.
- 10Credit. The amount that lowered the balance.
- 11Balance. The running balance.
A statement can be saved, so that the same period can be printed or sent again later:
- Set the From and To dates.
- Click the arrow of Save and then Create New Statement. MyCloudBook gives the statement the next statement number of the company and selects it in the list.
- Click Print to open the statement, or the arrow of Print and then Send to send it by email.
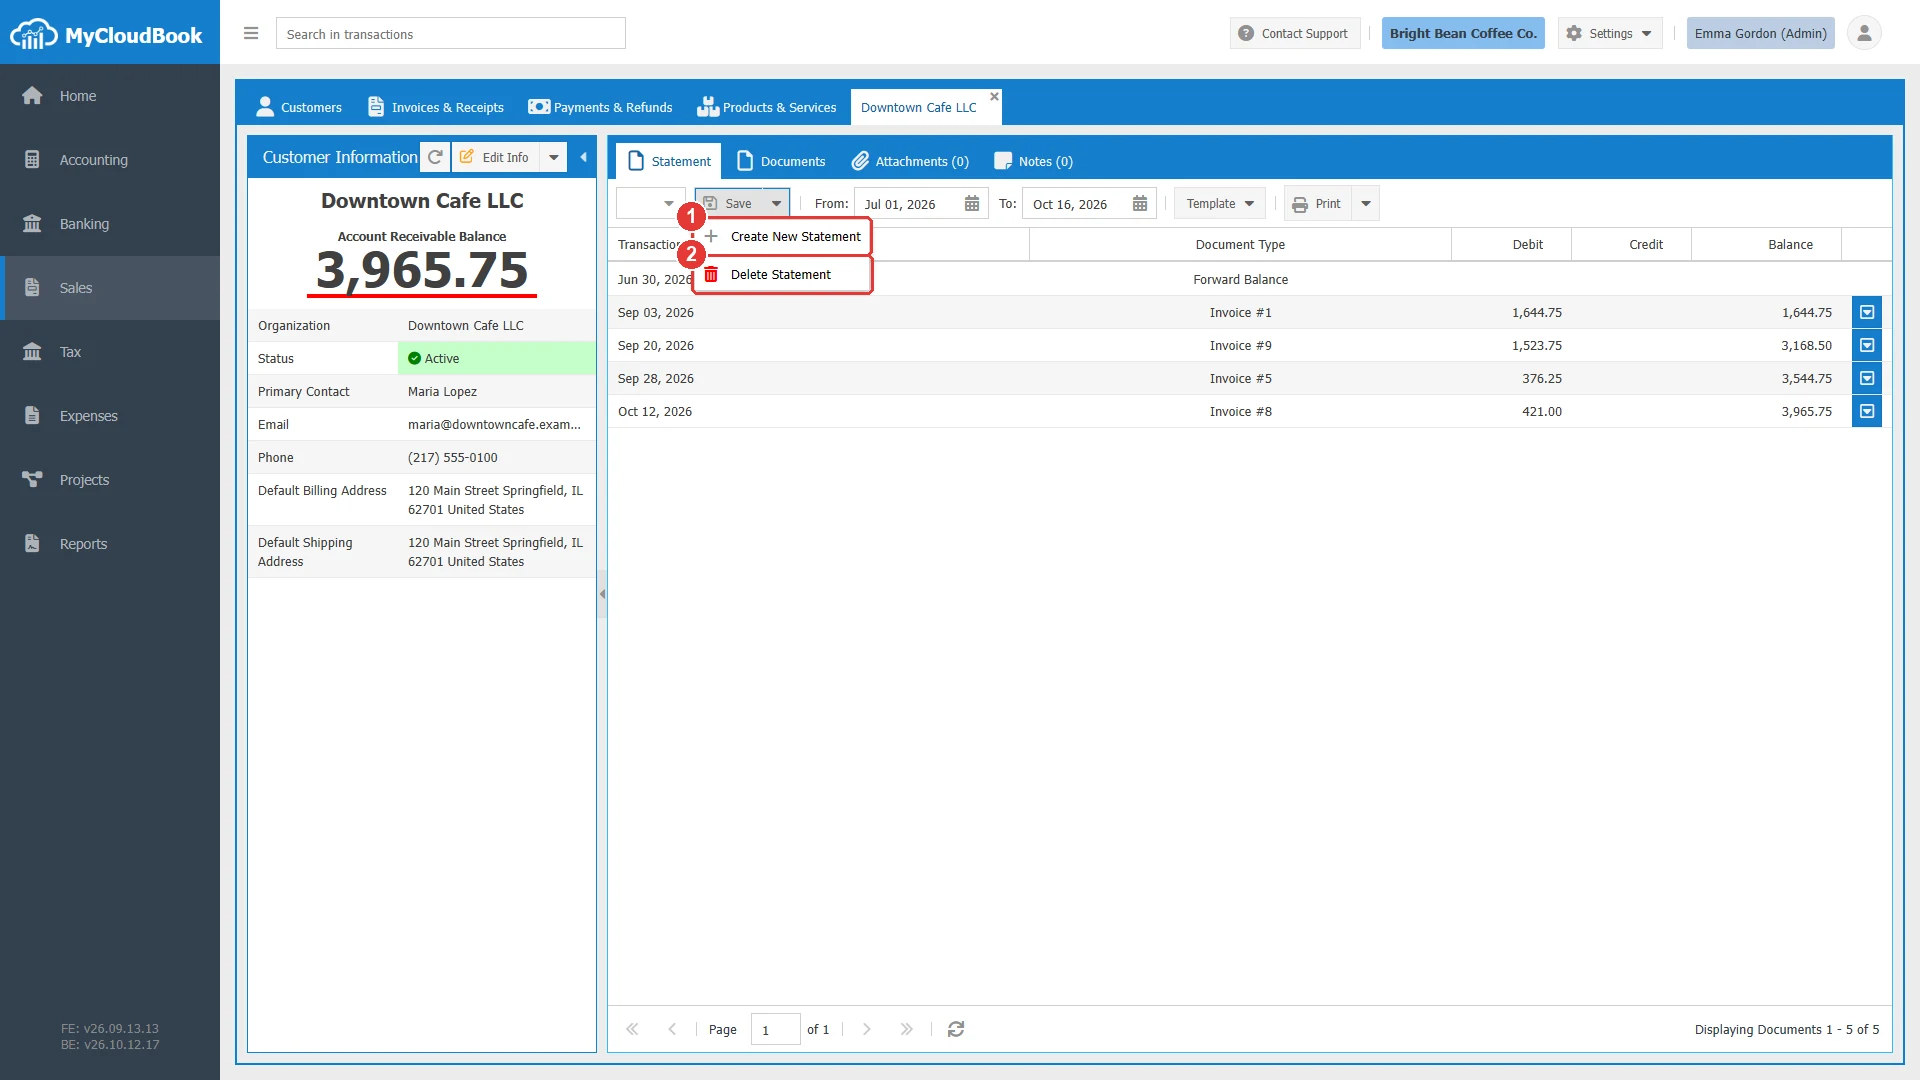
- 1Create New Statement. Saves the current dates as a new statement.
- 2Delete Statement. Deletes the selected statement after a confirmation.
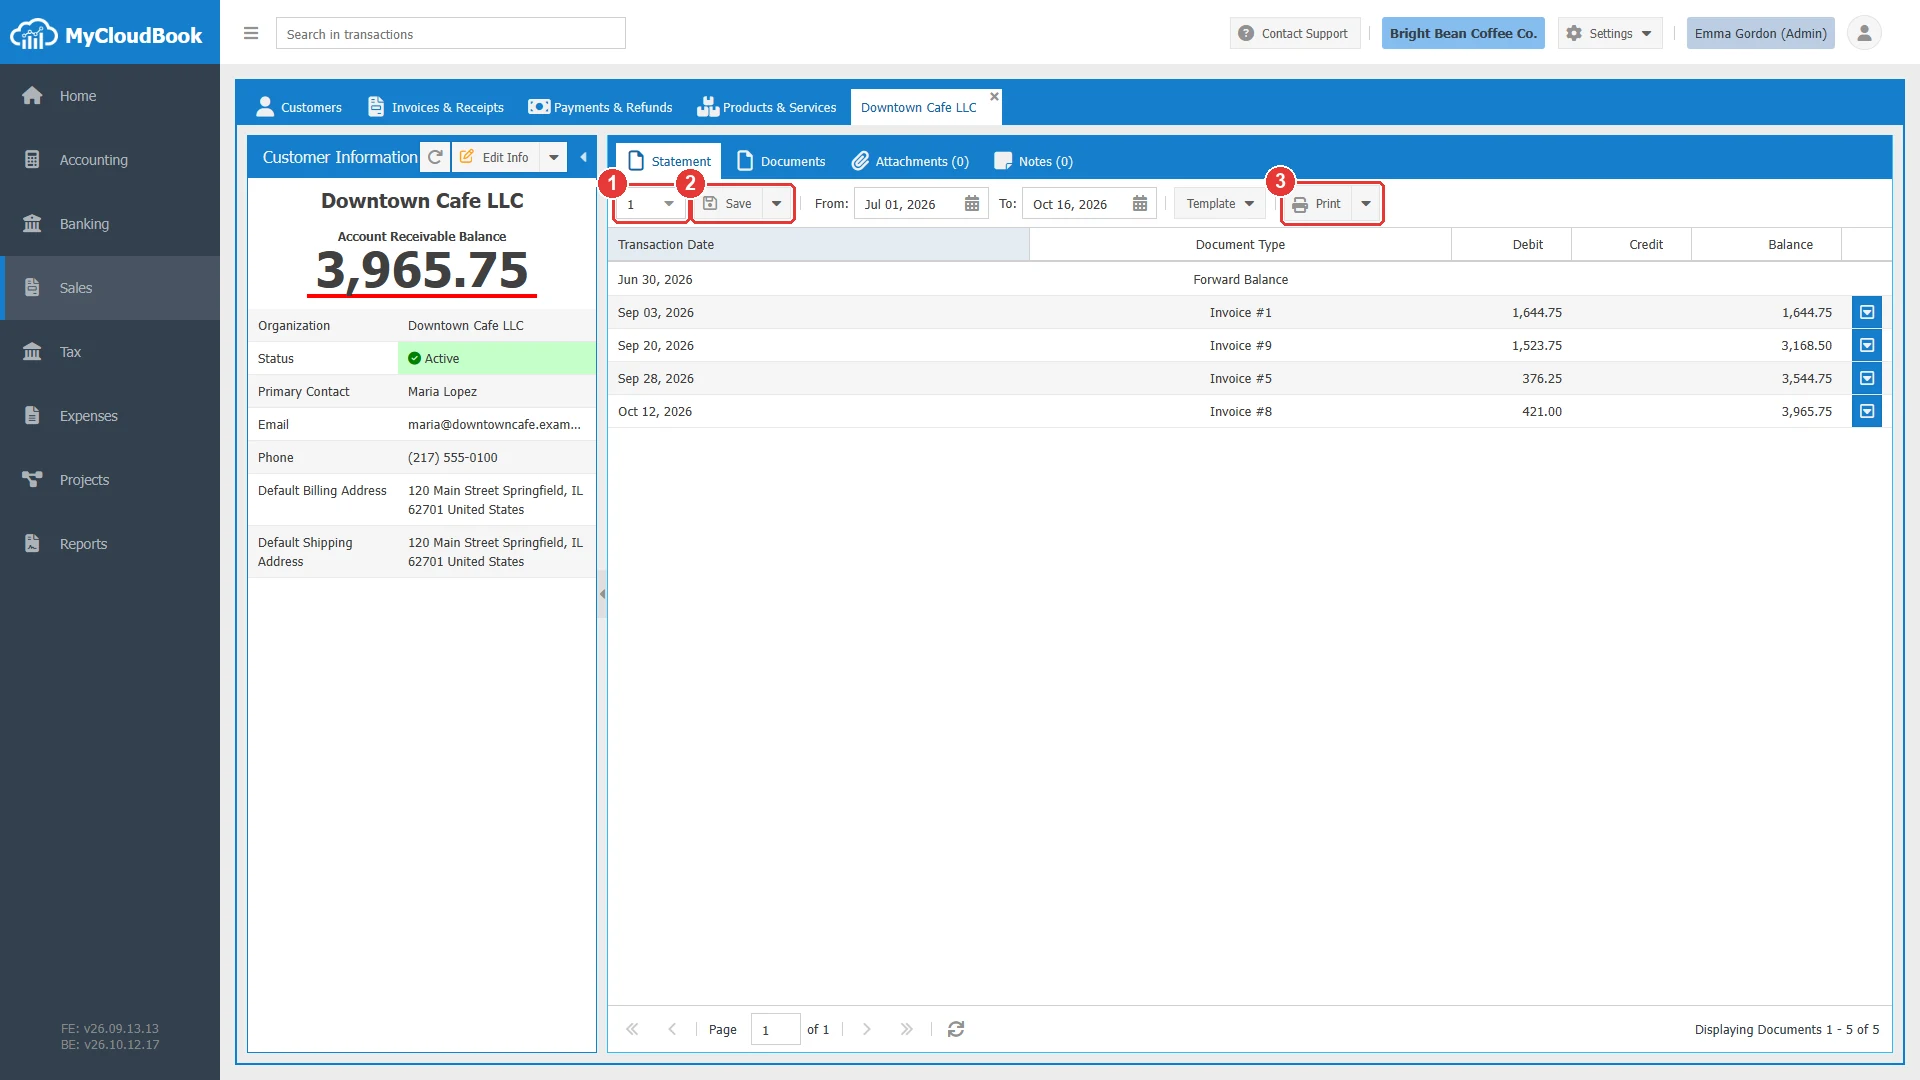
- 1The number of the saved statement.
- 2Save is now enabled.
- 3Print and Send.
The Documents tab
The Documents tab lists the sales documents of the customer, from the newest to the oldest: invoices, receipts, estimates, sales orders, receipt vouchers, draft invoices, and draft receipts. A double click on a row opens the document.
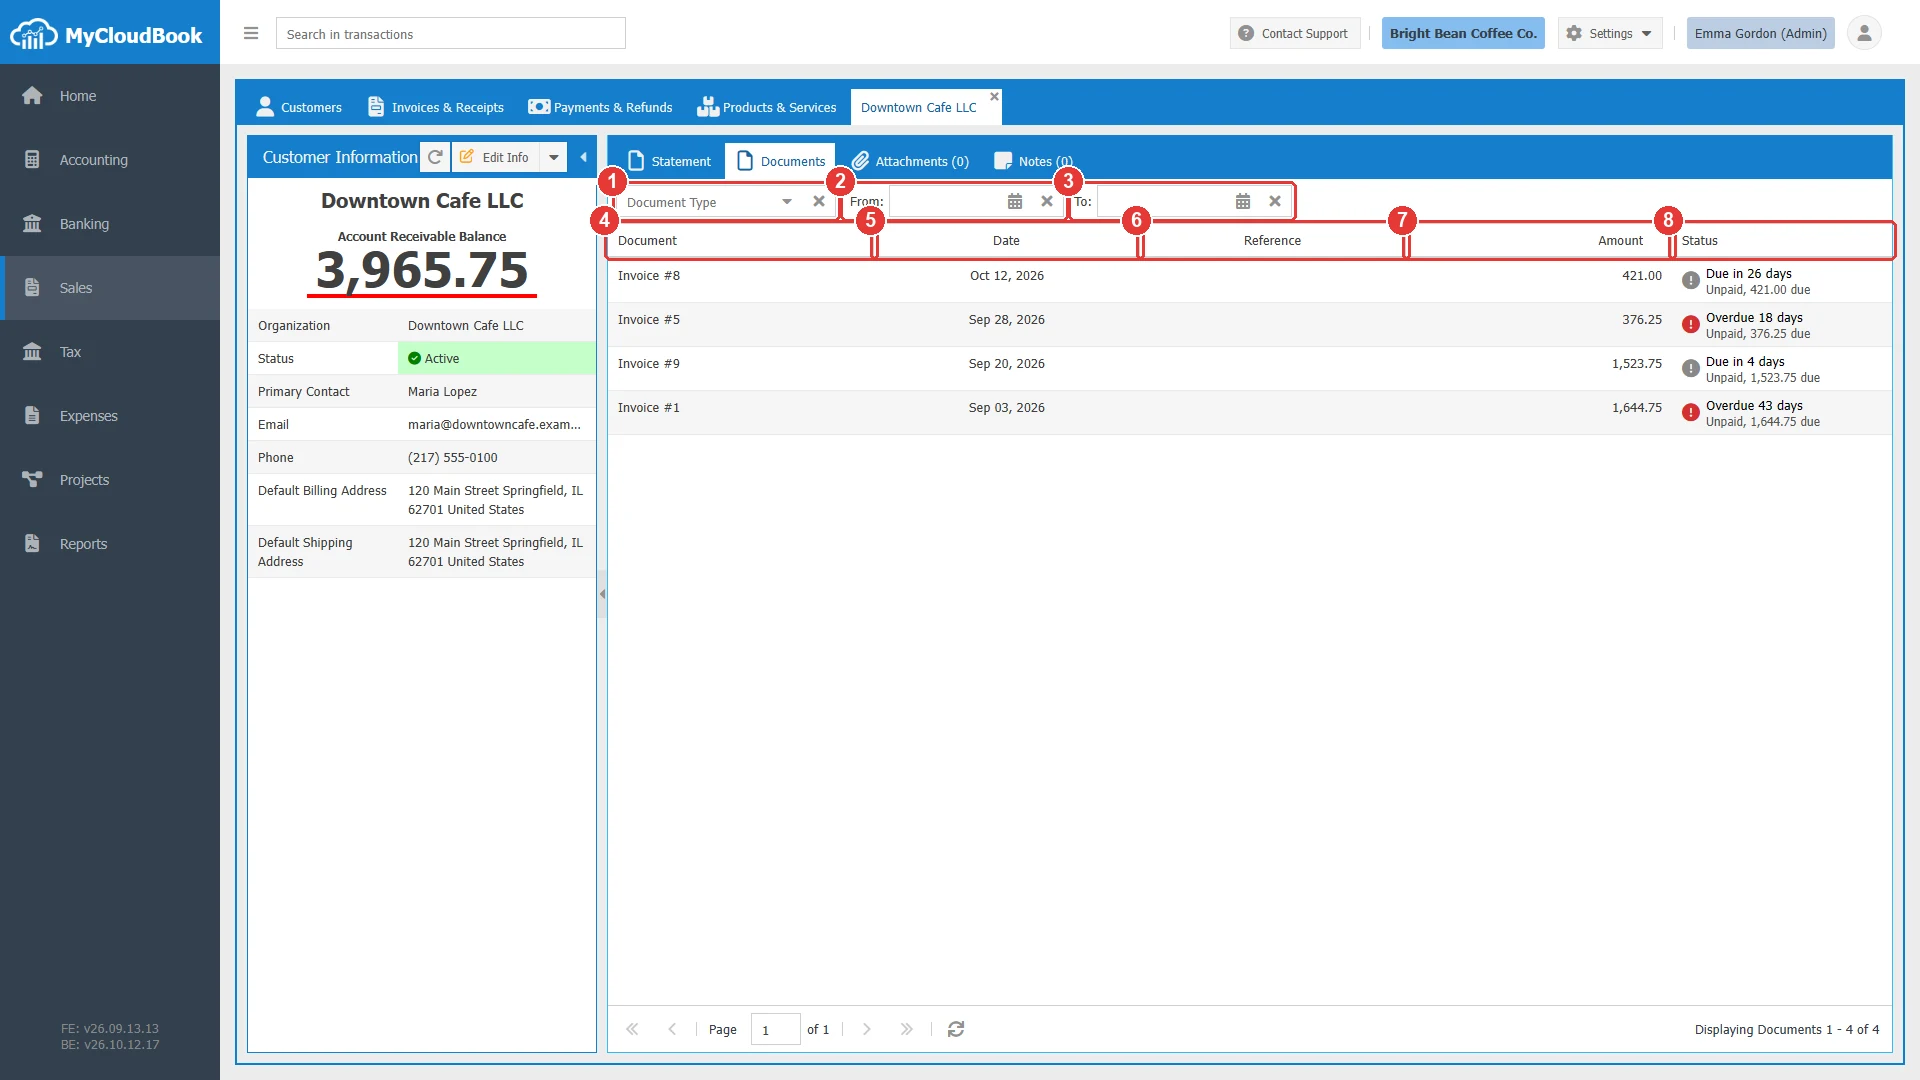
- 1Document Type. Keeps one document type.
- 2From. The first date.
- 3To. The last date.
- 4Document. The type and the number of the document.
- 5Date.
- 6Reference.
- 7Amount.
- 8Status. For example Paid, or Overdue with the amount due.
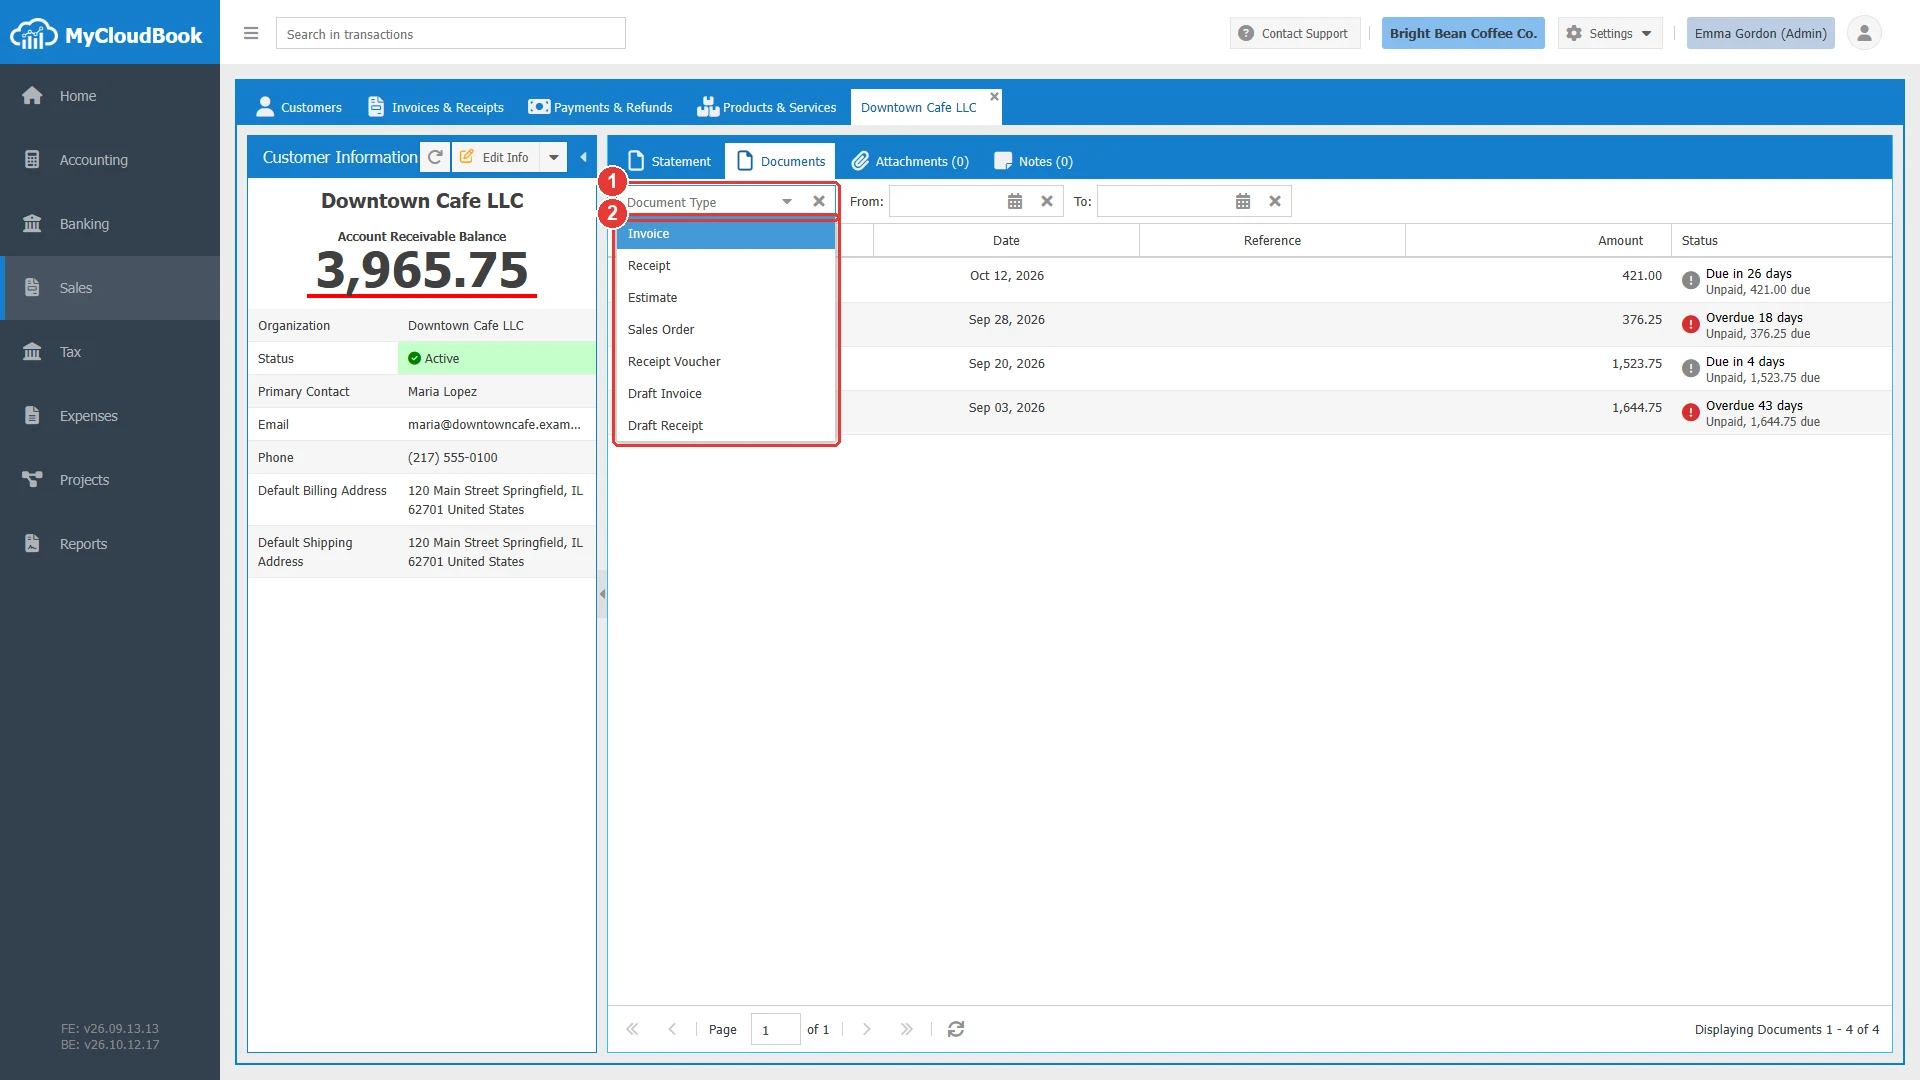
- 1Document Type.
- 2The document types.
Attachments and notes
The Attachments tab keeps files about the customer, for example a contract or a tax certificate. Add Attachment uploads one or more files, and Download Attachments downloads them. The row menu of a file has Set Note, Download, and Delete. The Notes tab keeps dated text notes about the customer. The numbers in the tab titles show how many files and notes exist.
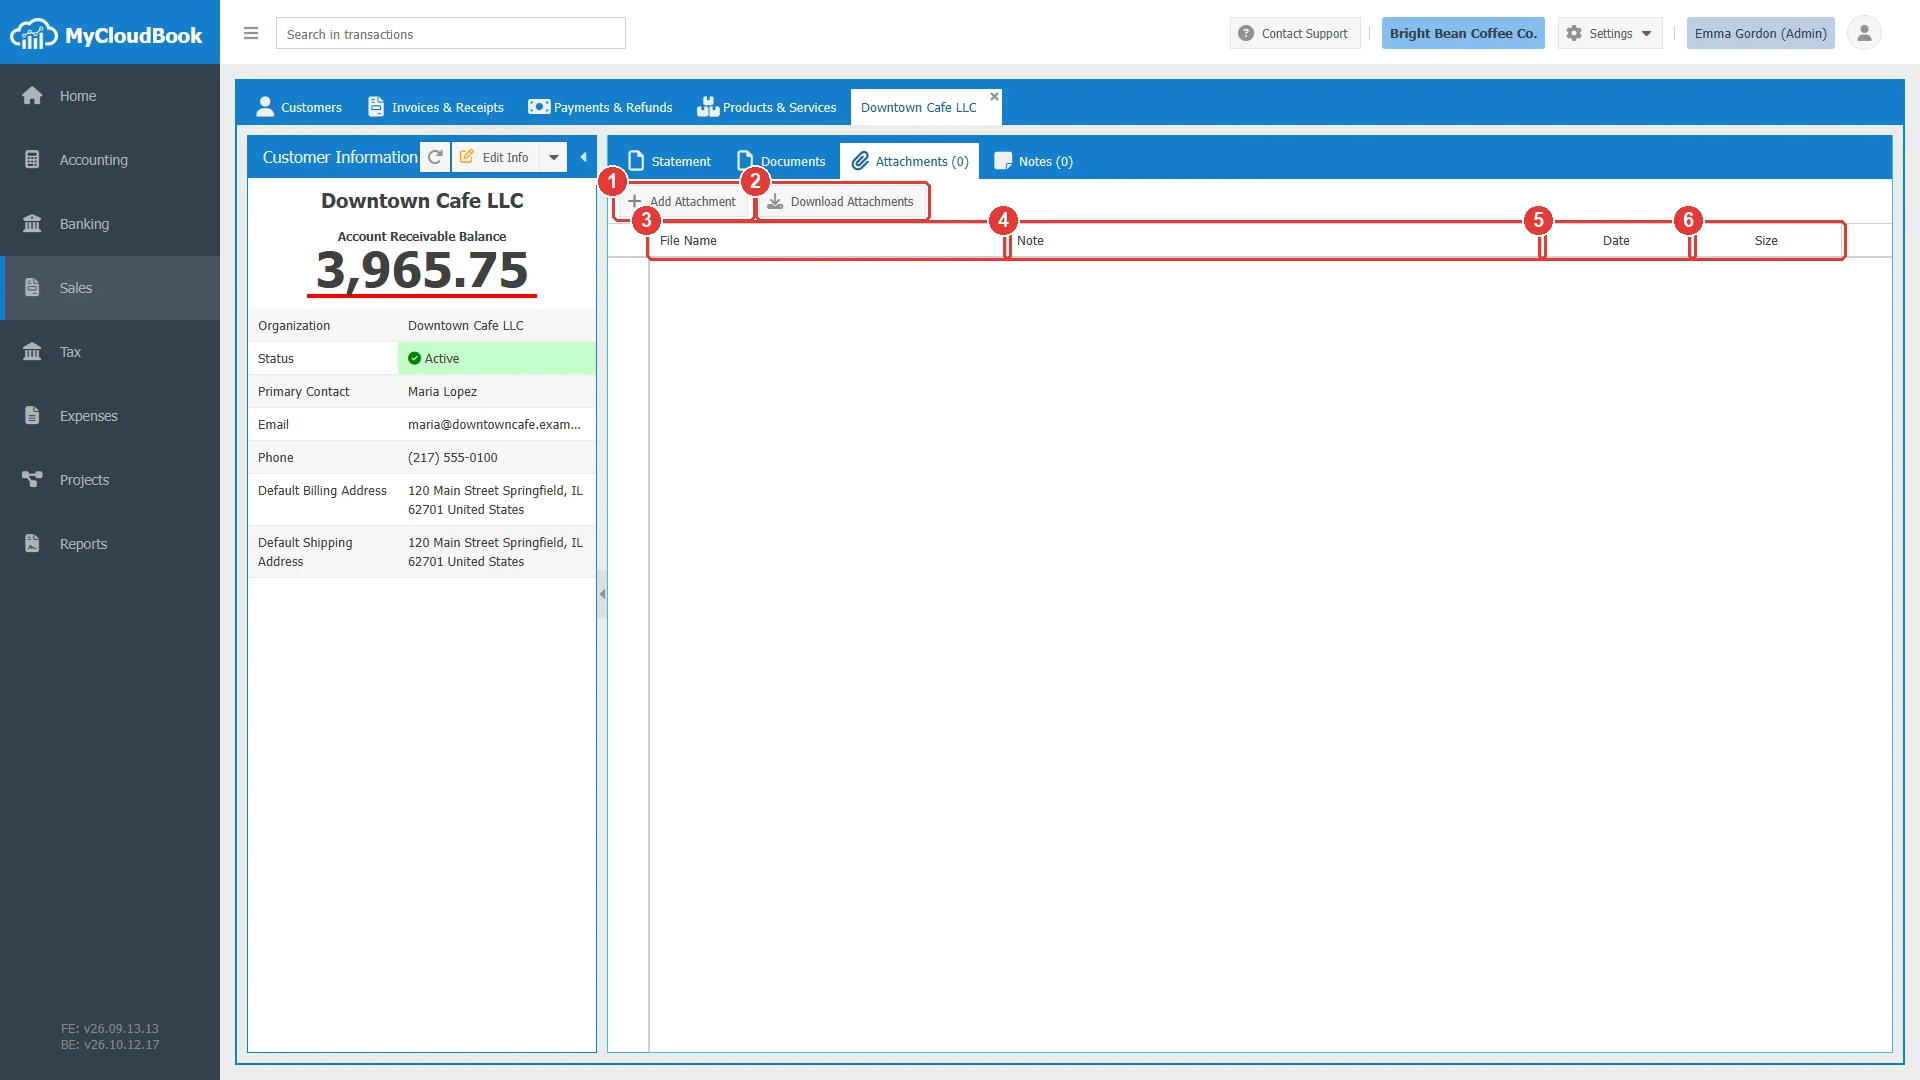
- 1Add Attachment.
- 2Download Attachments.
- 3File Name.
- 4Note. A note about the file.
- 5Date.
- 6Size.
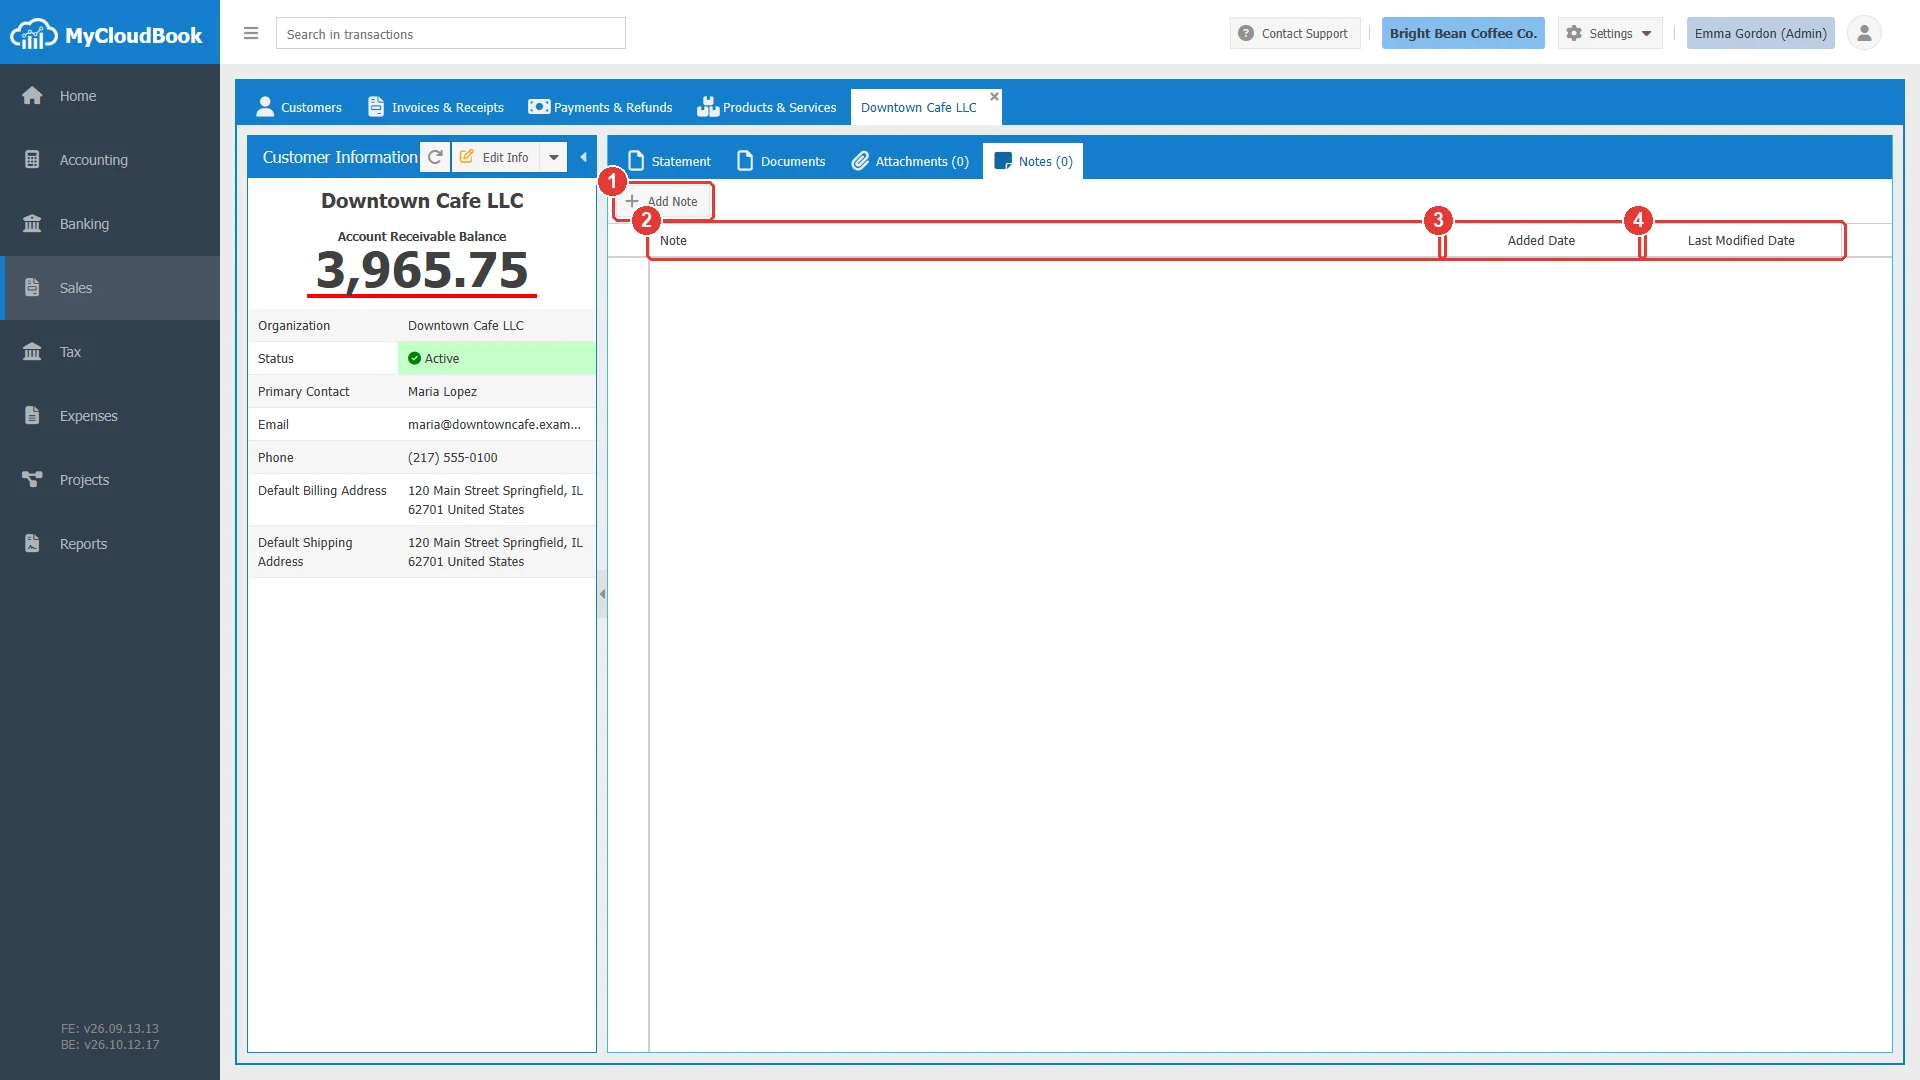
- 1Add Note.
- 2Note.
- 3Added Date.
- 4Last Modified Date.
Changing a customer
Click Edit in the row actions menu of the list, or Edit Info on the customer information screen. The Update Customer window opens with the values of the customer. Change the values and click Save. The list and the open information screen show the new values at once.
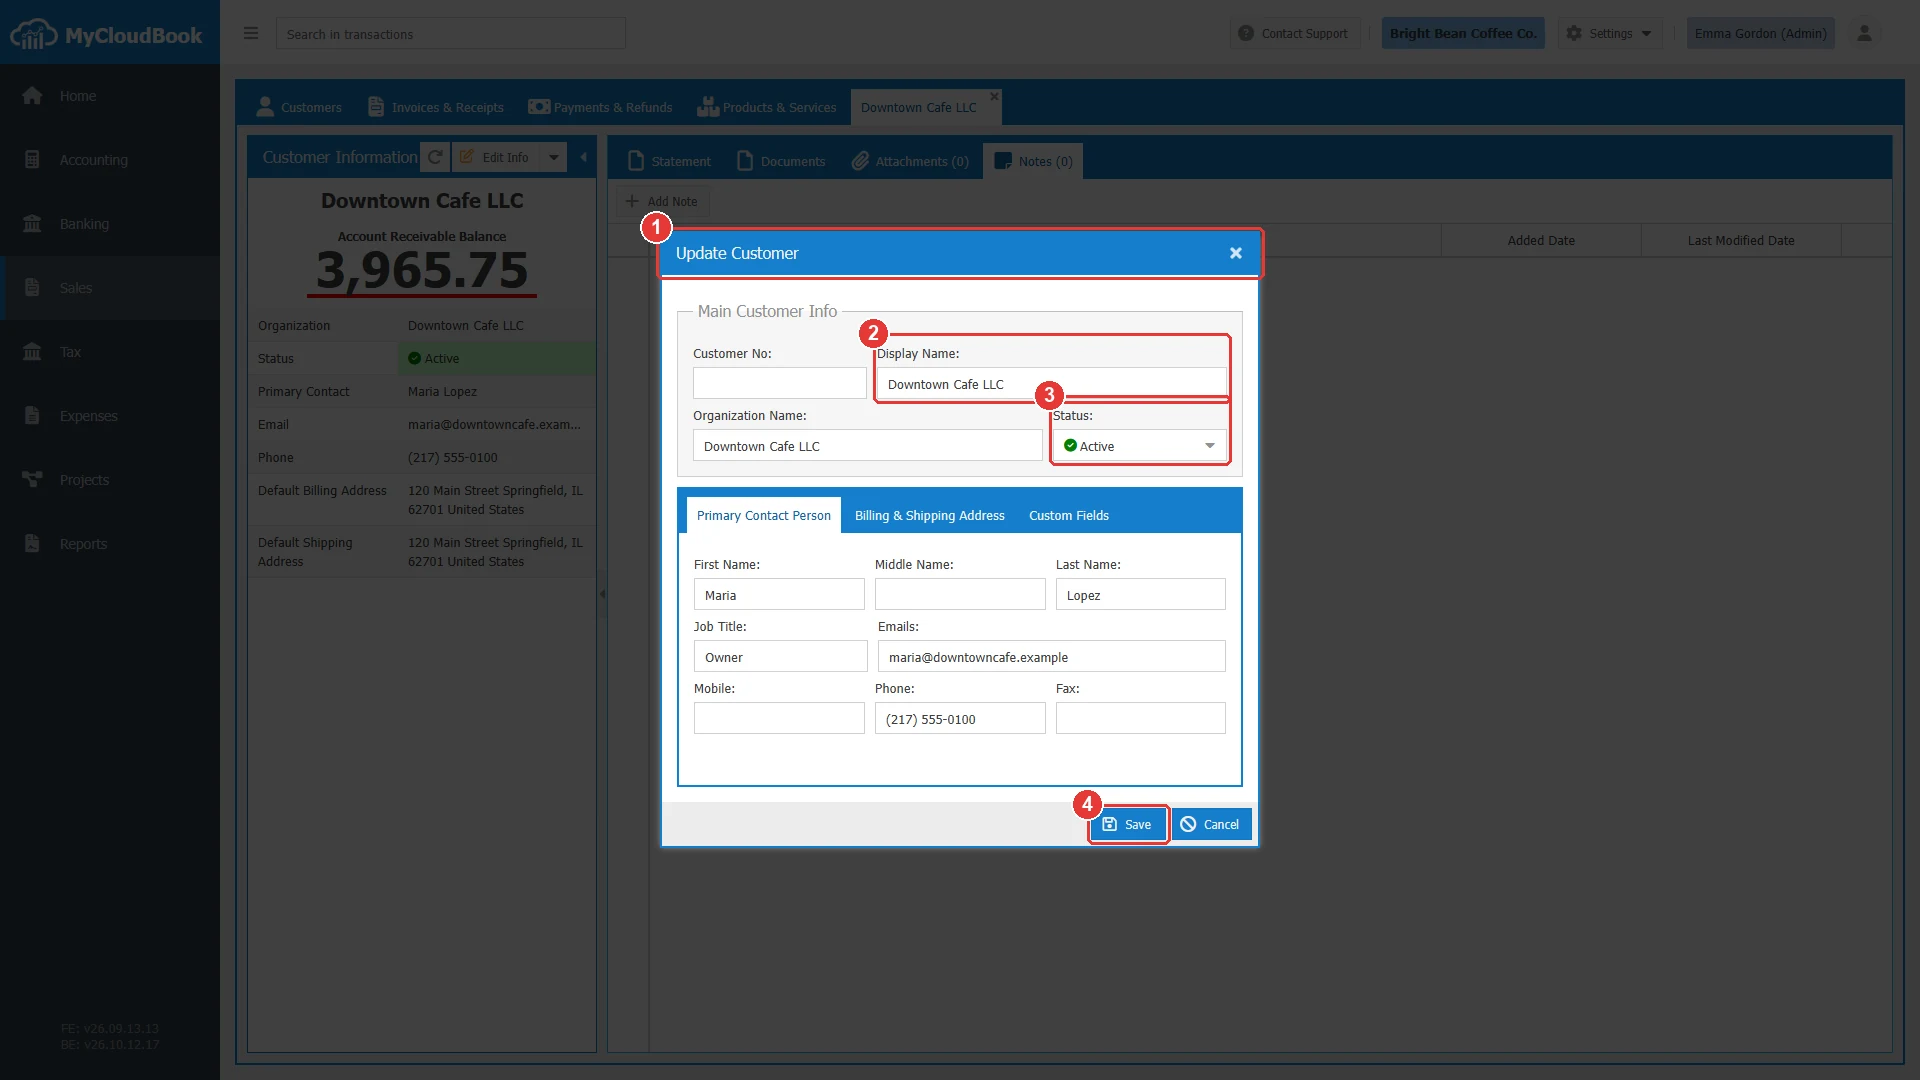
- 1The window title Update Customer.
- 2The values of the customer are loaded.
- 3Status.
- 4Save.
Making a customer inactive
A customer that no longer buys can be made inactive instead of deleted. Open the Update Customer window, set Status to Inactive, and click Save. The customer disappears from the list while the filter is Only Active. Its documents, its balance, and its statement stay unchanged. Set the filter to Only Inactive or Show All to see it again, and set the status back to Active to use it as before.
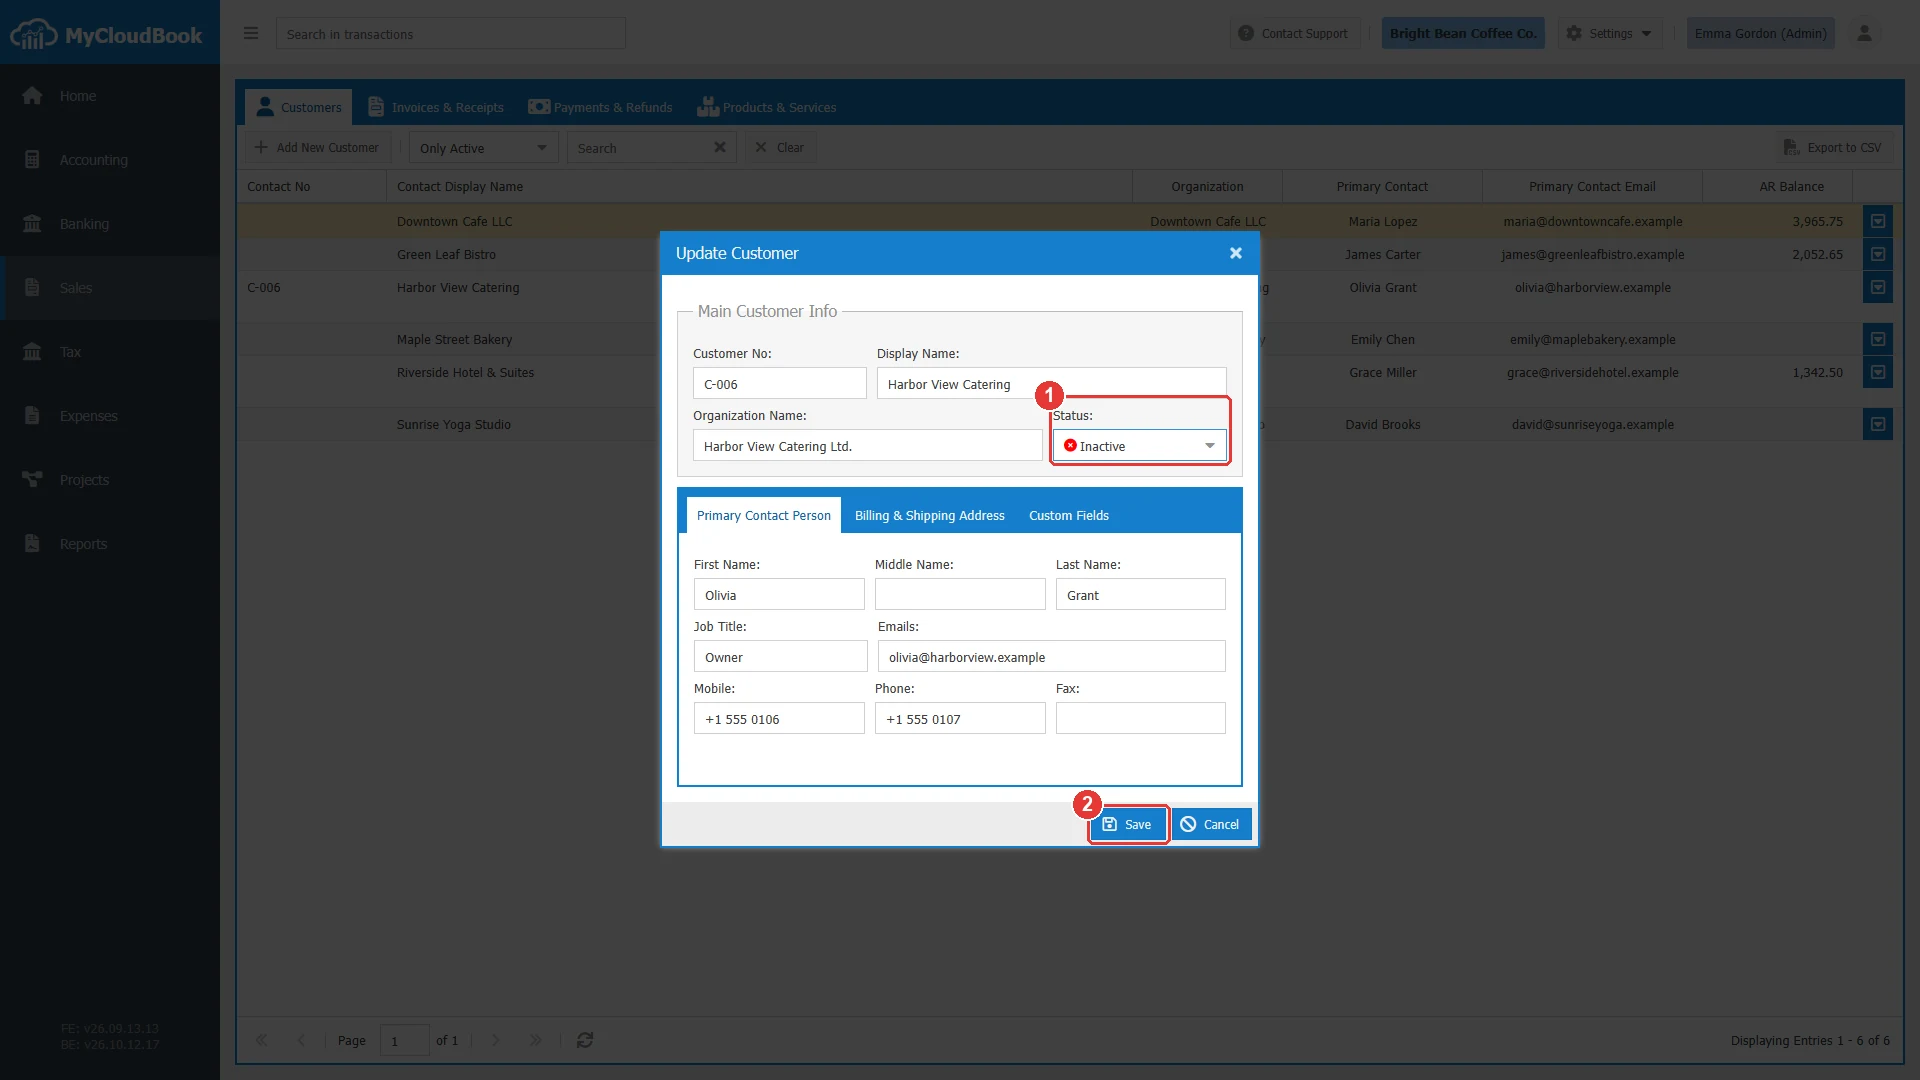
- 1Status set to Inactive.
- 2Save.
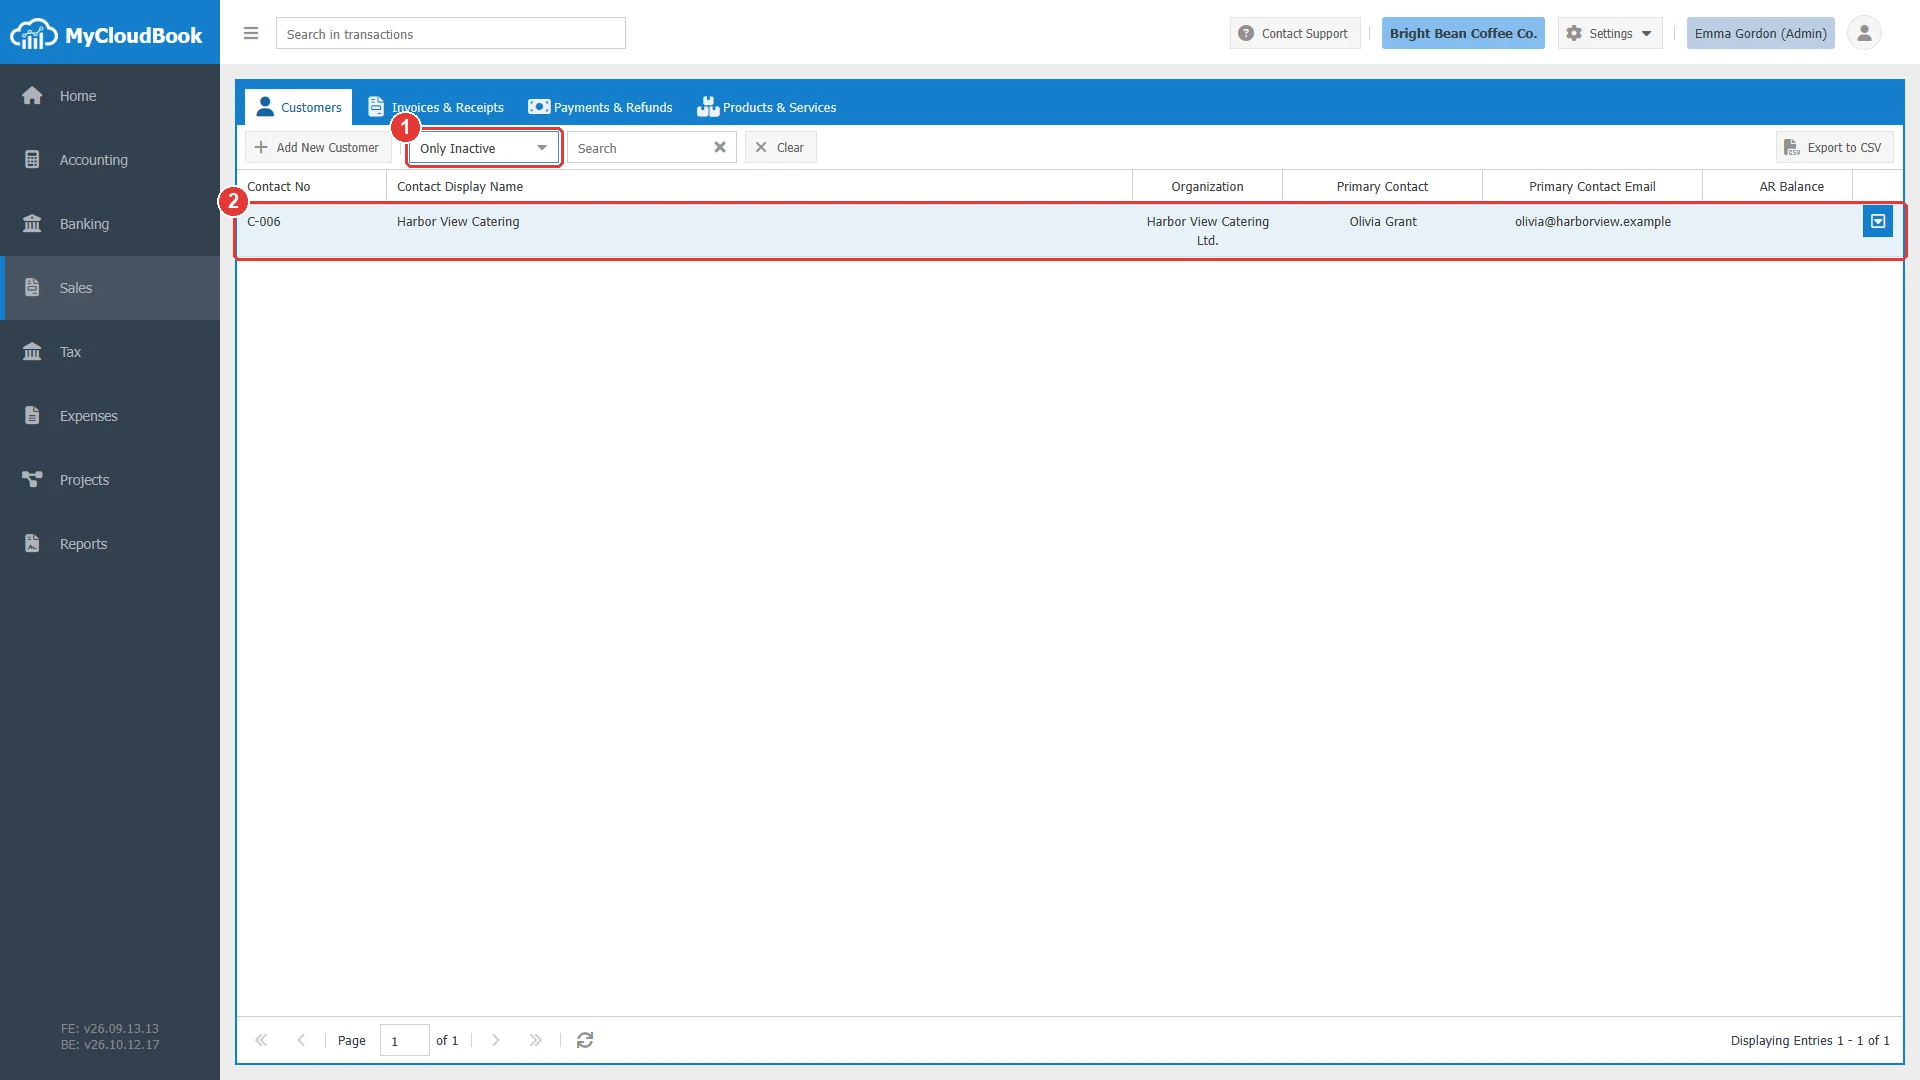
- 1The filter set to Only Inactive.
- 2The inactive customer.
Deleting a customer
- Click Delete in the row actions menu of the list, or the arrow of Edit Info and then Delete on the customer information screen.
- The confirmation names the customer. Click Yes to delete it, or No to keep it.
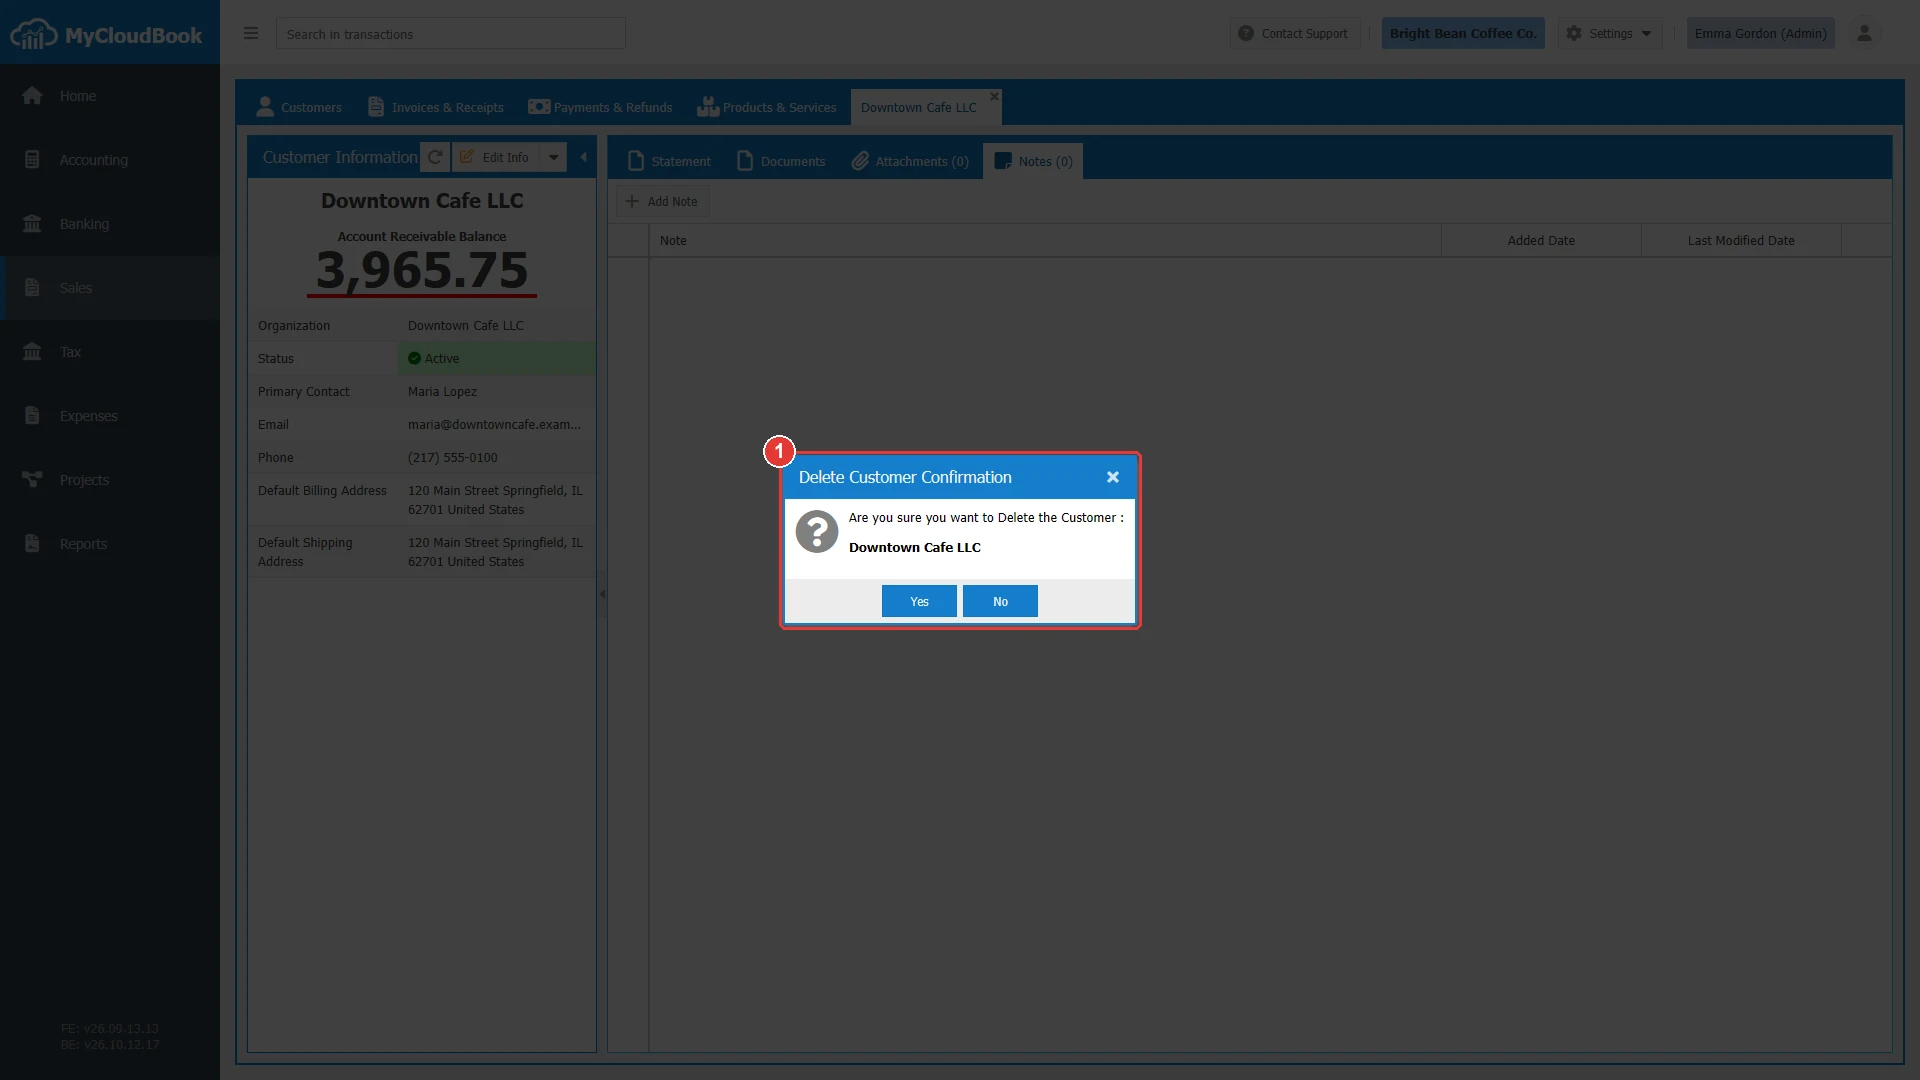
- 1The confirmation names the customer.
A customer can be deleted only when no journal post names it, that is, when no document and no journal entry of the company uses it. Otherwise the server refuses the delete. Make such a customer inactive instead. A deleted customer is removed with its contact person, its addresses, and its saved statements.
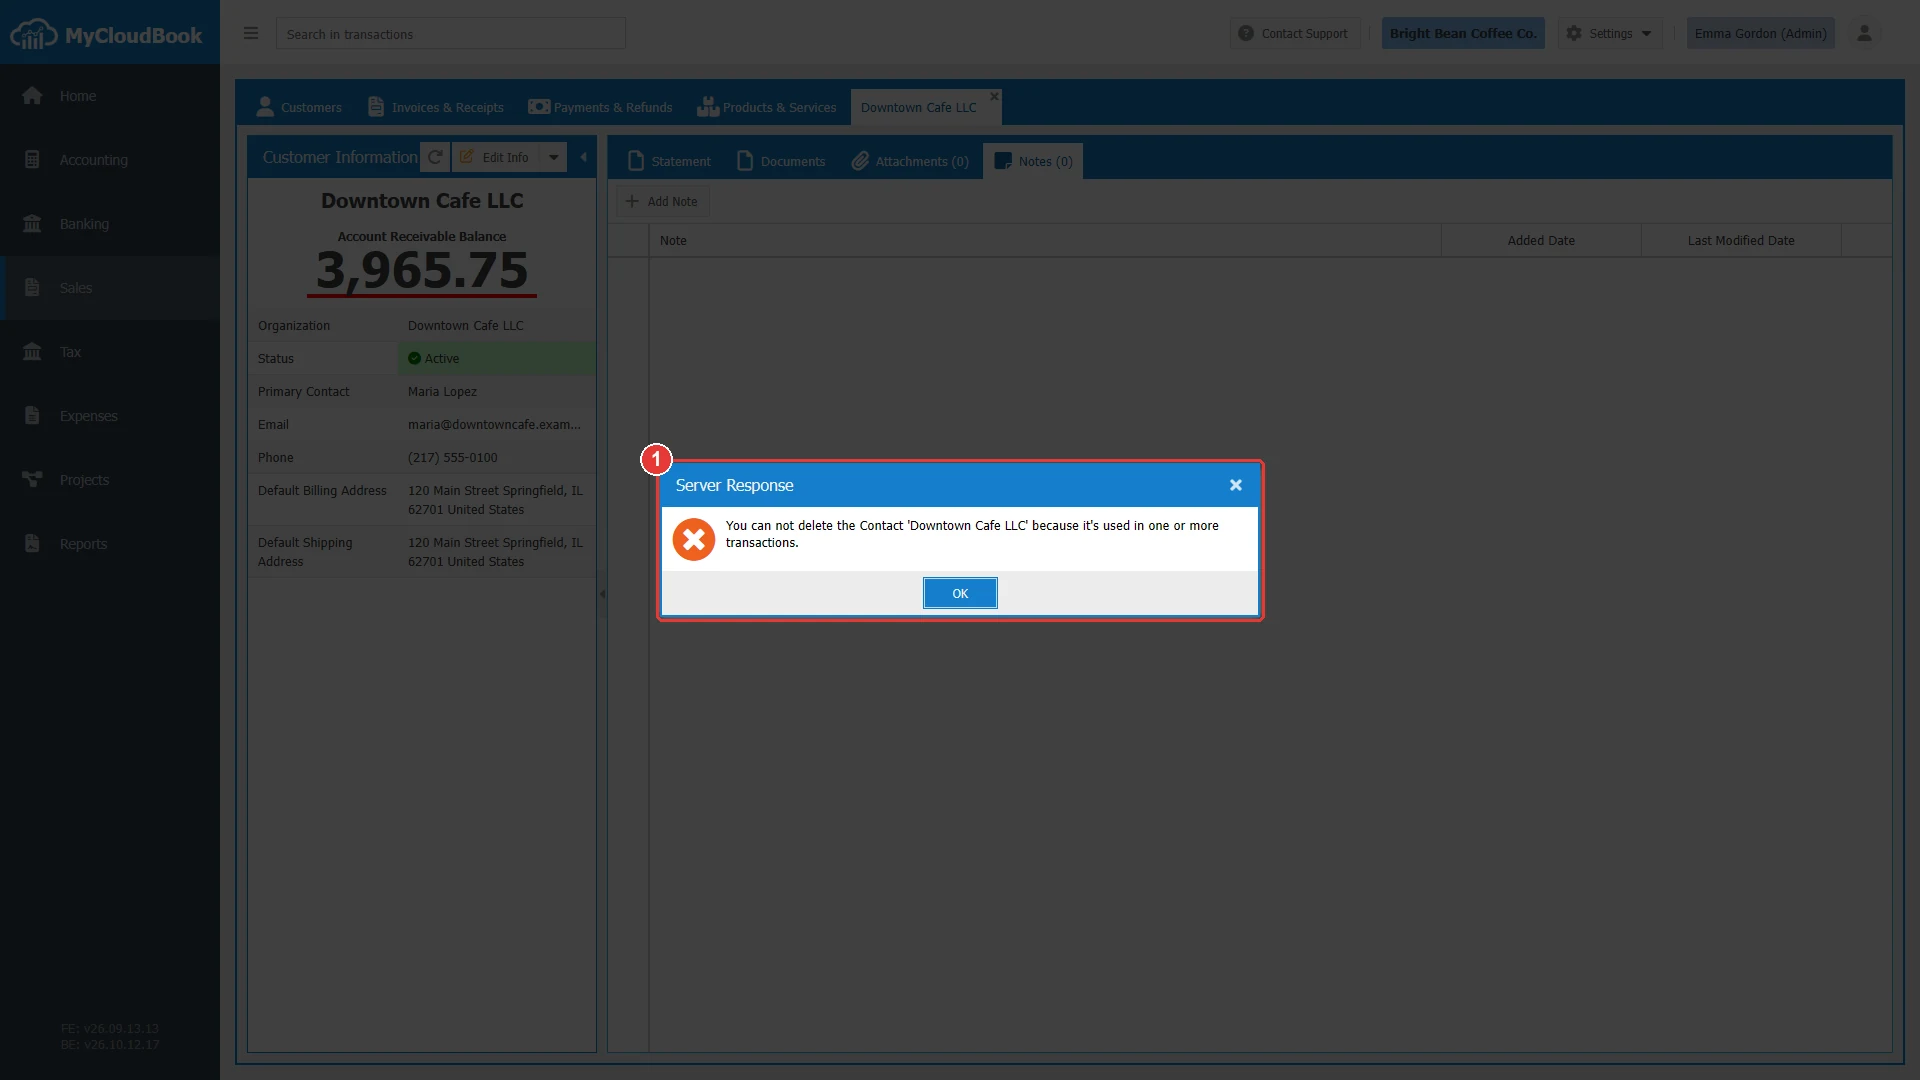
- 1The message from the server.
Exporting the customers
Export to CSV downloads the customers of the current filter as the file Customer-List.csv. The file has one line per customer with the columns: Contact No, Display Name, Organization, First Name, Middle Name, Last Name, Job Title, Email, Phone, Mobile, Fax, the six billing address columns (Line1, Line2, City, State, Zip, Country), the six shipping address columns, Type, Category, and Active. The export ignores the paging and includes every customer of the filter.
Messages and their meaning
Questions and answers
How do I add a customer in MyCloudBook?
Open Sales, Customers, and click Add New Customer. Type the Display Name, which is the only required field, add the contact person and the addresses, and click Save.
Where do I see how much a customer owes?
The AR Balance column of the customers list and the Account Receivable Balance of the customer information screen show the amount that the customer owes. MyCloudBook computes it from the posts on the Accounts Receivable account.
Why can I not delete a customer?
A customer that is used in any document or journal entry cannot be deleted, because the books would lose the history of its transactions. Set the status of the customer to Inactive instead.
Can a customer and a supplier have the same name?
Yes. The display name must be unique among the customers only. The customer number, however, must be unique among all the customers and suppliers of the company.
How do I send a statement to a customer?
Open the customer with a double click, choose the From and To dates in the Statement tab, then click the arrow of Print and choose Send. MyCloudBook saves the statement and opens the email window with the PDF statement attached.
Can I import customers from a file?
Yes. The AI Importer in Settings imports customers from a file.