Journal
This guide explains the Journal screen of MyCloudBook: the list of every journal entry of the company, the filters, the posts of an entry, and how to create, change, import, and delete a manual journal entry.
Overview
MyCloudBook keeps double entry books. Every transaction is recorded as a journal entry with two or more lines, called posts. Each post names an account and a debit or a credit amount, and the total of the debits of an entry always equals the total of its credits. The Journal is the list of every journal entry of the company, from the newest to the oldest.
Journal entries come from two sources:
- Documents. Every invoice, receipt, receipt voucher, credit note, refund voucher, bill, expense, bill payment, transfer, tax payment, tax adjustment, and inventory adjustment creates one journal entry automatically when it is saved. The entry is updated when the document changes and removed when the document is deleted. The Journal shows these entries with the type and the number of the document, for example Invoice #13.
- Manual journal entries. A manual journal entry records a transaction that no document covers, for example an opening balance, a depreciation, an accrual, a correction of a posting, or the capital that the owner brings into the company. The Journal shows these entries with the type Journal Entry.
Every journal entry has a number, shown in the No column. The same number is shown in the ledger of each account that the entry posts to, in the Journal # column.
How to open the screen
- In the left navigation, click Accounting.
- Click the Journal tab, the second tab of the Accounting page.
The screen
The screen is a list with one row per journal entry. The first figure shows the screen with every part marked. The rows are listed from the newest to the oldest, by date, and the list shows up to one hundred entries per page.
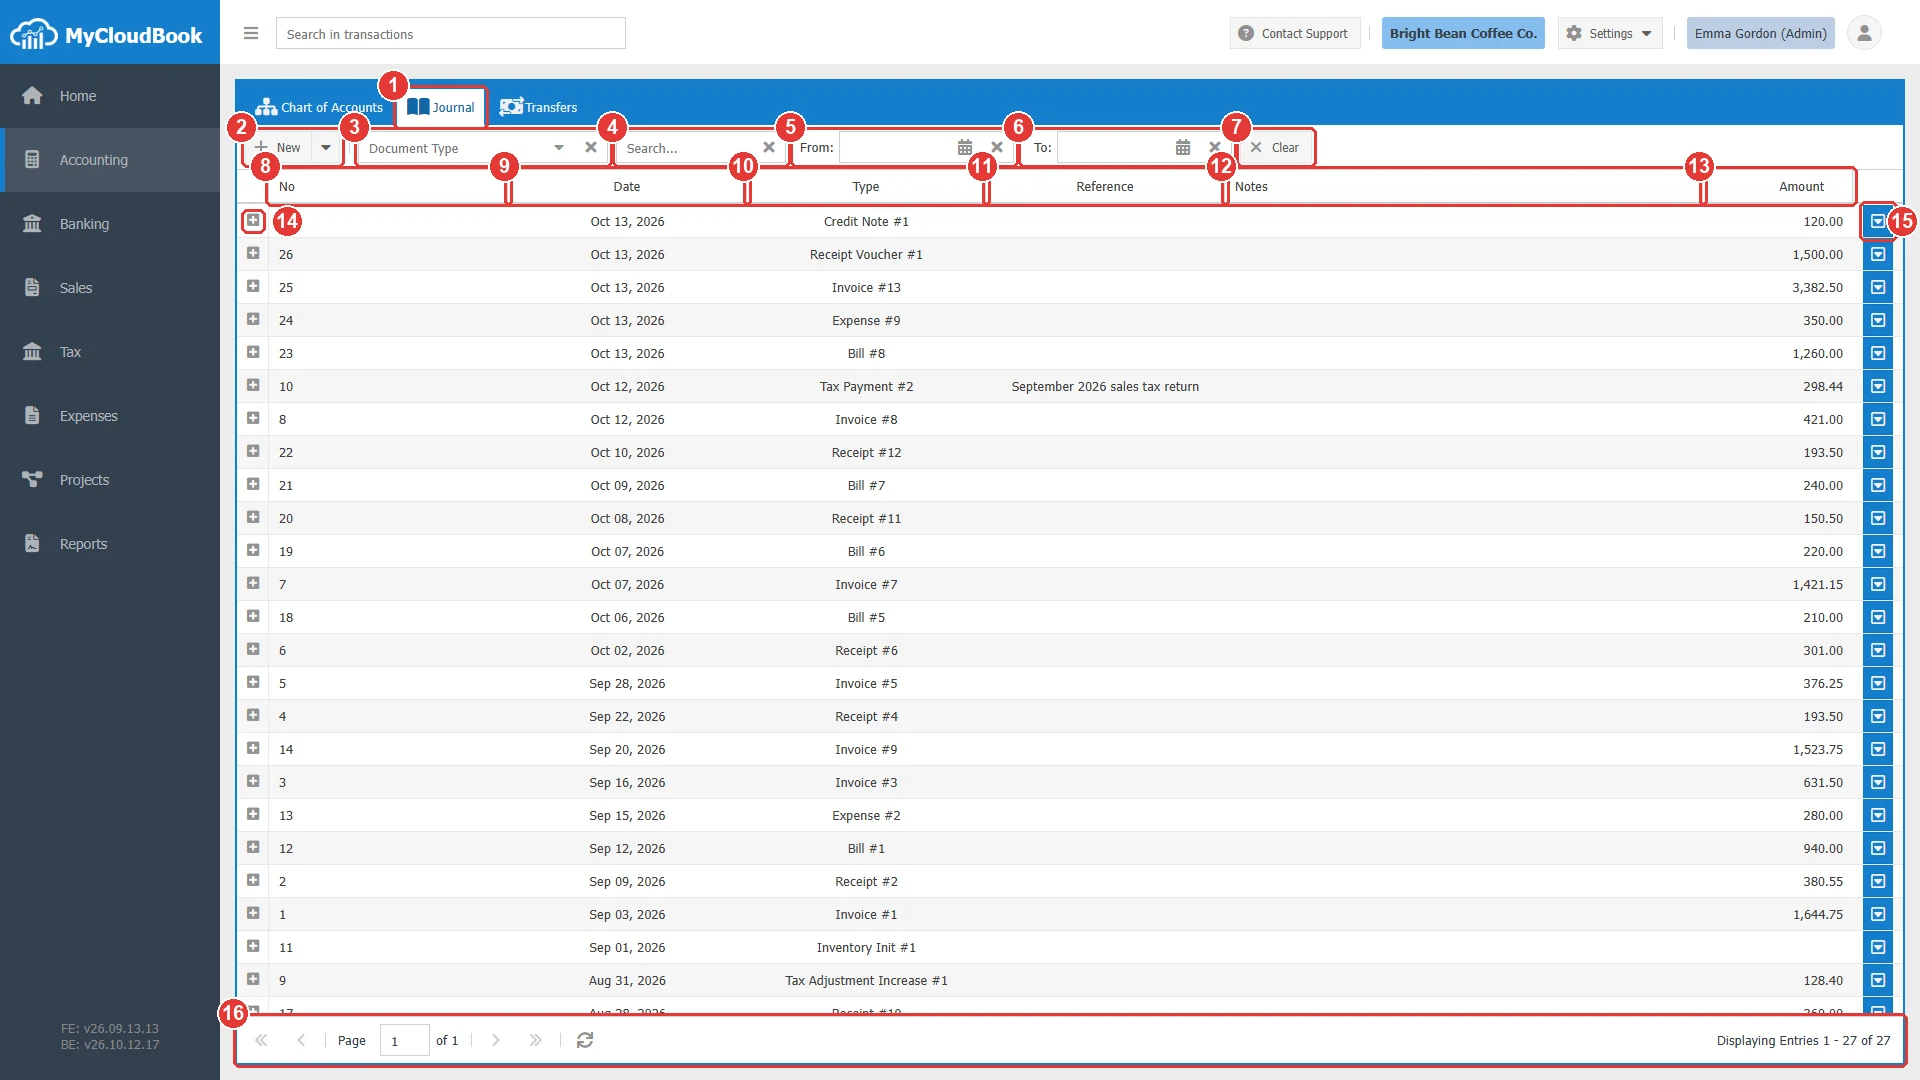
- 1Journal tab.
- 2New. The main part of the button opens a new journal entry. The arrow opens a menu with New Journal Entry from CSV.
- 3Document Type. Keeps the entries of one document type only.
- 4Search. Finds the entries by document number, reference, or description. Press Enter to search.
- 5From. The first date of the period.
- 6To. The last date of the period.
- 7Clear. Removes every filter.
- 8No. The number of the journal entry.
- 9Date. The date of the transaction.
- 10Type. The type and the number of the document, or Journal Entry for a manual entry.
- 11Reference. The reference typed in the document or in the entry.
- 12Notes. The notes of the document.
- 13Amount. The total of the entry, in the main currency.
- 14The expander of a row. A click shows the posts of the entry under the row.
- 15The row actions button. It opens a menu with Edit and Delete.
- 16The paging toolbar. It shows the entries that are displayed and moves between the pages.
The journal is being updated. When inventory movements are waiting for their journal entries, the toolbar shows the message The backend is updating the Journal. Reload in a few minutes. A background process of MyCloudBook creates these entries. Click Clear or reload the page after a few minutes.
The posts of an entry
A click on the expander at the start of a row shows the posts of the entry under the row, under the title Posts for Journal Entry #number. Each post is one line of the entry. A second click on the expander hides the posts.
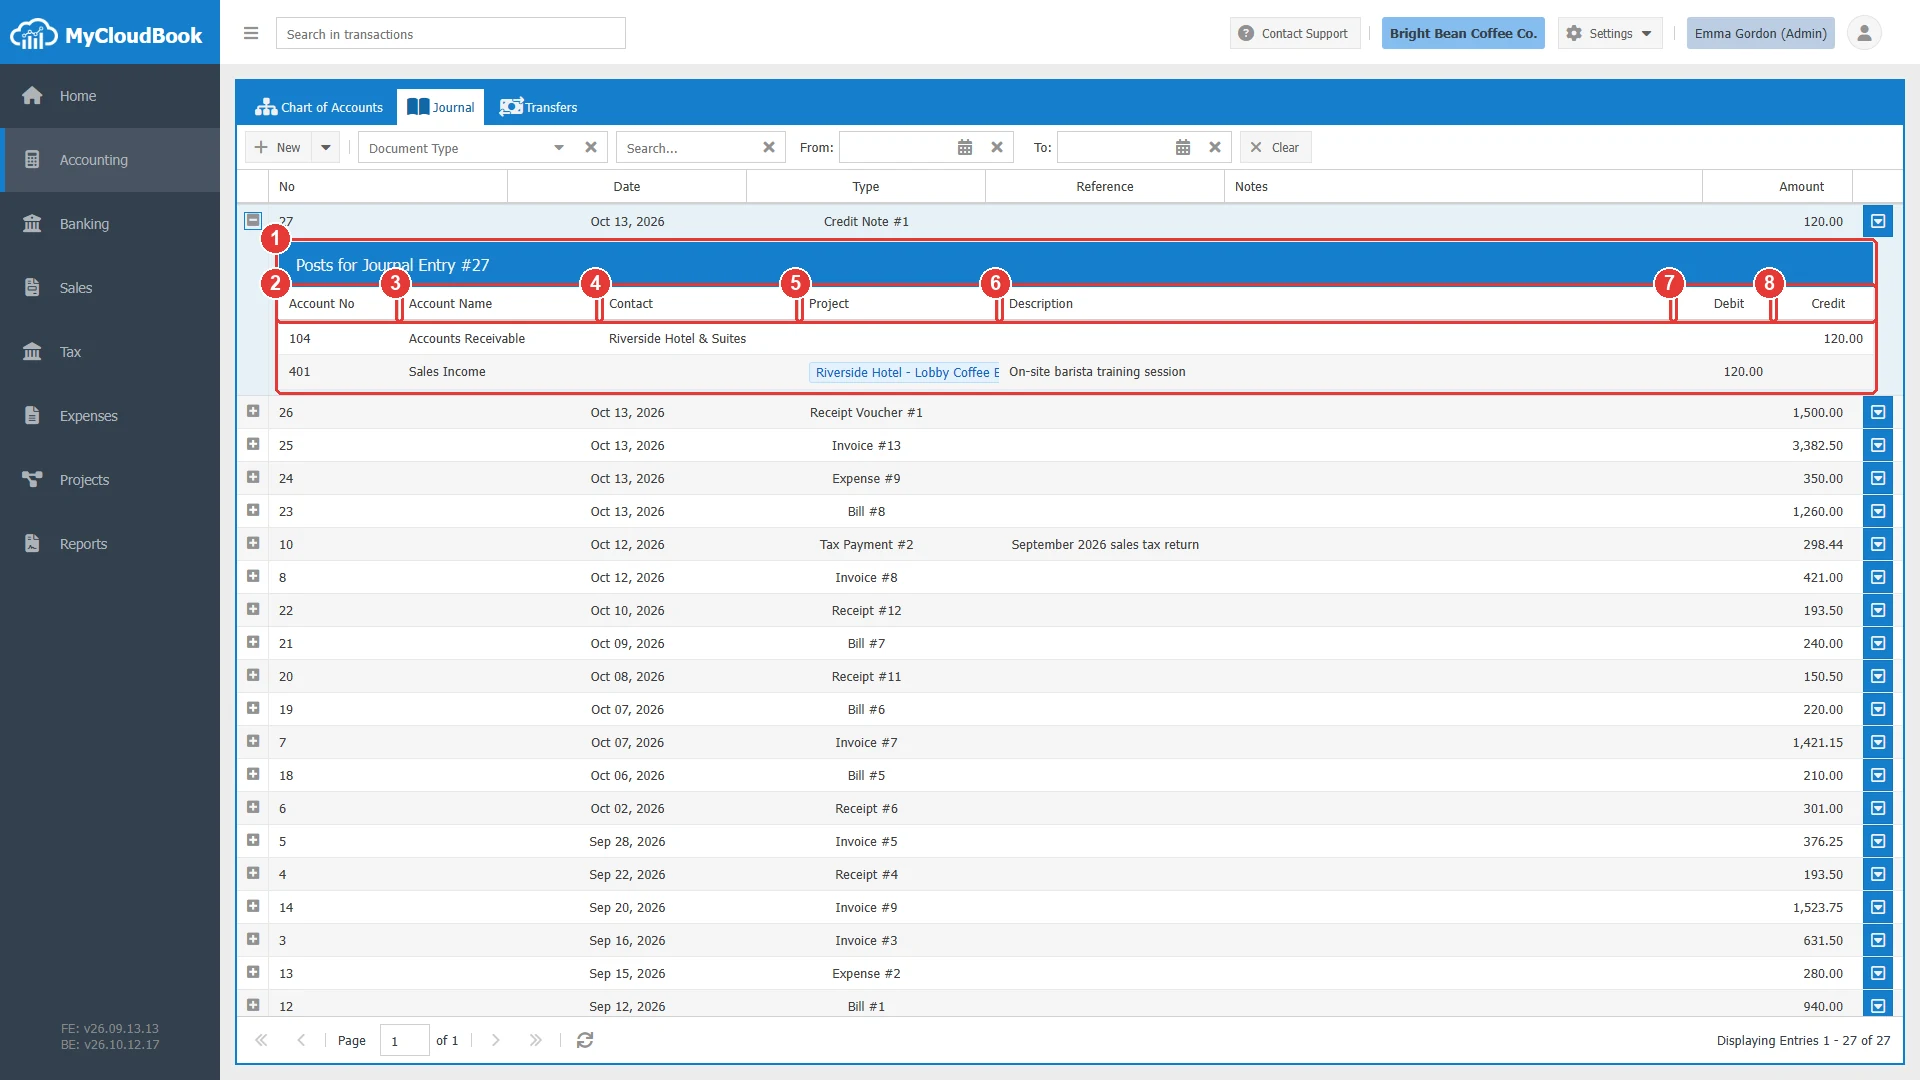
- 1The posts of the entry, one line per account.
- 2Account No. The number of the account.
- 3Account Name. The name of the account.
- 4Contact. The customer or the supplier of the post, for the Accounts Receivable and Accounts Payable accounts.
- 5Project. The project of the post. The column is shown when Track Projects Profitability is enabled in Settings, Preferences.
- 6Description. The description of the post.
- 7Debit. The debit amount, in the main currency.
- 8Credit. The credit amount, in the main currency.
Filters and search
The toolbar holds four filters. The list is read again from the server after every change.
| Filter | What it does |
|---|---|
| Document Type | Keeps the entries of one document type. The list groups the types by module: Base Accounting (Journal Entries, Transfers), Sales (Invoices, Receipts, Receipt Vouchers, Credit Notes, Refund Vouchers), Expenses (Bills, Expenses, Bill Payments), and Inventory (Inventory Adjustments Increase, Inventory Adjustments Decrease, Inventory Initializations). Select Journal Entries to see the manual entries only. The cross clears the filter. |
| Search | Finds the entries whose document number, reference, or post description contains the typed text. Type at least three characters and press Enter. A shorter text shows the message At least 3 letters have to be entered. The cross clears the search. |
| From and To | Keep the entries of a period. Each date can be used alone. The cross of each field clears the date. |
| Clear | Removes every filter and shows the whole journal again. |
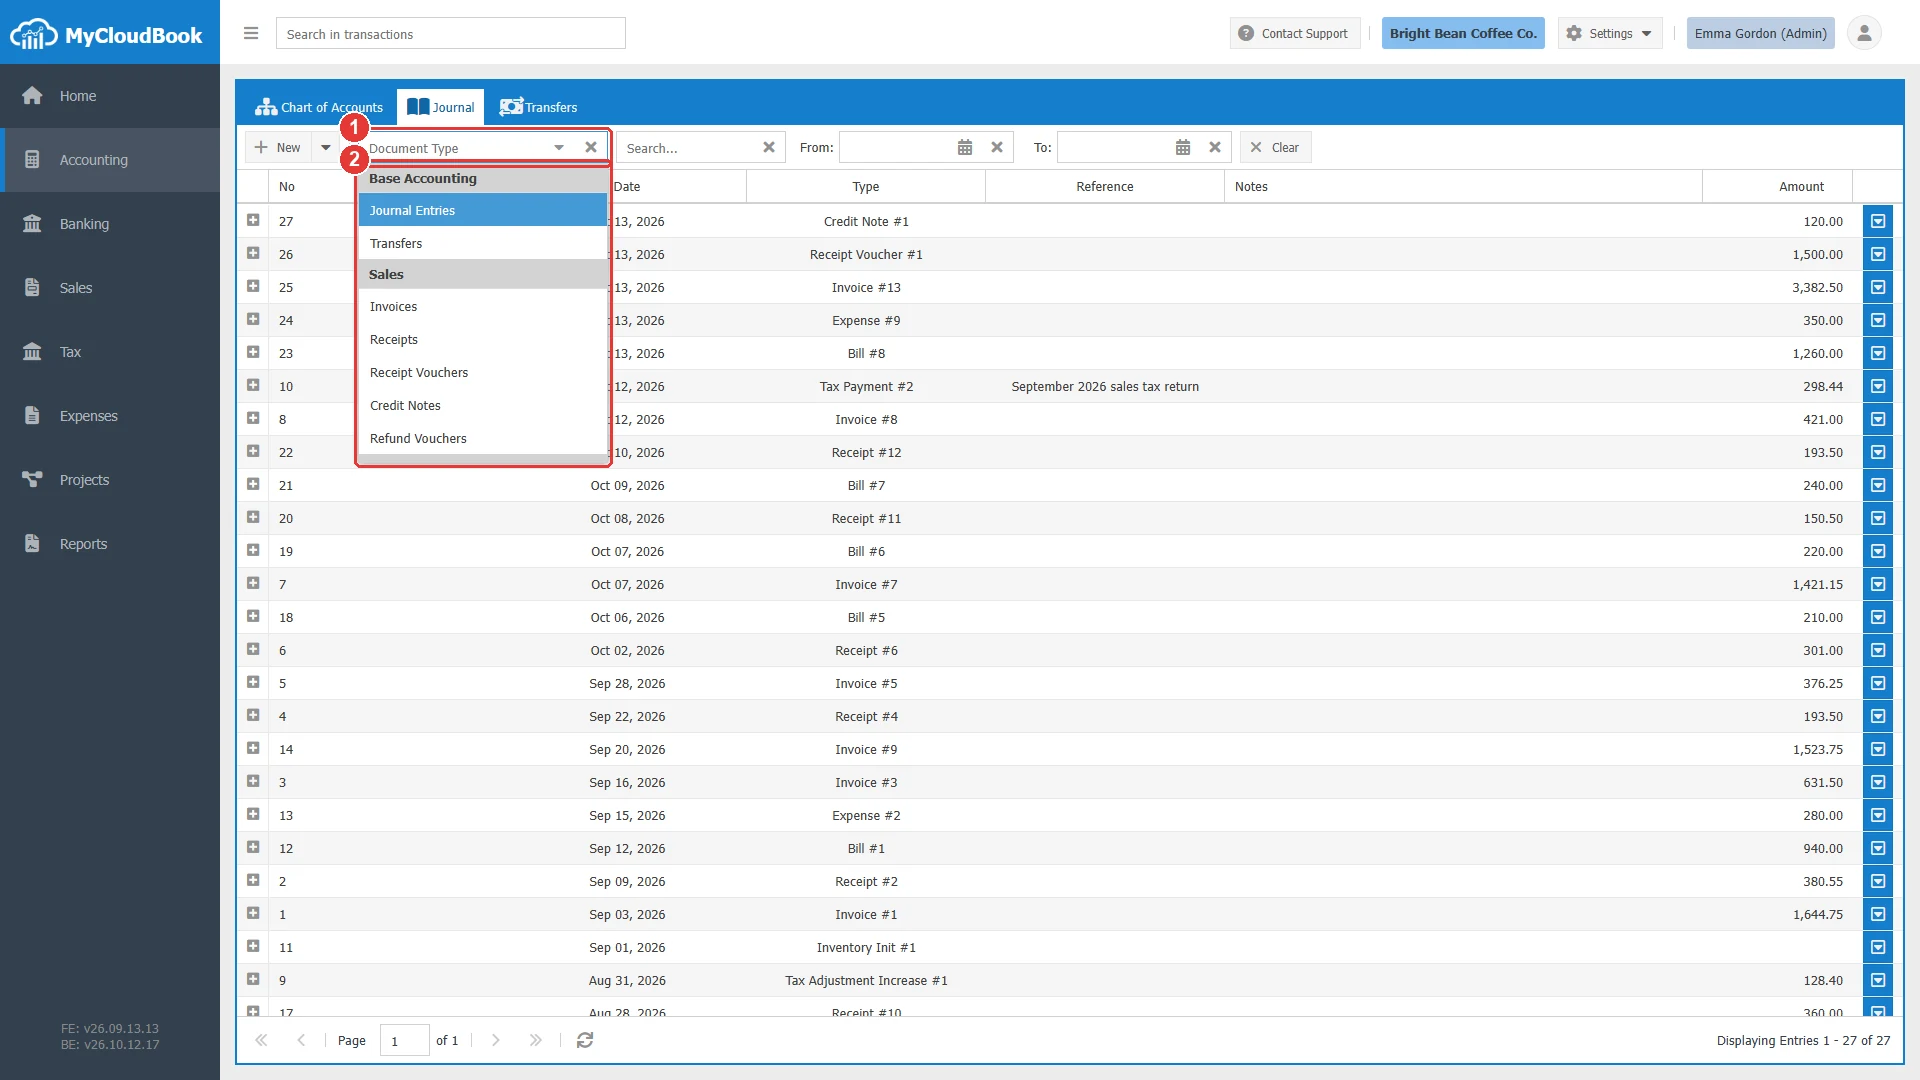
- 1Document Type.
- 2The document types, grouped by module.
The next figures show the filters at work. After the Document Type filter is set to Journal Entries, only the manual entries remain. The search text rent finds the entry of the example of this guide through its description. A search text shorter than three characters is refused with a message.
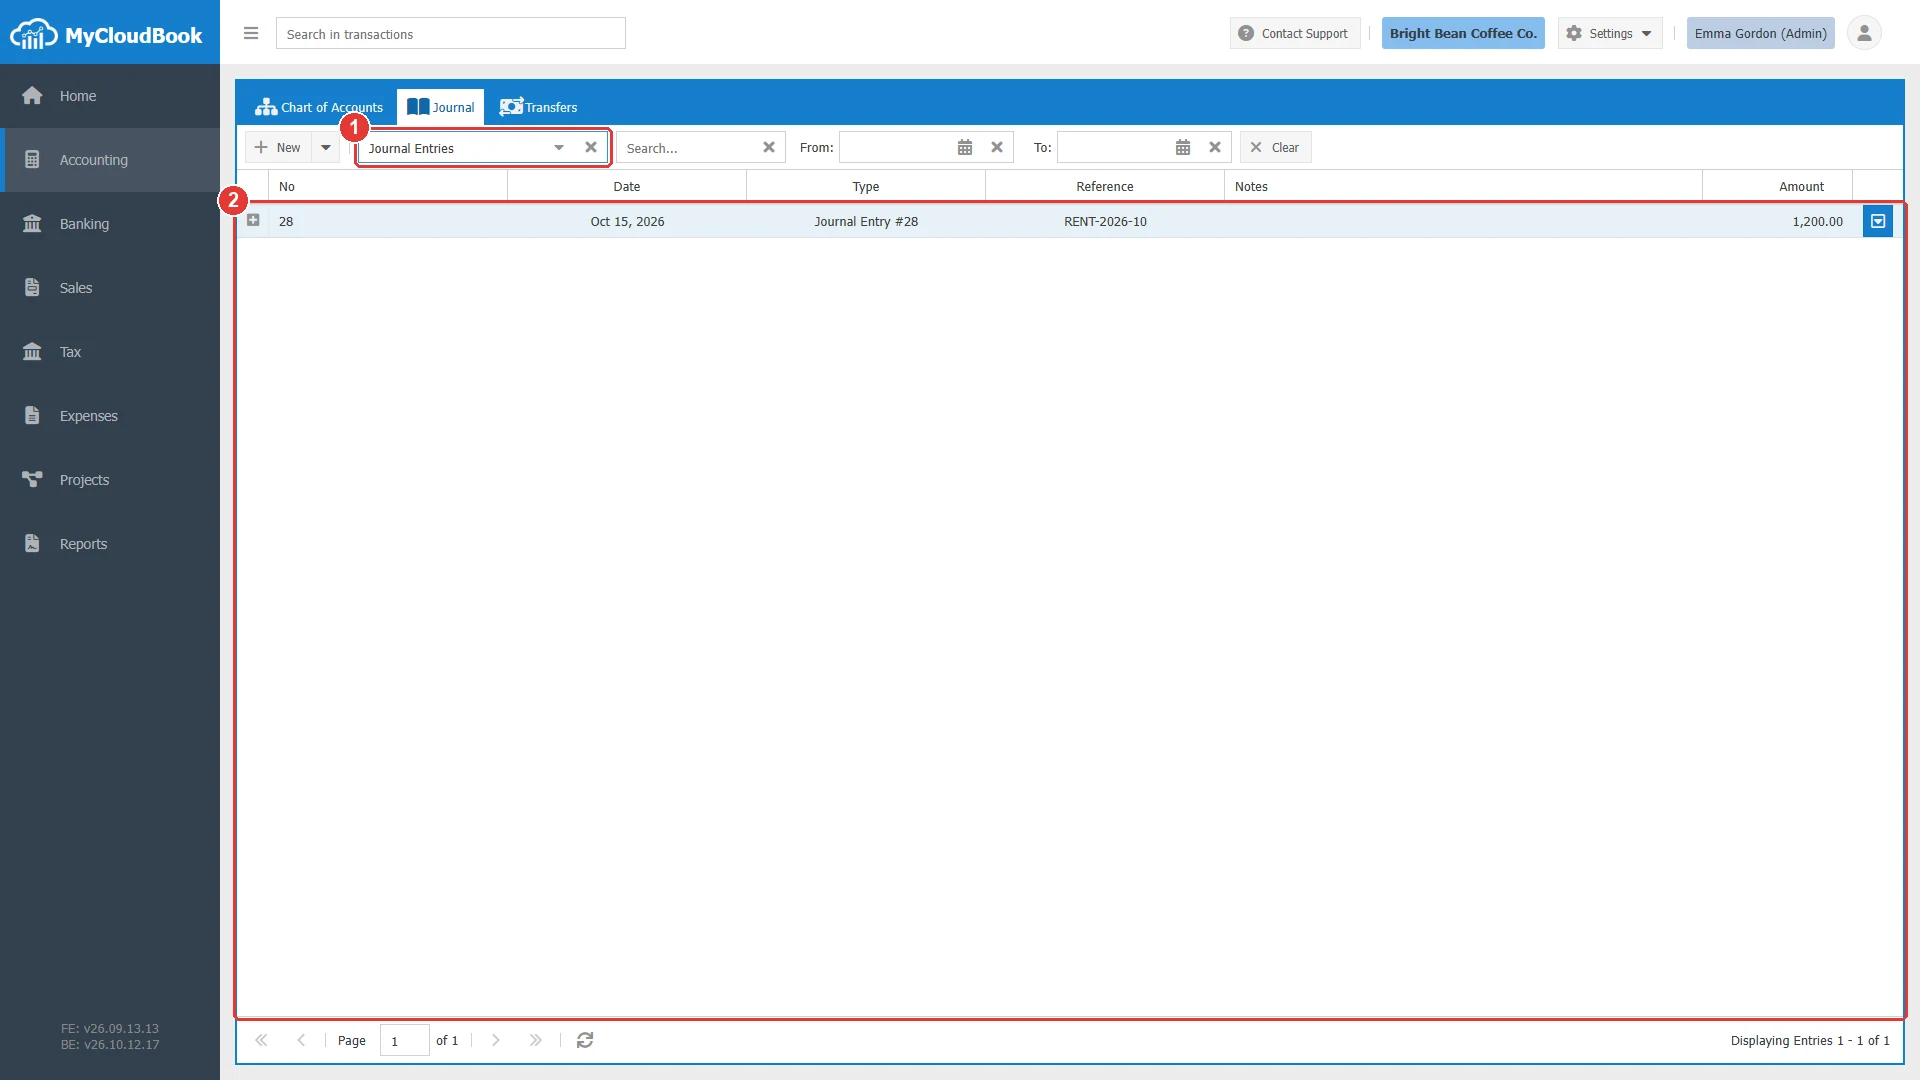
- 1Document Type set to Journal Entries. The cross clears the filter.
- 2Only the manual entries remain.
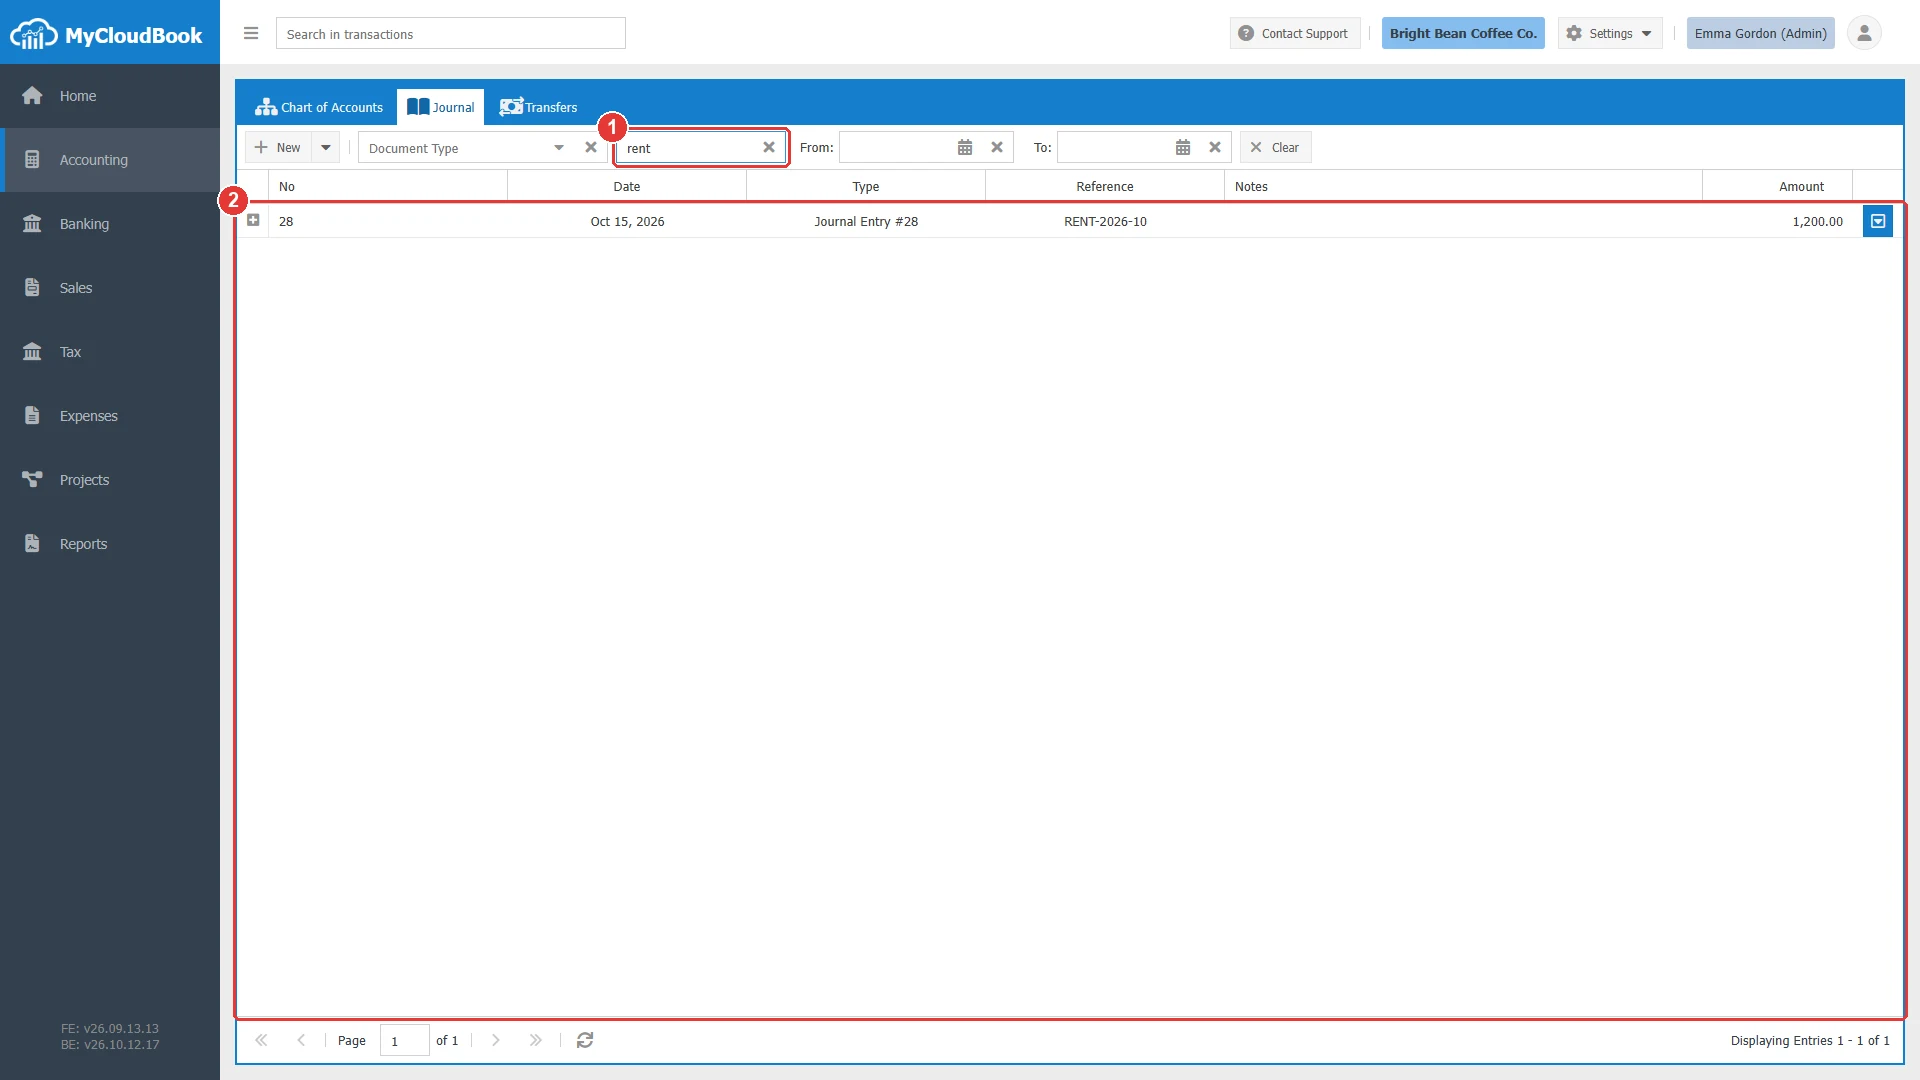
- 1The search text. Enter starts the search, and the cross clears it.
- 2The entries whose document number, reference, or description contains the text.
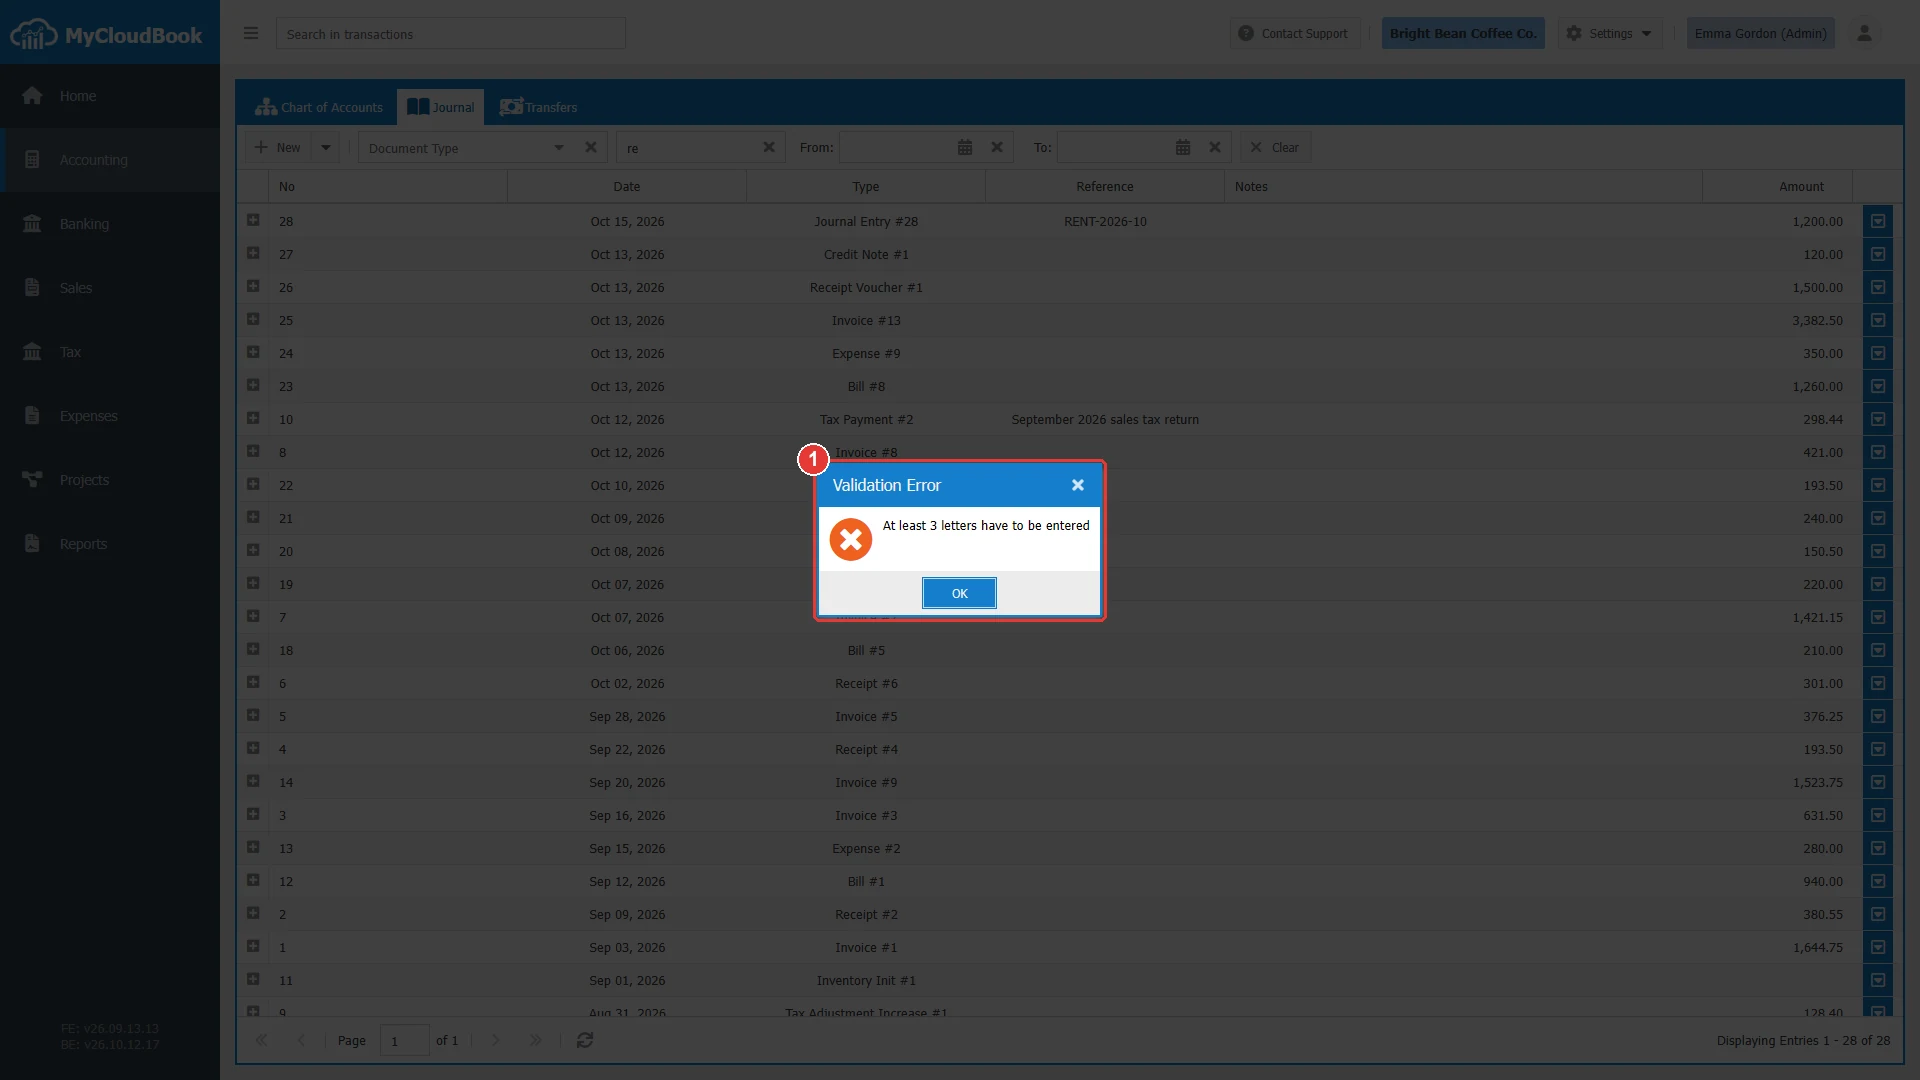
- 1The message. Type at least three characters.
Opening an entry
A double click on a row, or Edit in the row actions menu, opens the source of the entry:
- For the entry of a document, the document itself opens in its own module, for example an invoice in Sales or a bill in Expenses. The journal entry of a document cannot be edited directly. Change the document, and MyCloudBook updates the entry.
- For a manual journal entry, the entry opens in a tab of the Accounting page, named Journal Entry #number, where its lines can be changed.
When a post of a manual entry is reconciled with a bank transaction in the Banking module, the post must keep its account and its amount. A change of either one is refused until the bank transaction is unreconciled.
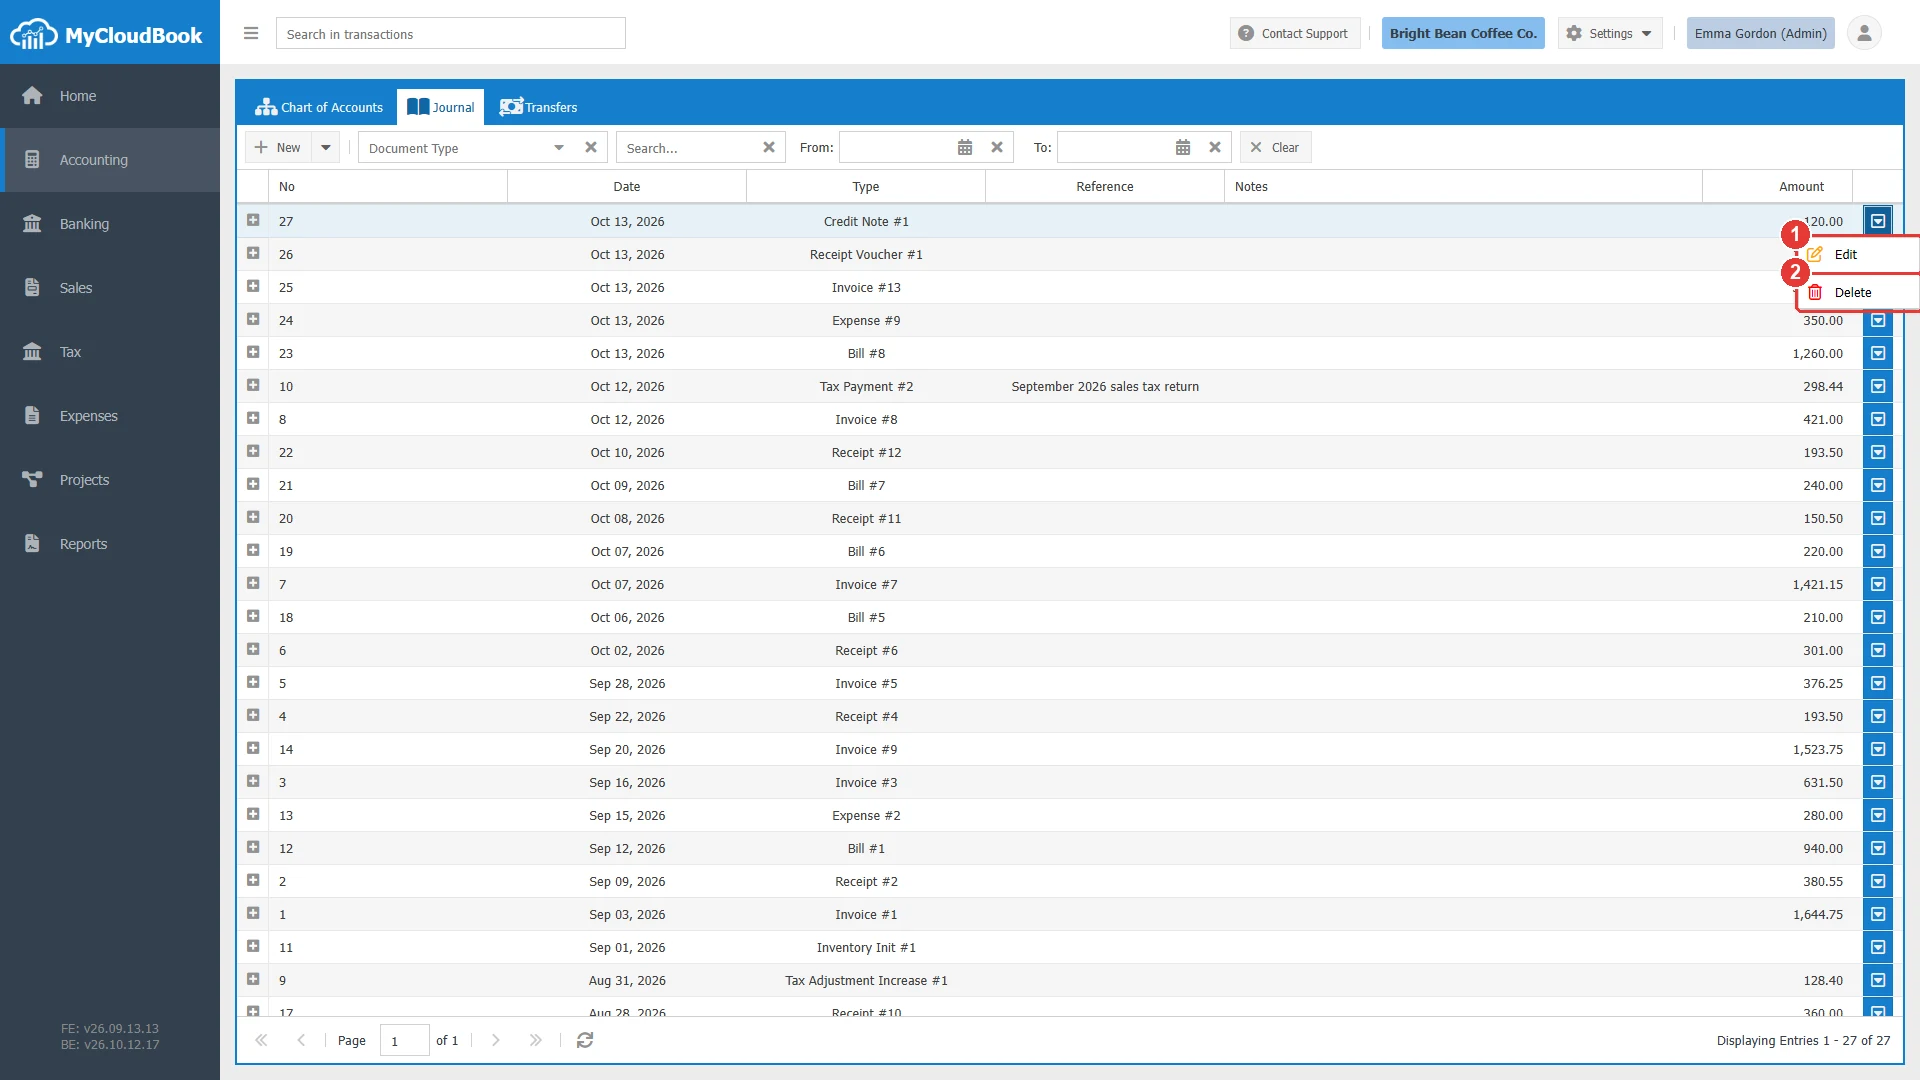
- 1Edit. Opens the document, or the manual entry.
- 2Delete. Deletes a manual entry after a confirmation.
Adding a manual journal entry
- In the Journal, click New. A tab named New Journal Entry opens with two empty lines.
- Keep the Entry No at 0, so MyCloudBook assigns the next number. Type a Ref if you want one, and check the Date.
- In each line, select the GL Account, type a Description, and type the amount in Debit or in Credit. A new empty line is added when the last line is used.
- Check the totals under the lines. The total debit must equal the total credit.
- Click Save to keep the tab open, or Save & Close to close it.
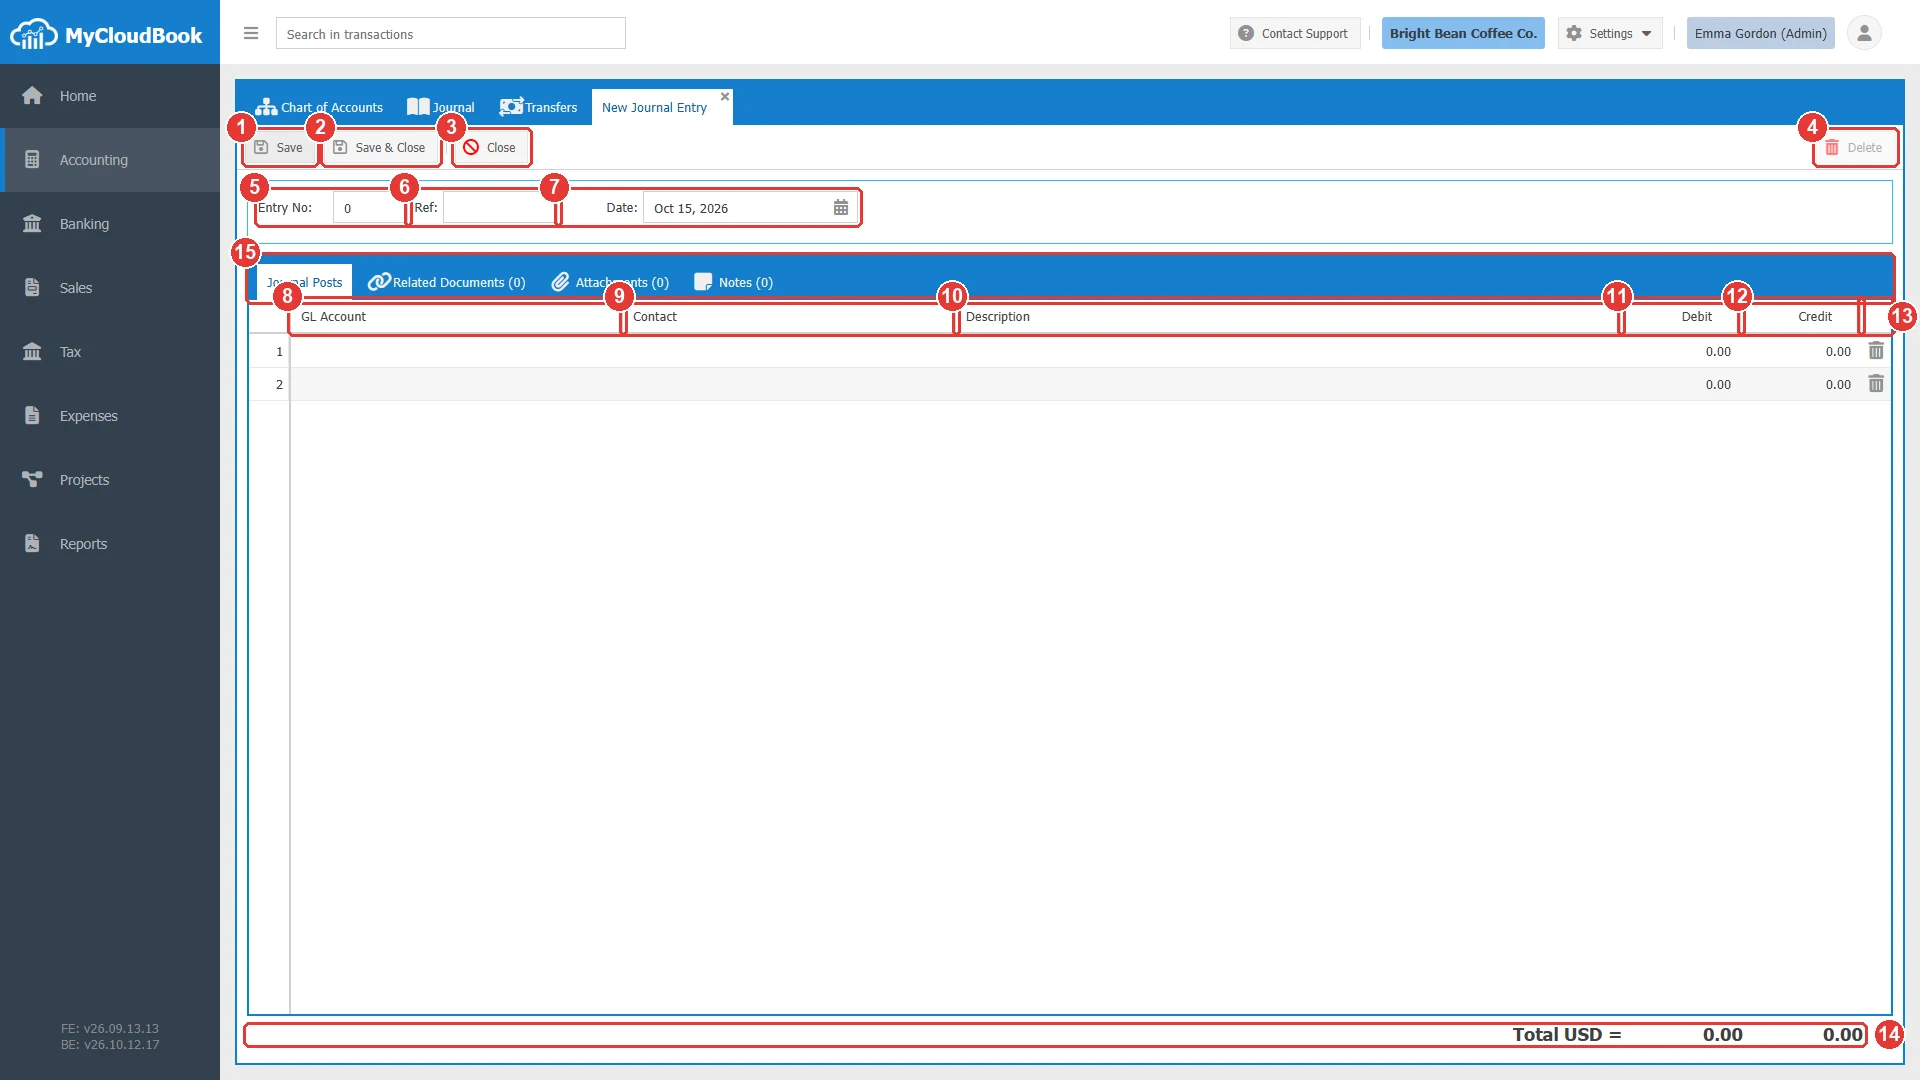
- 1Save. Checks the entry and saves it. The tab stays open.
- 2Save & Close. Saves the entry and closes the tab.
- 3Close. Closes the tab without saving.
- 4Delete. Available after the first save.
- 5Entry No. 0 means the next free number.
- 6Ref. A free reference.
- 7Date. The date of the transaction.
- 8GL Account. The account of the line.
- 9Contact. The customer or the supplier, for the receivable and payable accounts only.
- 10Description. The description of the line.
- 11Debit.
- 12Credit.
- 13The icon removes the line.
- 14The totals of the debit and of the credit.
- 15The tabs Journal Posts, Related Documents, Attachments, and Notes.
The fields
| Field | Required | Purpose and rules |
|---|---|---|
| Entry No | Required | The number of the entry. Keep the value 0, and MyCloudBook assigns the next number after the highest number of the journal when the entry is saved. After the save, the number is shown and cannot be changed. |
| Ref | Optional | A free reference, for example the number of a bank statement or of an external document. It is shown in the Reference column of the Journal, and the search finds it. |
| Date | Required | The date of the transaction. The field starts with the date of today. Every line of the entry carries this date in the ledgers and in the reports. |
| Currency | Optional | The currency of the amounts of the entry. The field is shown only when multi-currency is enabled in Settings, Preferences, and it starts with the main currency. See Multi-currency entries. |
| GL Account | Required | The account of the line. The list shows the accounts of the company, with their number, name, type, and balance. A main account cannot be used. A line without an account is ignored when the entry is saved, and the entry needs at least two lines with an account. |
| Contact | Optional | The customer or the supplier of the line. The list shows the customers and the suppliers with their balance. The contact is required for a line on the Accounts Receivable account (a customer) or on the Accounts Payable account (a supplier), and it is not allowed on any other account. See Lines with a contact. |
| Description | Optional | The description of the line, up to 4000 characters. It is shown in the posts of the entry and in the ledger of the account, and the search finds it. |
| Debit, Credit | Required | The amount of the line, in the currency of the entry. Type the amount in one of the two columns and leave the other at 0. A negative amount is not accepted. The totals under the lines must be equal before the entry can be saved. |
The following rules apply to the whole entry:
- The entry needs at least two lines with an account.
- The total of the debit column must equal the total of the credit column.
- Every account must be an account that receives transactions. A main account is refused.
- In a multi-currency company, every account of the entry must be in the main currency or in the currency of the entry.
- The lines can be reordered by drag and drop. The icon at the end of a line removes it.
Example: the rent of the shop paid from the bank account
The example records the rent of October, paid from the checking account. The expense account is debited and the bank account is credited.
- Click New.
- In line 1, click the GL Account cell and select 508 - Rent or Lease from the list. The list can be searched by number or by name.
- Type the description Shop rent for October 2026 and the amount 1200 in Debit.
- In line 2, select 101 - Checking Account, type the same description, and type 1200 in Credit.
- The totals show 1,200.00 on both sides. Click Save.
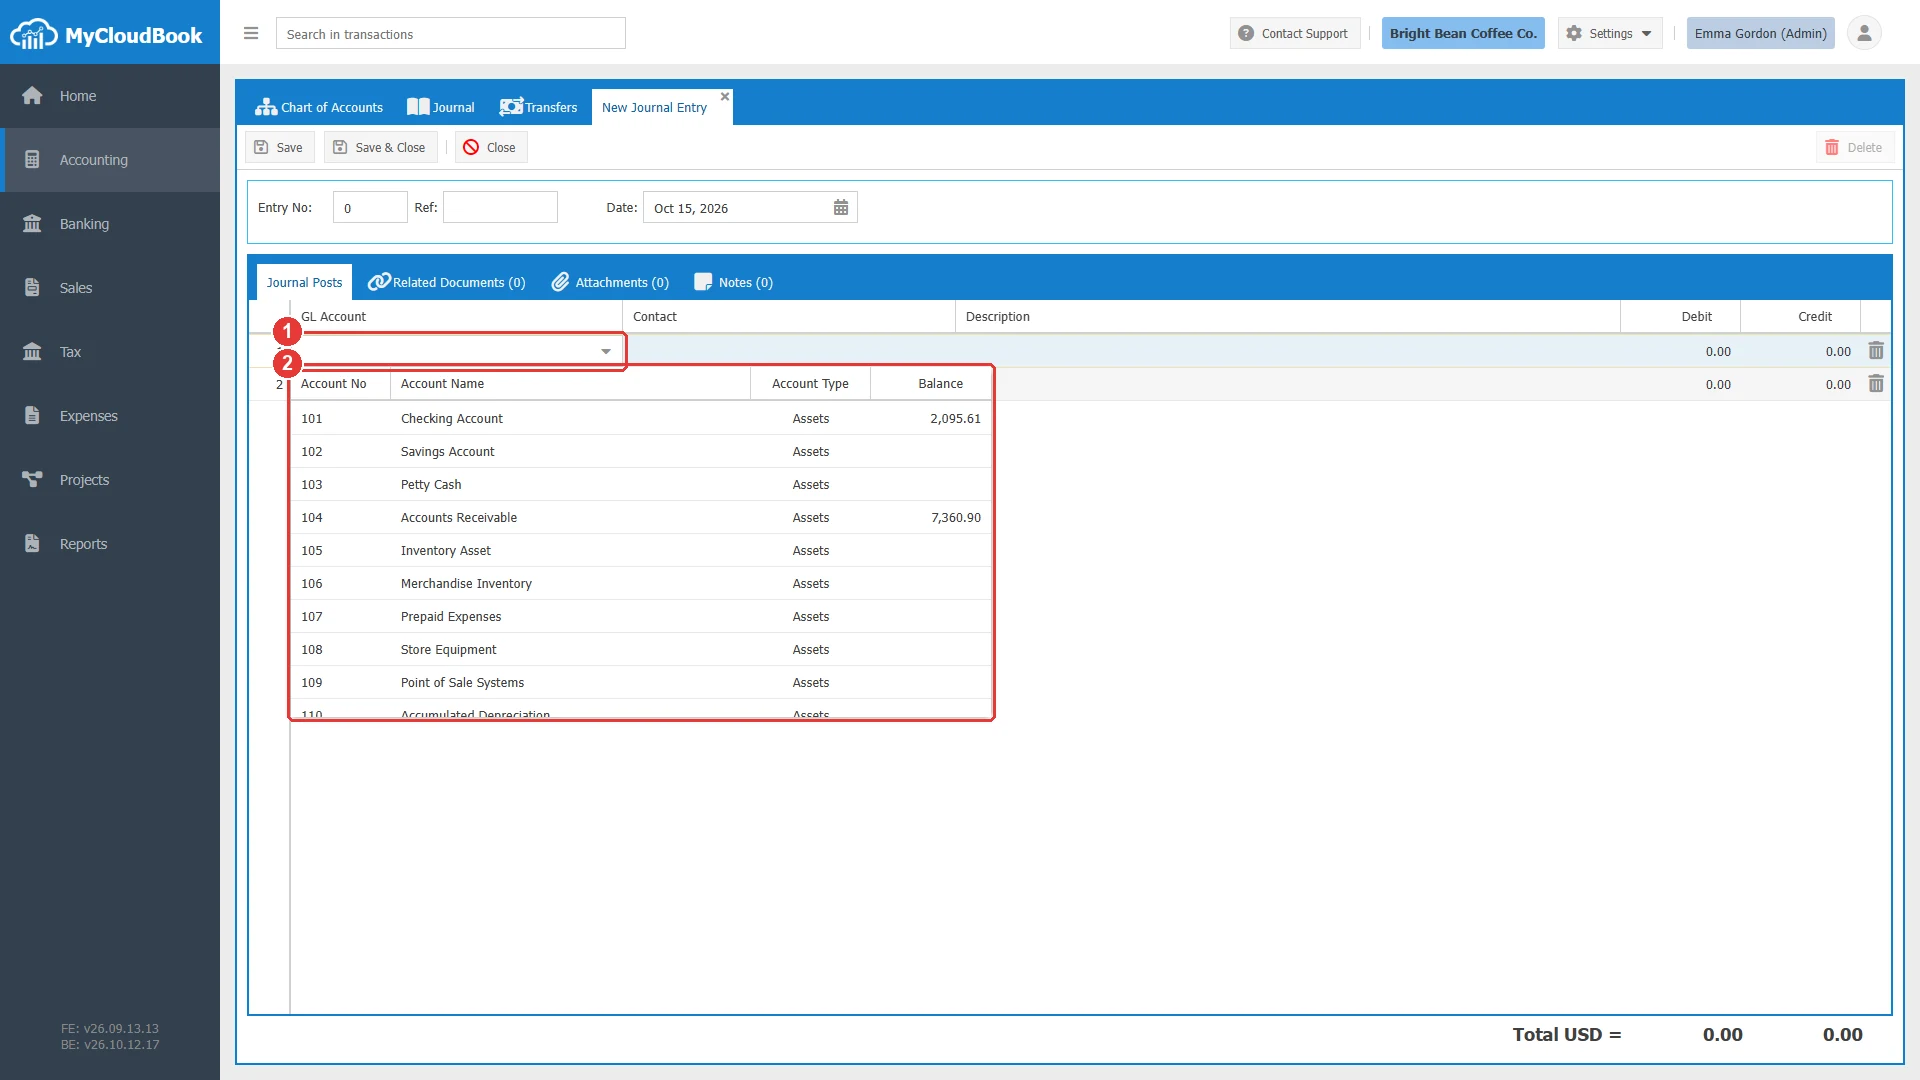
- 1The GL Account cell of the line. A click opens the editor, and the arrow opens the list.
- 2The accounts, with their number, name, type, and balance. Typing a part of the number or of the name filters the list.
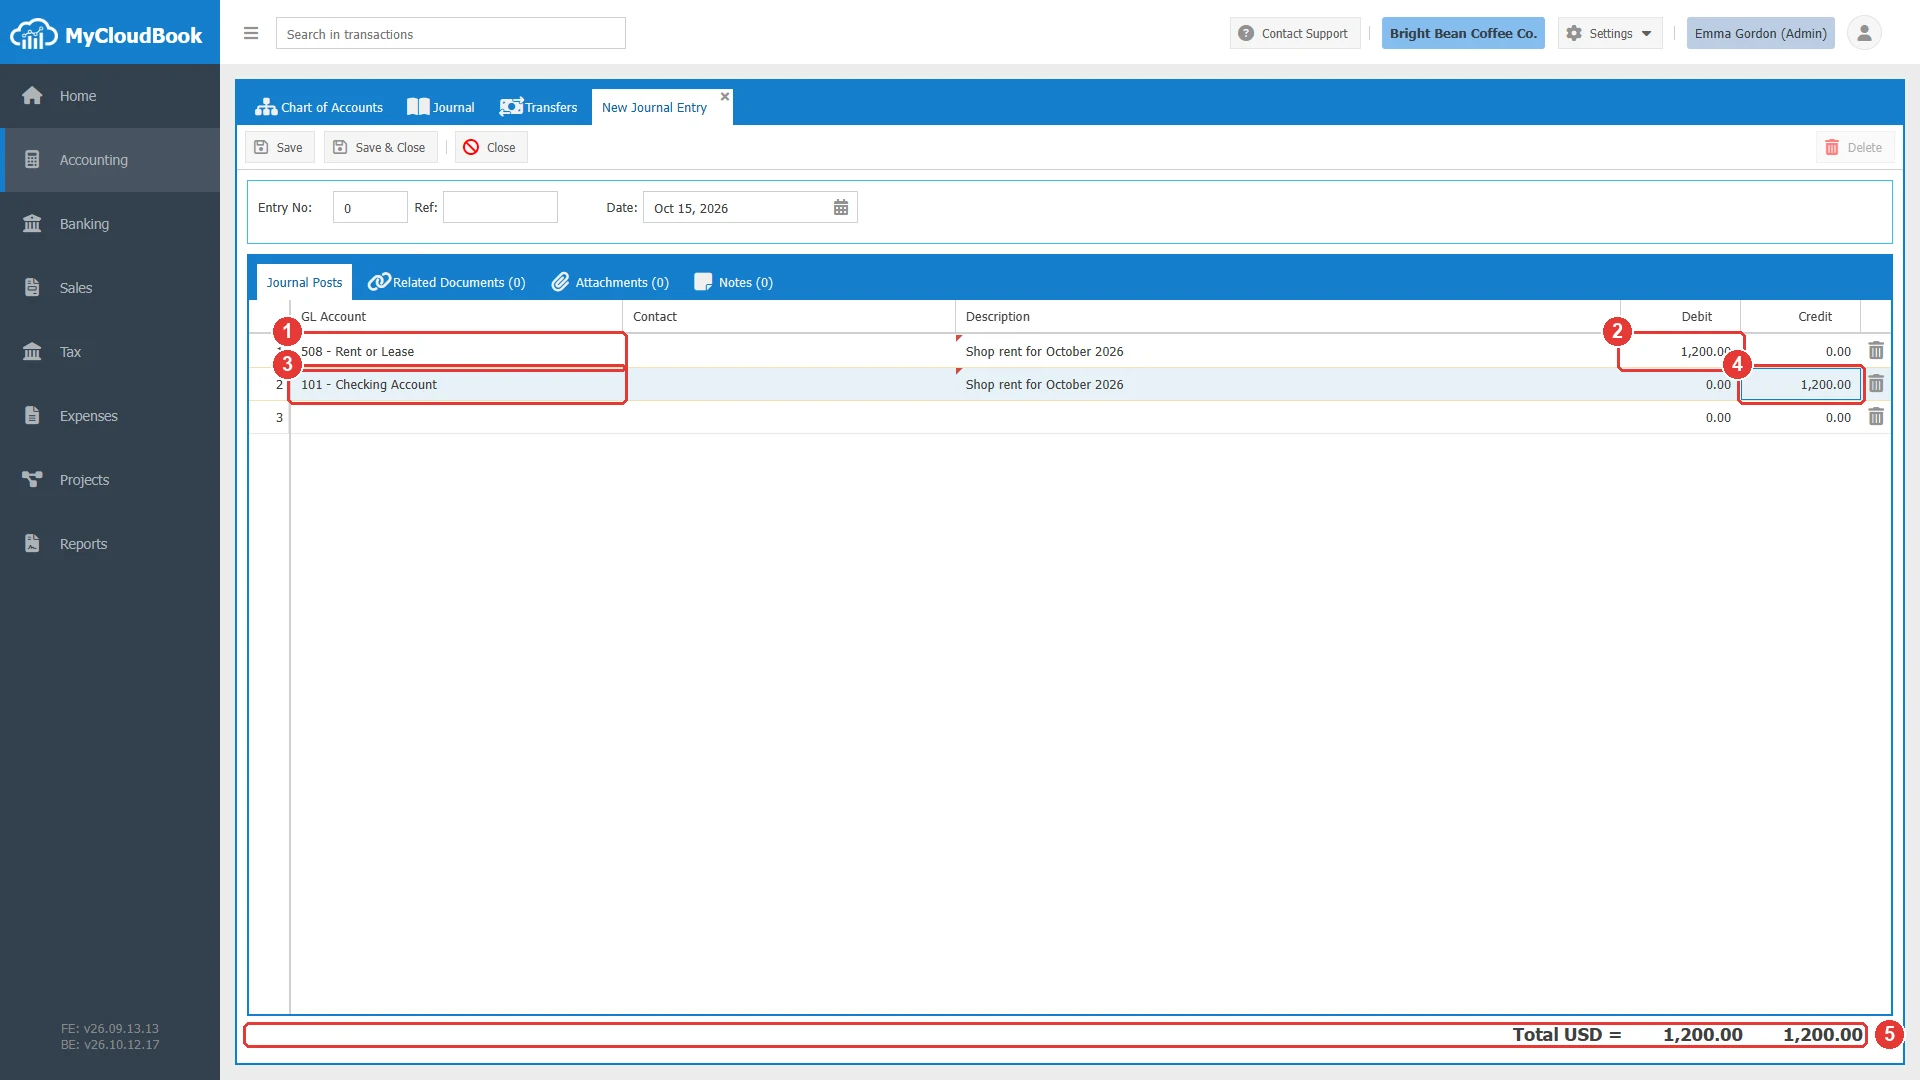
- 1Line 1: the expense account, on the debit side.
- 2The debit amount.
- 3Line 2: the bank account, on the credit side.
- 4The credit amount.
- 5The totals are equal, so the entry can be saved.
After the save, the tab is named Journal Entry #number, the Entry No shows the number that MyCloudBook assigned, and the Delete button becomes available. The Journal, the Chart of Accounts, and the open ledgers of the accounts of the entry are updated at once. The tabs Related Documents, Attachments, and Notes of the entry can then be used, for example to attach the scan of a receipt.
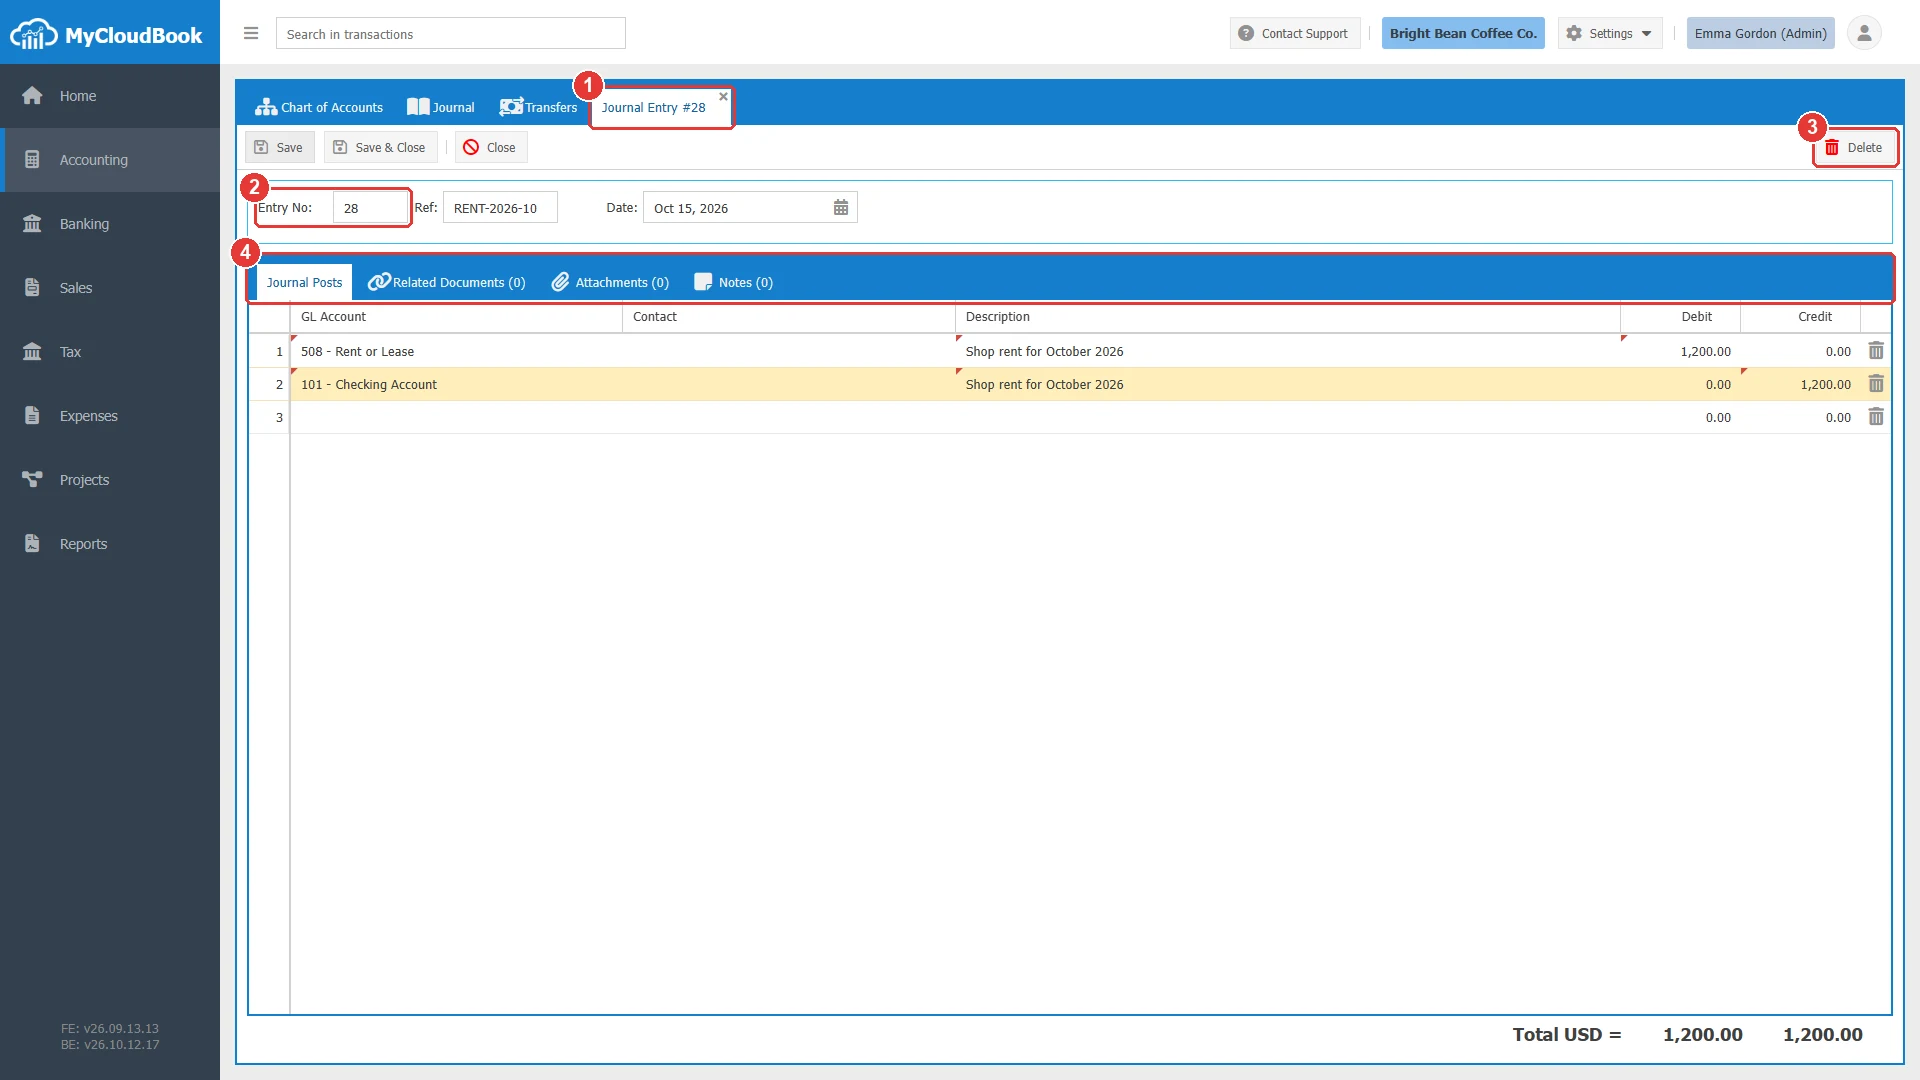
- 1The tab shows the number of the entry.
- 2Entry No, assigned by MyCloudBook.
- 3Delete is now available.
- 4The tabs Related Documents, Attachments, and Notes can be used.
In the Journal, the entry appears with the type Journal Entry, its reference, and its amount. The expander shows its two posts.
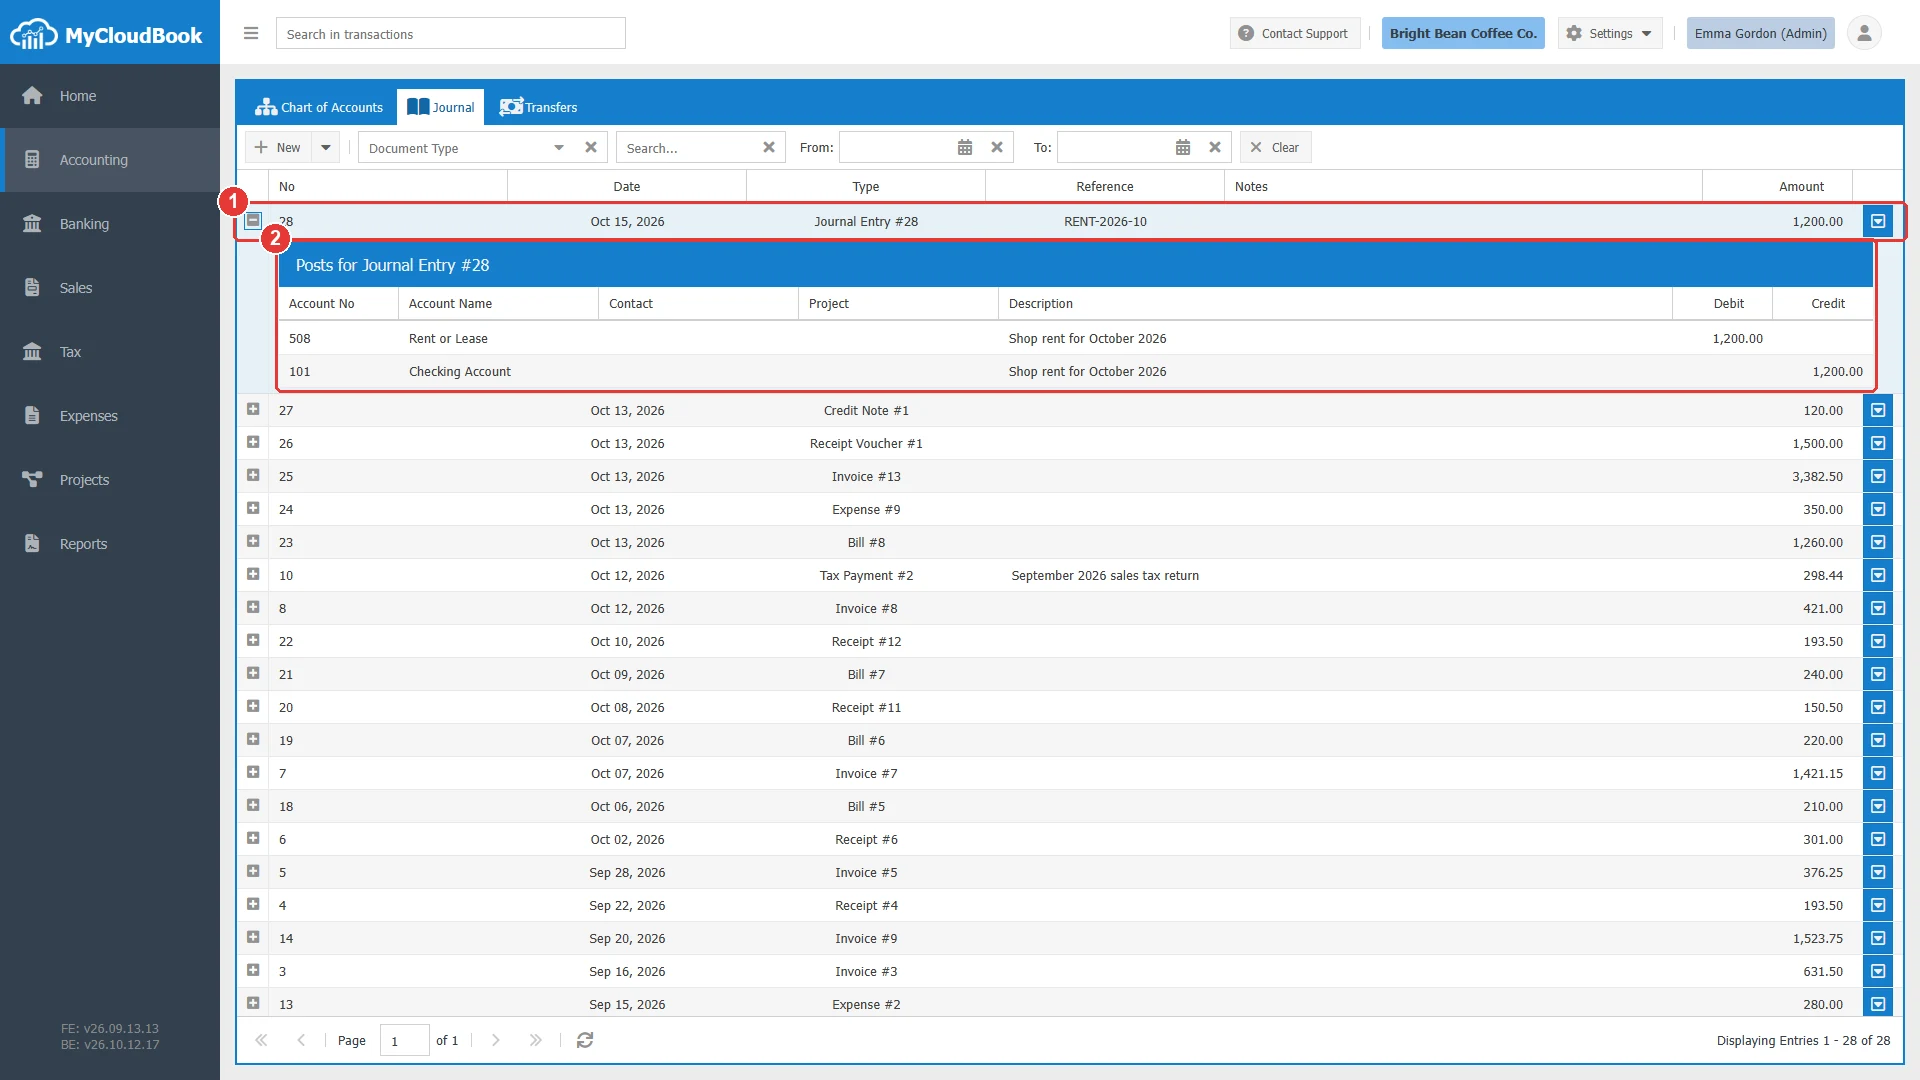
- 1The entry, with the type Journal Entry and the reference.
- 2Its two posts.
When the totals differ, the save is refused and the message 'Total Debit' & 'Total Credit' Must be Equal is shown, as the next figure shows.
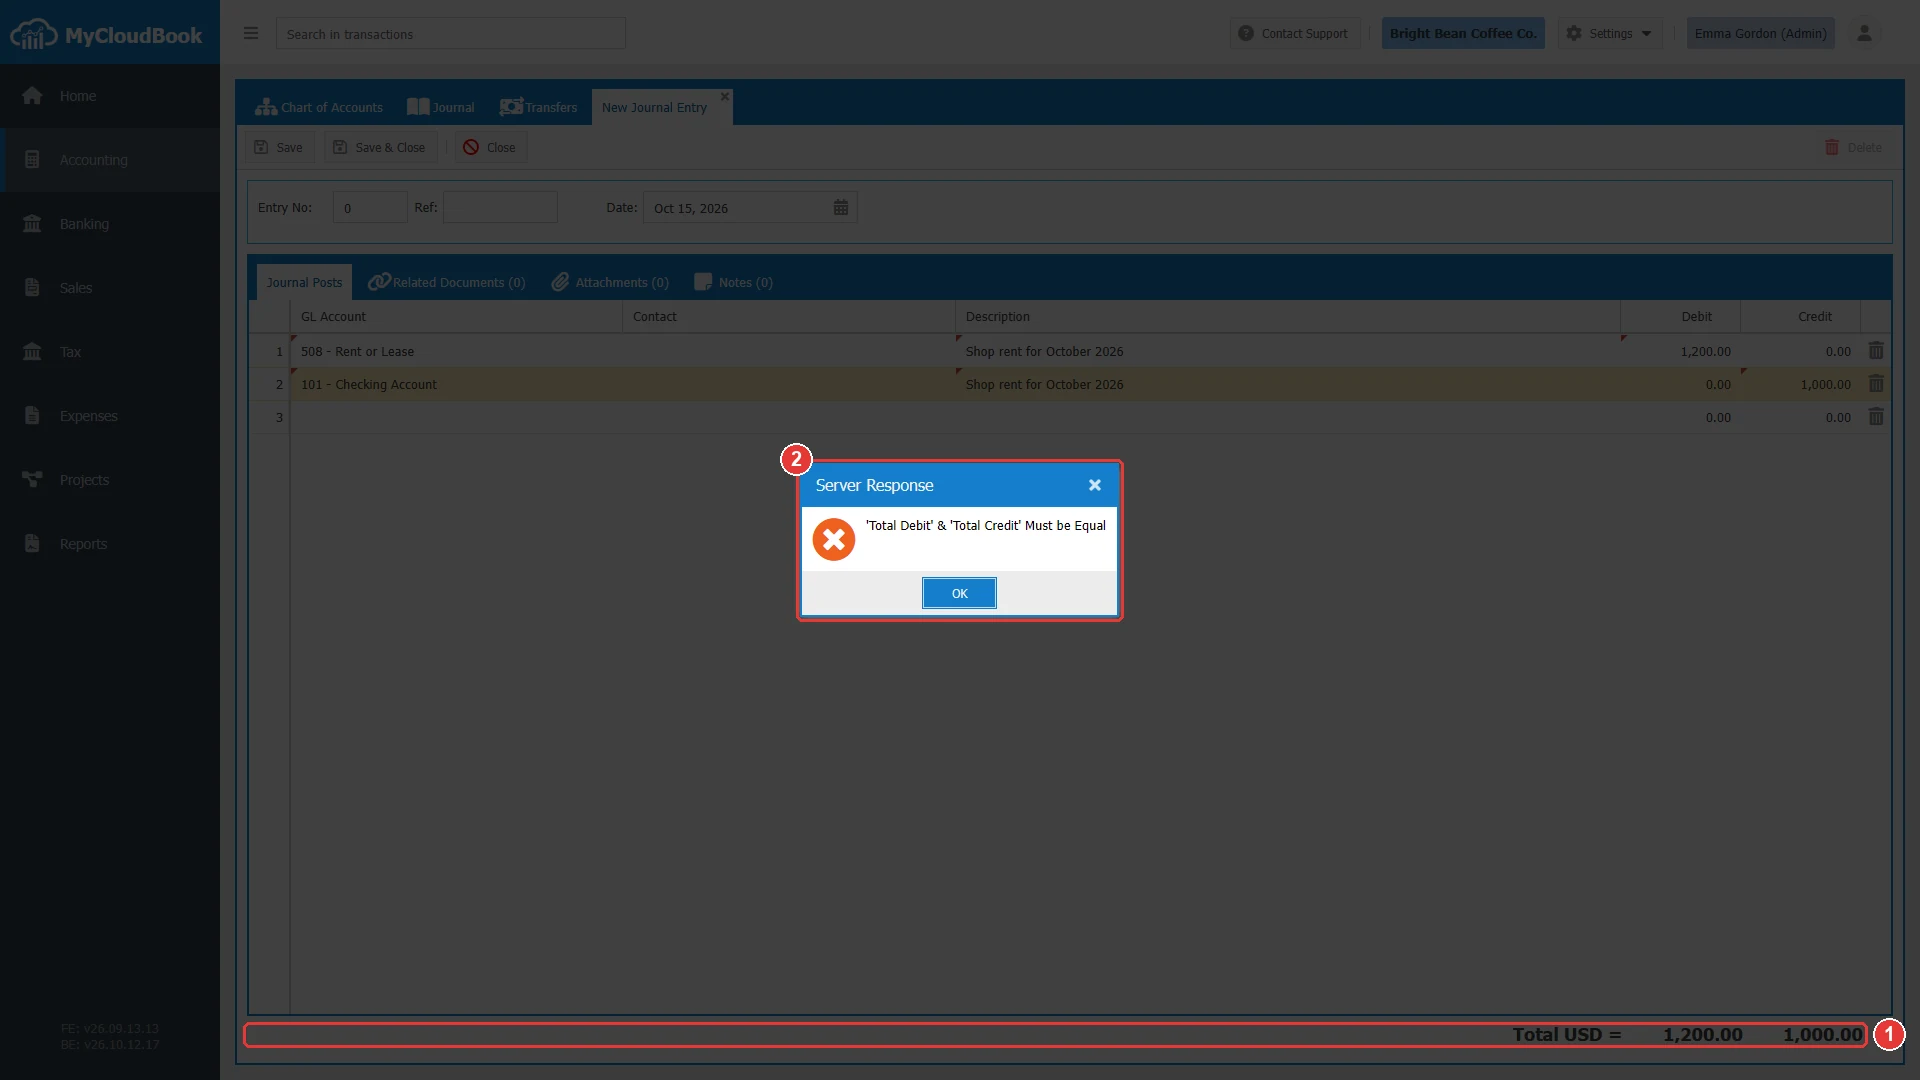
- 1The totals differ.
- 2The message from the server.
Lines with a contact
MyCloudBook keeps the balance of every customer and every supplier through the posts on the Accounts Receivable and Accounts Payable accounts. A manual line on one of these accounts must therefore name the contact.
| Account of the line | Contact |
|---|---|
| Accounts Receivable | A customer is required. The line changes the balance of that customer, for example an opening balance that the customer owes. |
| Accounts Payable | A supplier is required. The line changes the balance of that supplier. |
| Tax Payable | A tax item is required. Record tax payments and tax adjustments in Tax, Sales Tax Center. |
| Every other account | No contact is allowed. The save is refused with the message You can not add a contact in the line of the account 'X'. |
The Contact cell of a line opens the list of the customers and the suppliers of the company. The list shows the display name, the type, and the open balance of each contact. Select a customer for a receivable line and a supplier for a payable line.
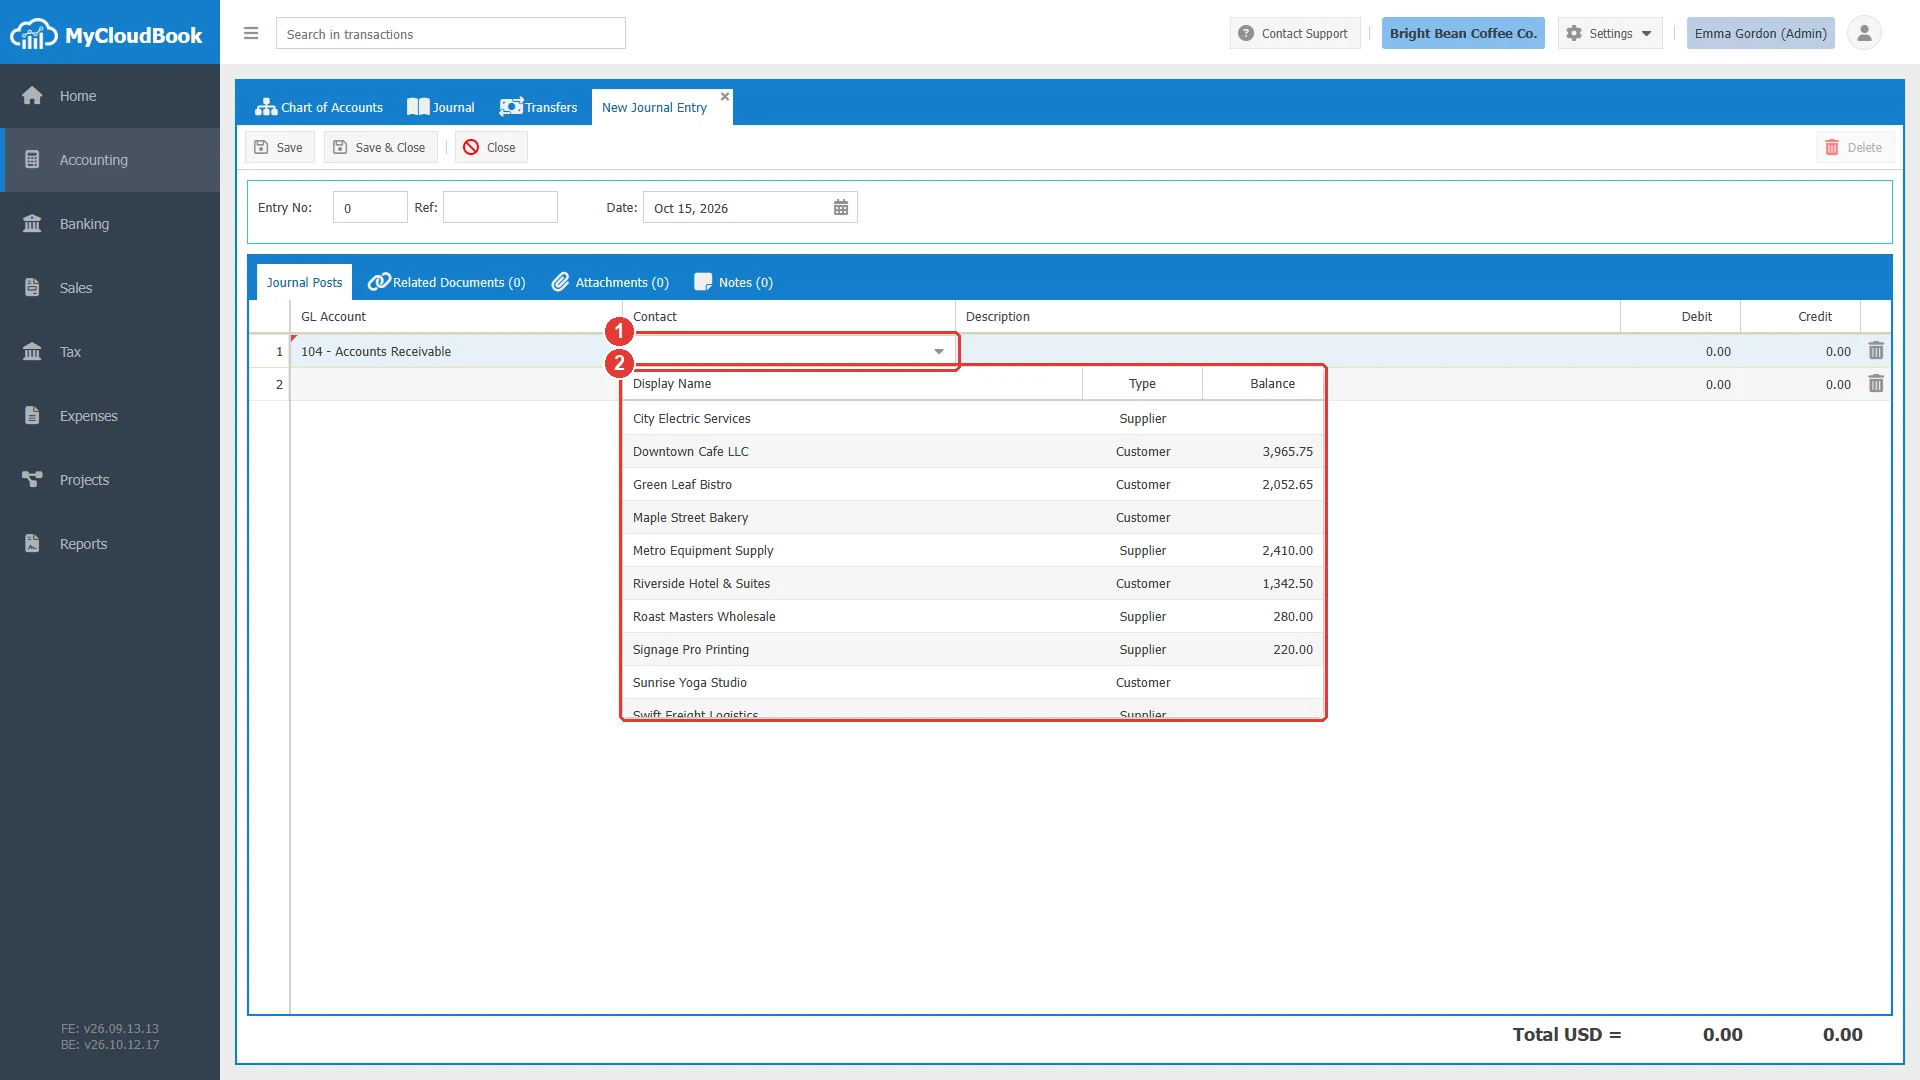
- 1The Contact cell of the line. A click opens the editor, and the arrow opens the list.
- 2The customers and the suppliers, with their type and their open balance. Typing a part of the name filters the list.
Importing an entry from a CSV file
A journal entry with many lines, for example the opening balances of every account or of every customer, can be imported from a CSV file. Each row of the file becomes one line of the entry.
- In the Journal, click the arrow of the New button and then New Journal Entry from CSV.
- Click Download Template and choose a template: Accounts Opening Balance, Customers Opening Balance, or Suppliers Opening Balance. Fill in the file in a spreadsheet program and save it as CSV.
- Select the Entry Date. In a multi-currency company, select the Currency and, for a foreign currency, type the rate.
- Choose the file in CSV File and click Upload. MyCloudBook checks the file, creates the entry, and shows it in the Journal.
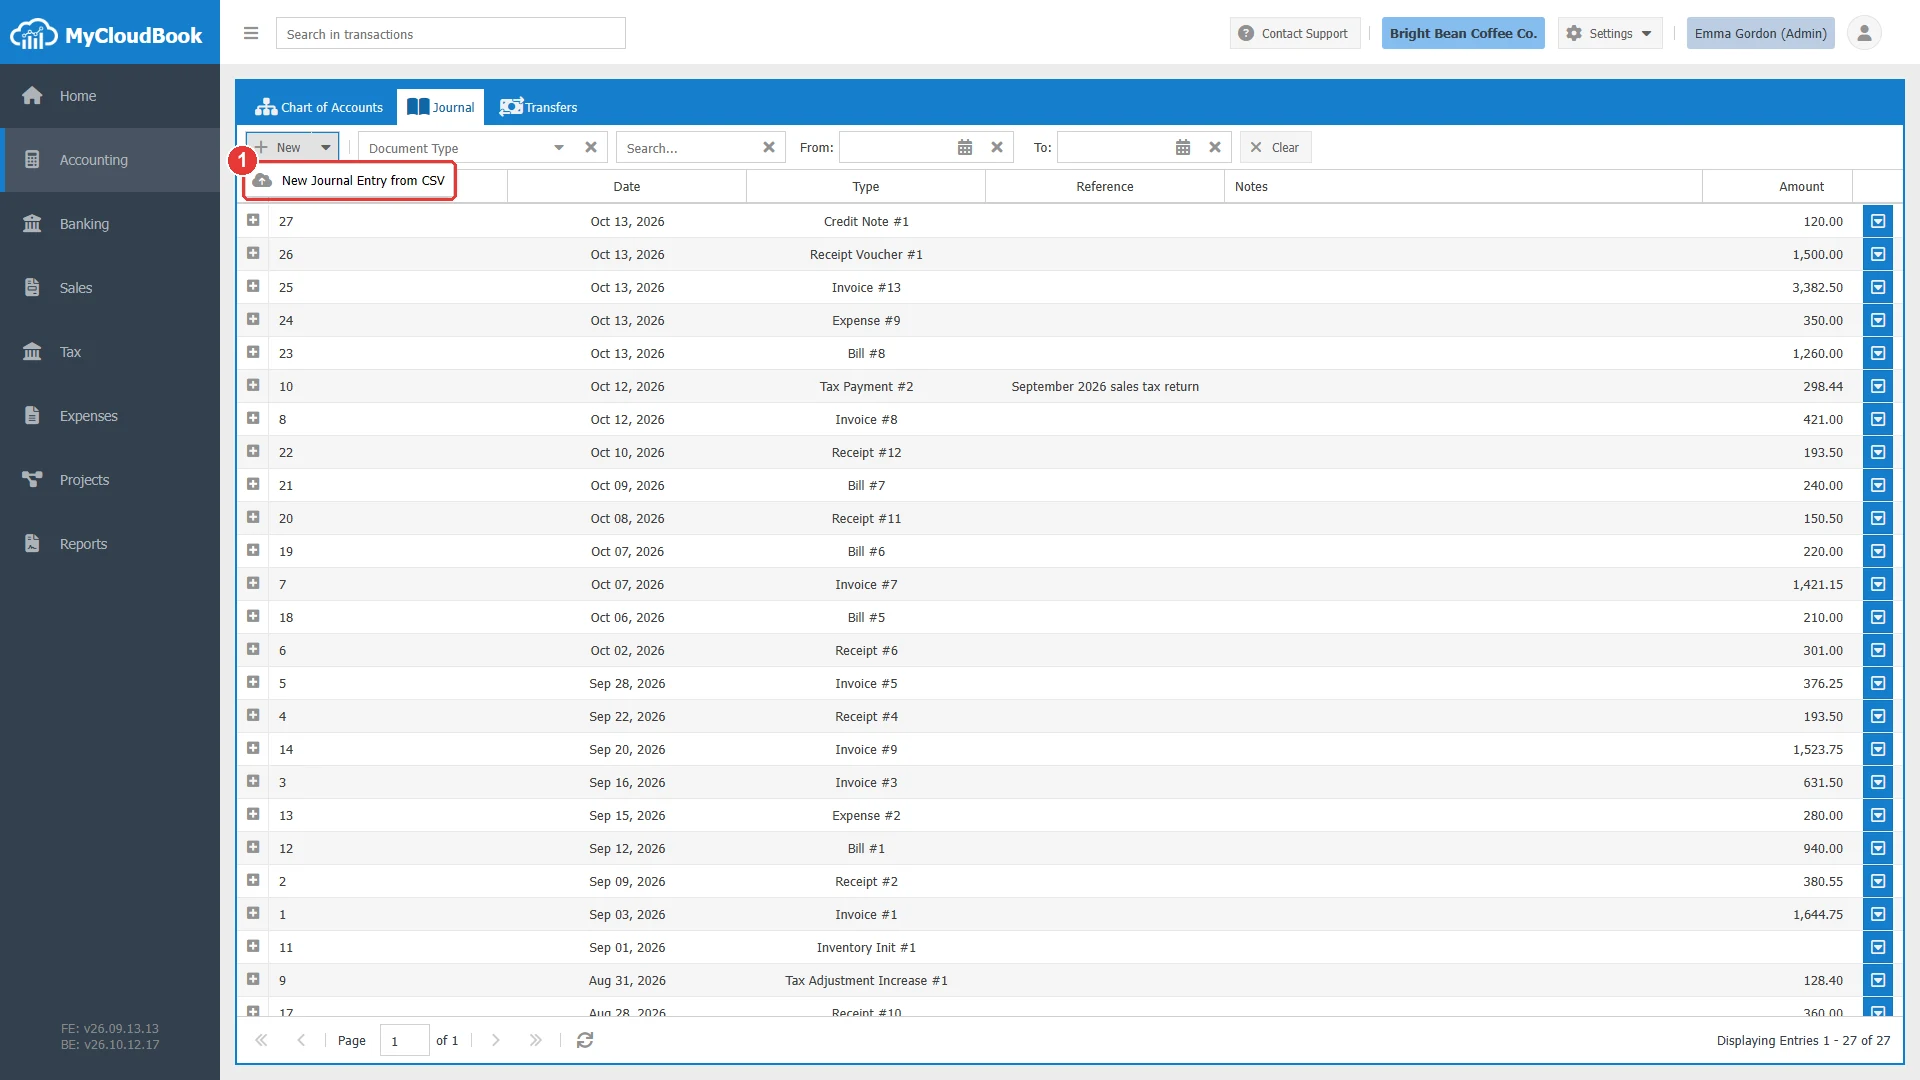
- 1New Journal Entry from CSV.
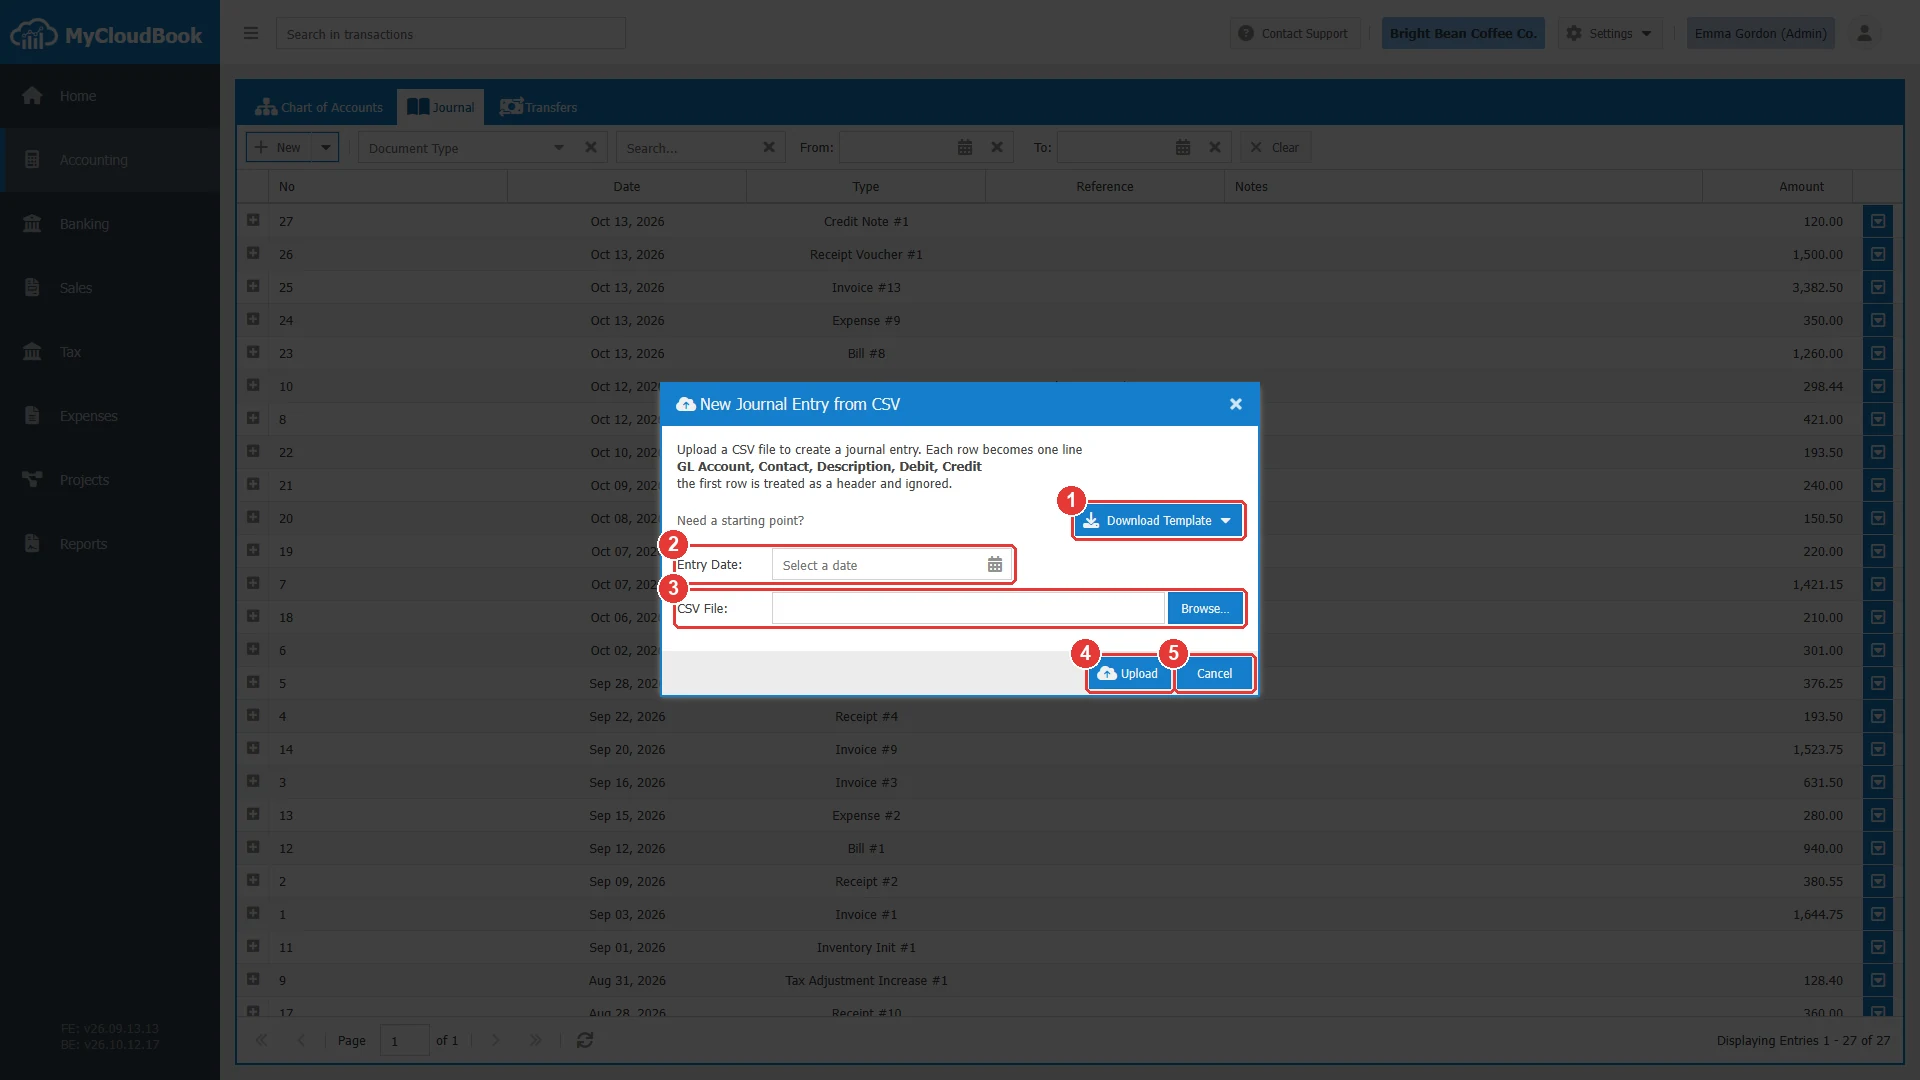
- 1Download Template. Opens the list of the three templates.
- 2Entry Date. Required. Every line of the entry uses this date.
- 3CSV File. Required. The file to import.
- 4Upload. Checks the file and creates the entry.
- 5Cancel. Closes the window.
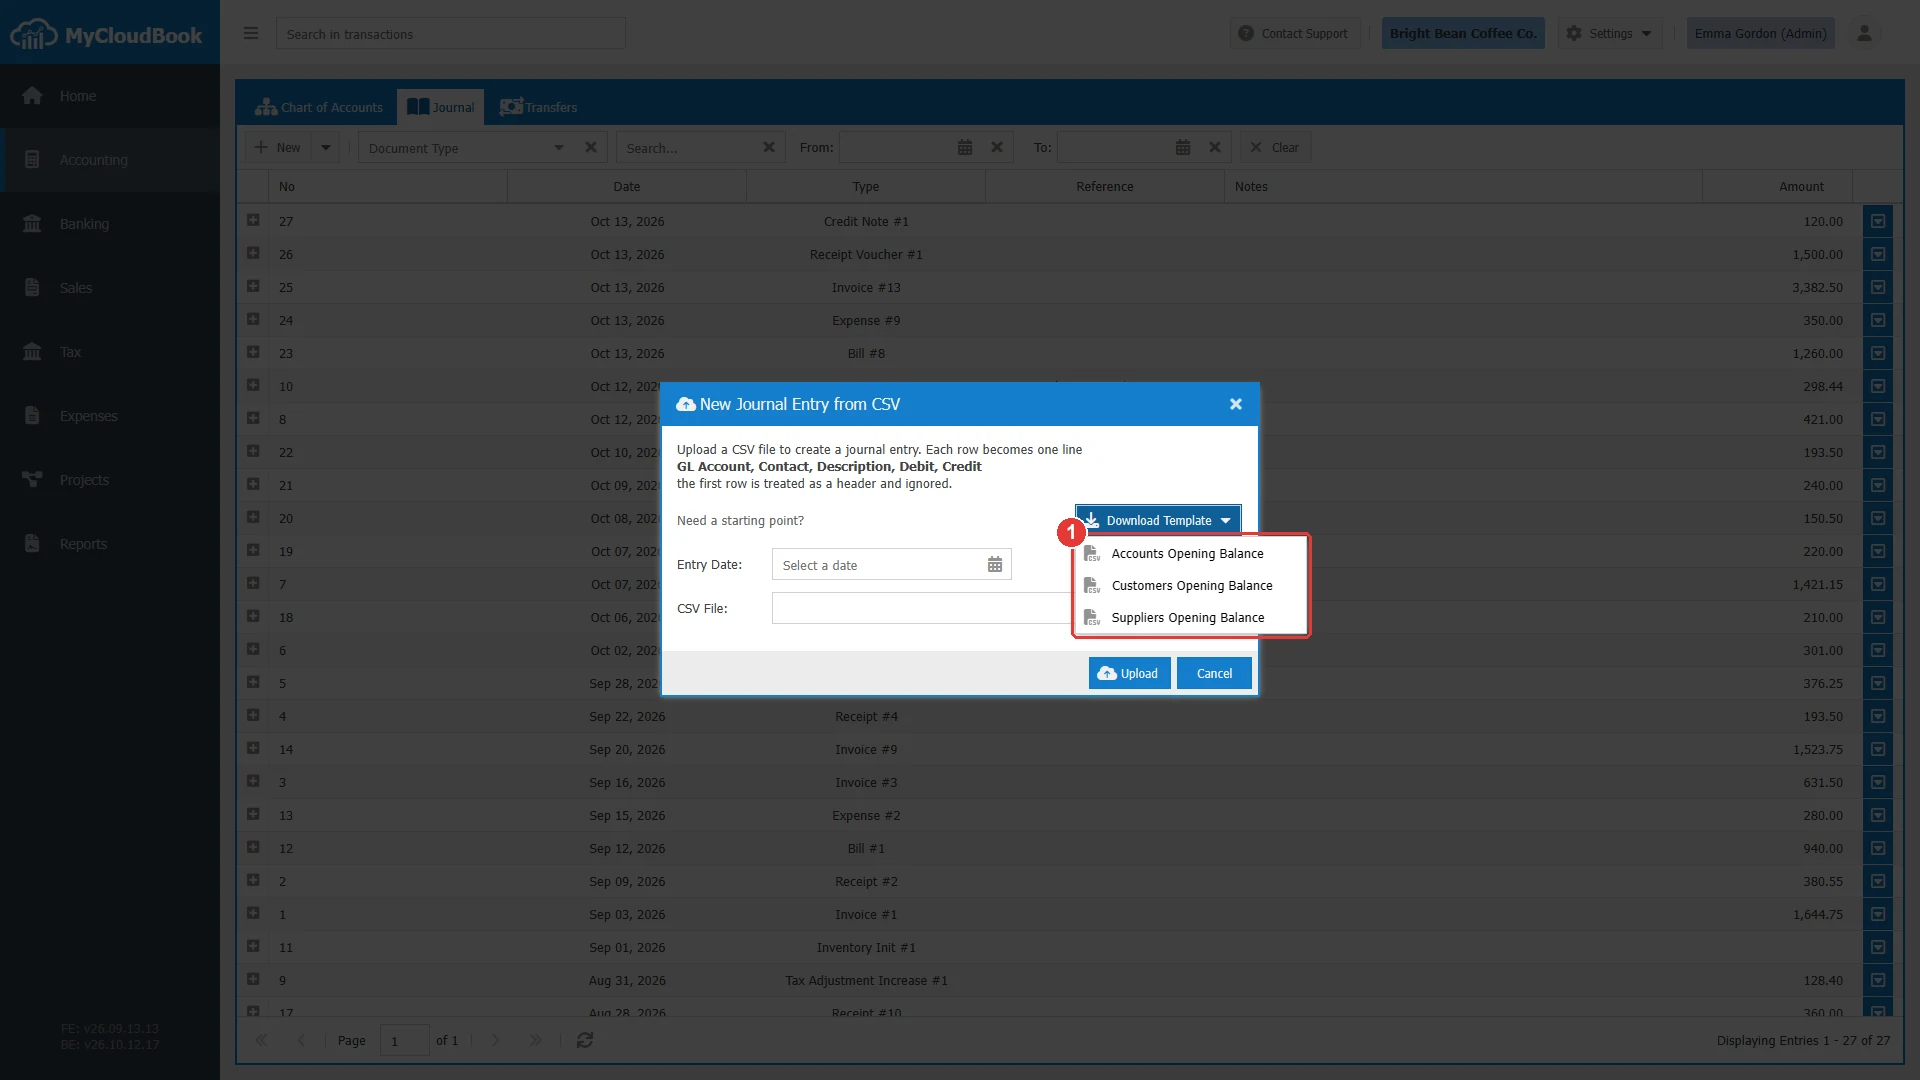
- 1The templates. Each one is a CSV file with the header row and example lines.
The file
The first row of the file is the header row and is ignored. Every other row holds five values, separated by commas: GL Account, Contact, Description, Debit, Credit. The rules of the entry window apply to the file as well.
| Column | Content |
|---|---|
| GL Account | The name of the account, exactly as it is written in the Chart of Accounts. The letter case is ignored. The name must belong to one account only. The column is required. |
| Contact | The name of the customer, for a line on Accounts Receivable, or of the supplier, for a line on Accounts Payable. Empty for every other account. |
| Description | The description of the line. |
| Debit, Credit | The amount of the line in one of the two columns. An empty value counts as zero. |
The templates place the Opening Balance Equity account in the first data line, because an opening balance entry uses it as the account on the other side. The value 0 marks the column that you fill in each line, and the other amount column stays empty. An opening balance entry uses the main currency only.
| Template | Lines of the file |
|---|---|
| Accounts Opening Balance | The equity account with 0 in the Credit column, then Account 1 and Account 2 with 0 in the Debit column. Replace the names with the names of your accounts and add one line per account. Put the balance of an asset account in the Debit column and the balance of a liability or equity account in the Credit column. The equity line takes the difference. |
| Customers Opening Balance | The equity account with 0 in the Credit column, then the Accounts Receivable account with Customer 1 and Customer 2 in the Contact column and 0 in the Debit column. Add one line per customer with the amount that the customer owes. The equity line takes the total in the Credit column. |
| Suppliers Opening Balance | The equity account with 0 in the Debit column, then the Accounts Payable account with Supplier 1 and Supplier 2 in the Contact column and 0 in the Credit column. Add one line per supplier with the amount that the company owes. The equity line takes the total in the Debit column. |
The checks and the result
MyCloudBook reads the file row by row and stops at the first problem. The message names the line of the file and the problem. The line numbers count the header row as line 1, so the first data row is line 2. Correct the file and upload it again.
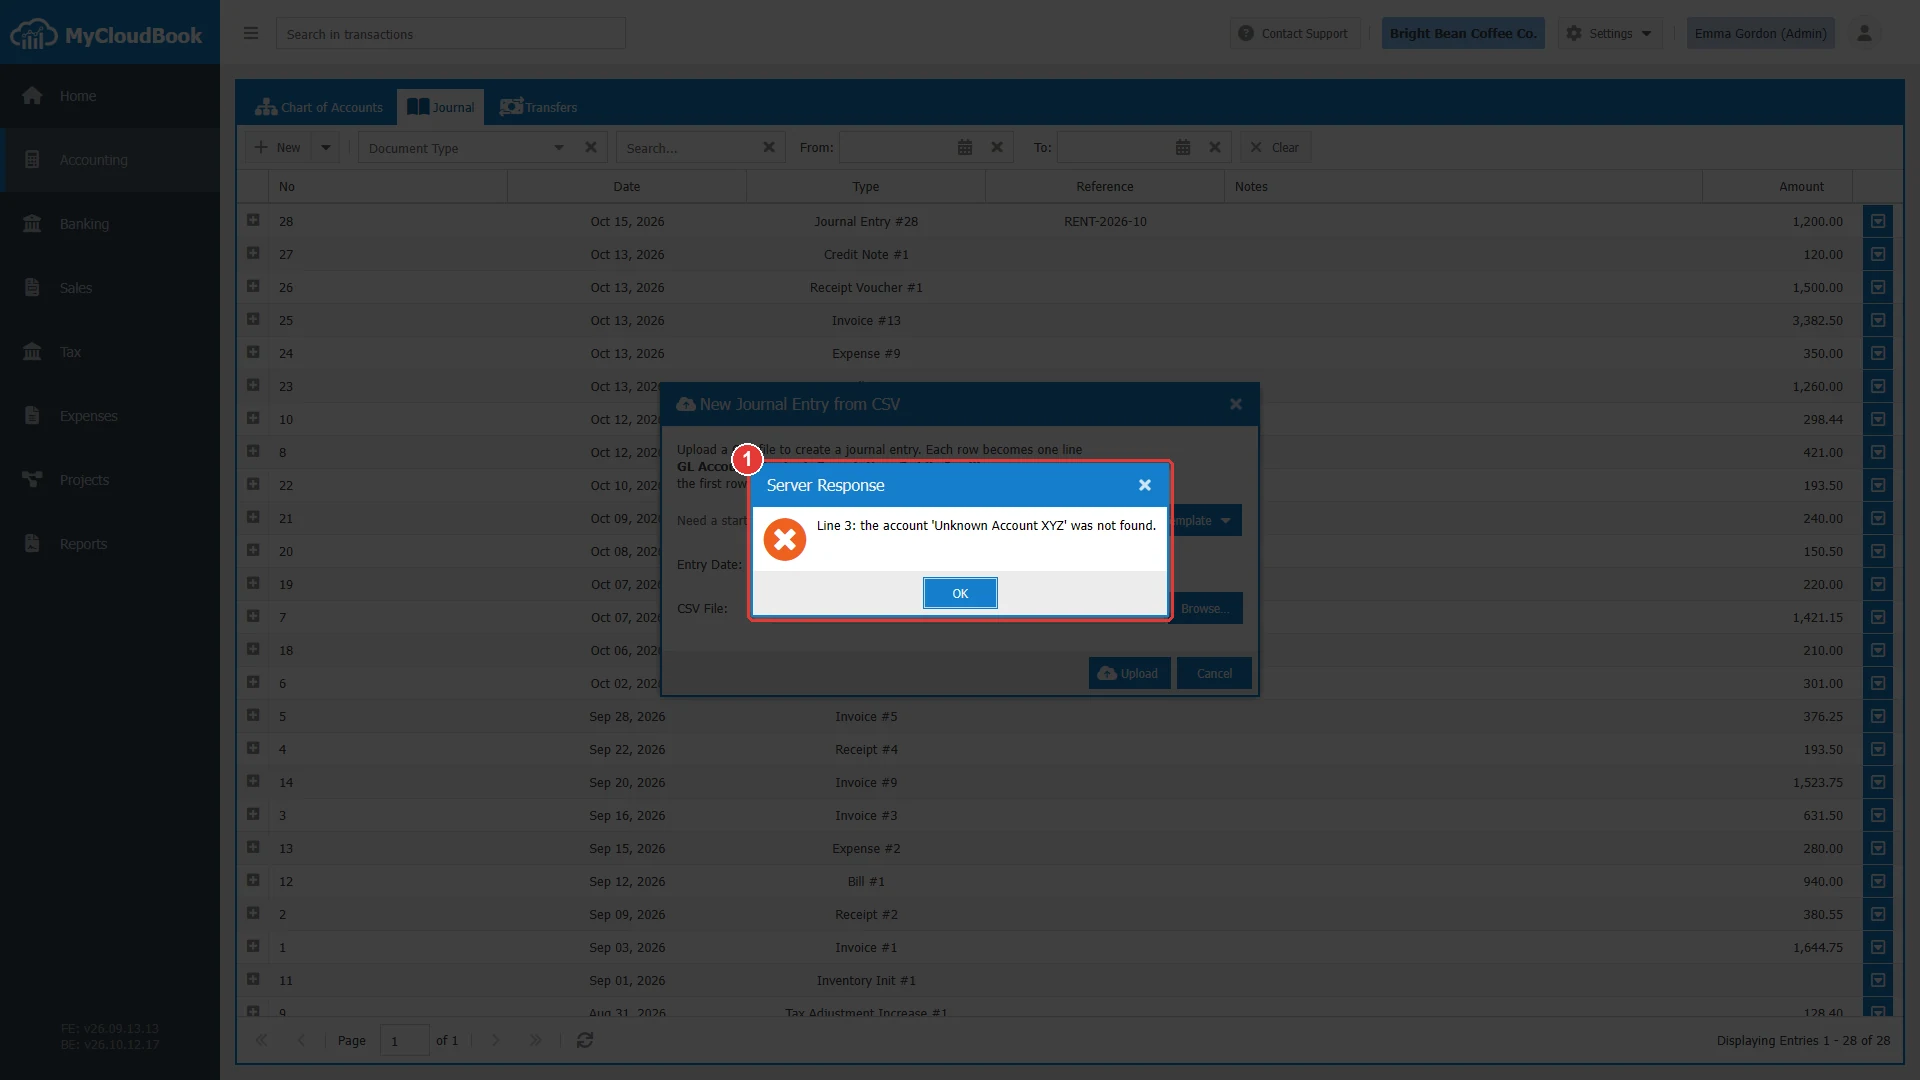
- 1The message names the line of the file and the problem.
When the file passes every check, the window closes and the entry appears in the Journal with the type Journal Entry and the Entry Date as its date. Each row of the file is one post. The entry has no reference, and it can be opened, changed, and deleted like any manual entry.
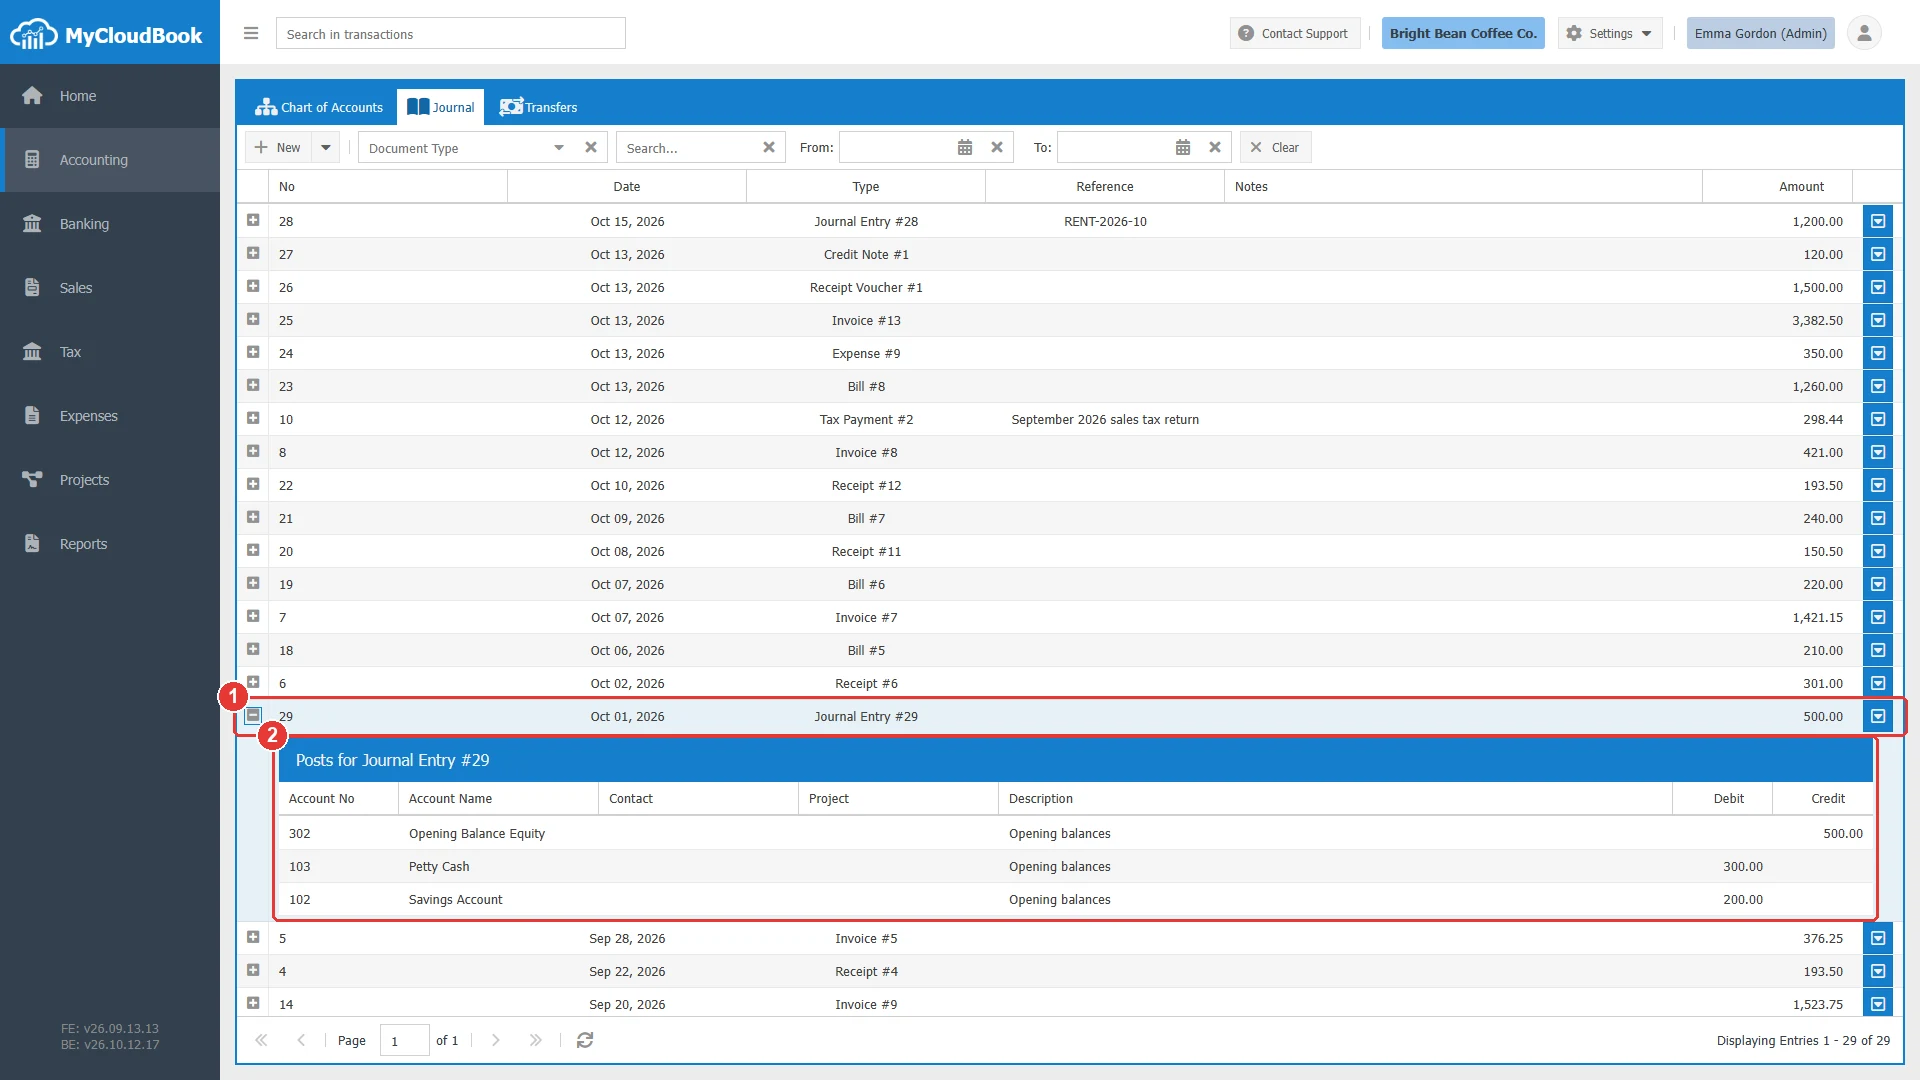
- 1The entry created from the file, dated with the Entry Date.
- 2One post per row of the file.
Deleting an entry
- In the Journal, click the row actions button of the entry and then Delete. The Delete button of the open entry does the same.
- A confirmation shows the number of the entry. Click Yes to delete it, or No to keep it.
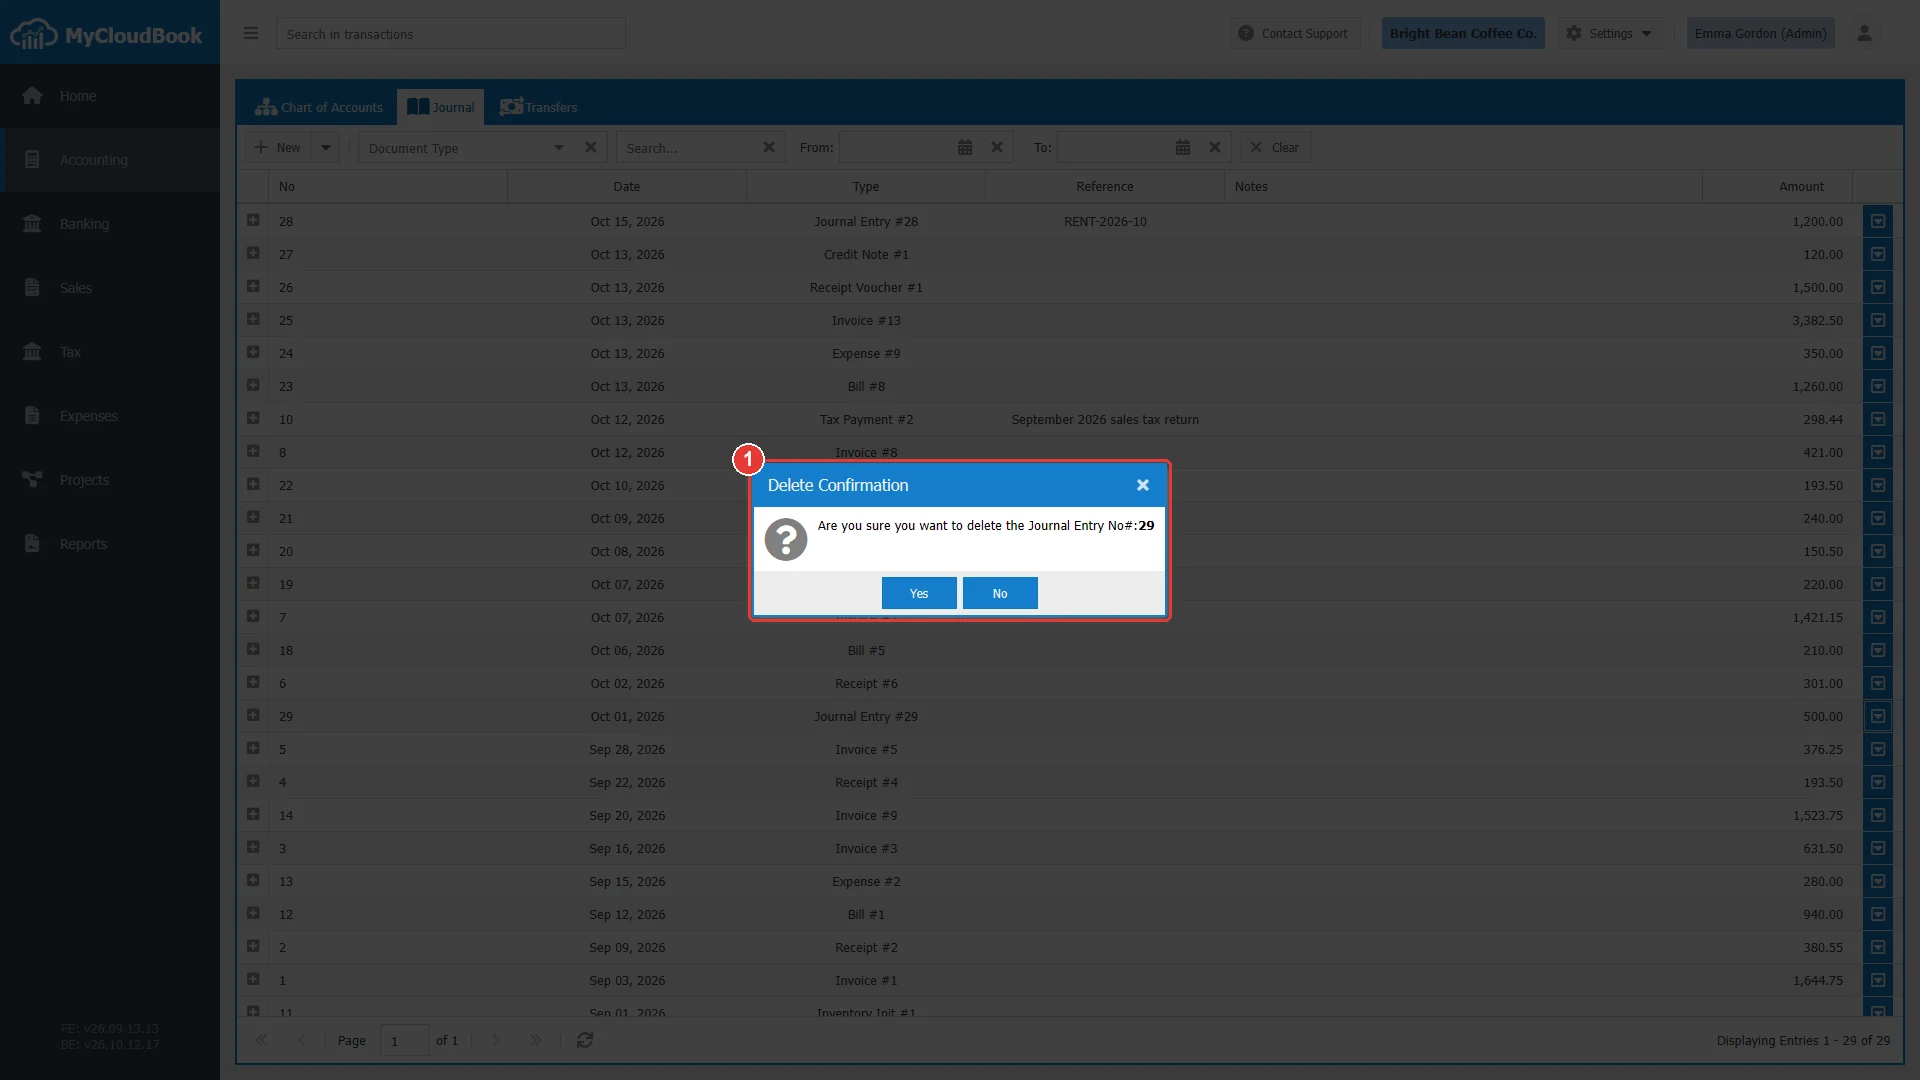
- 1The confirmation names the number of the entry. Yes deletes it, and No keeps it.
After Yes, the entry disappears from the Journal at once, and the balances of its accounts change.
The following rules apply:
- Only a manual journal entry can be deleted here. The entry of a document is deleted with the document. An attempt to delete it shows the message You Can not delete non General Journal Entry, as the last figure of this section shows.
- An entry whose post is reconciled with a bank transaction in the Banking module cannot be deleted. Unreconcile the bank transaction first.
- The deletion is permanent. The balances of the accounts of the entry change at once.
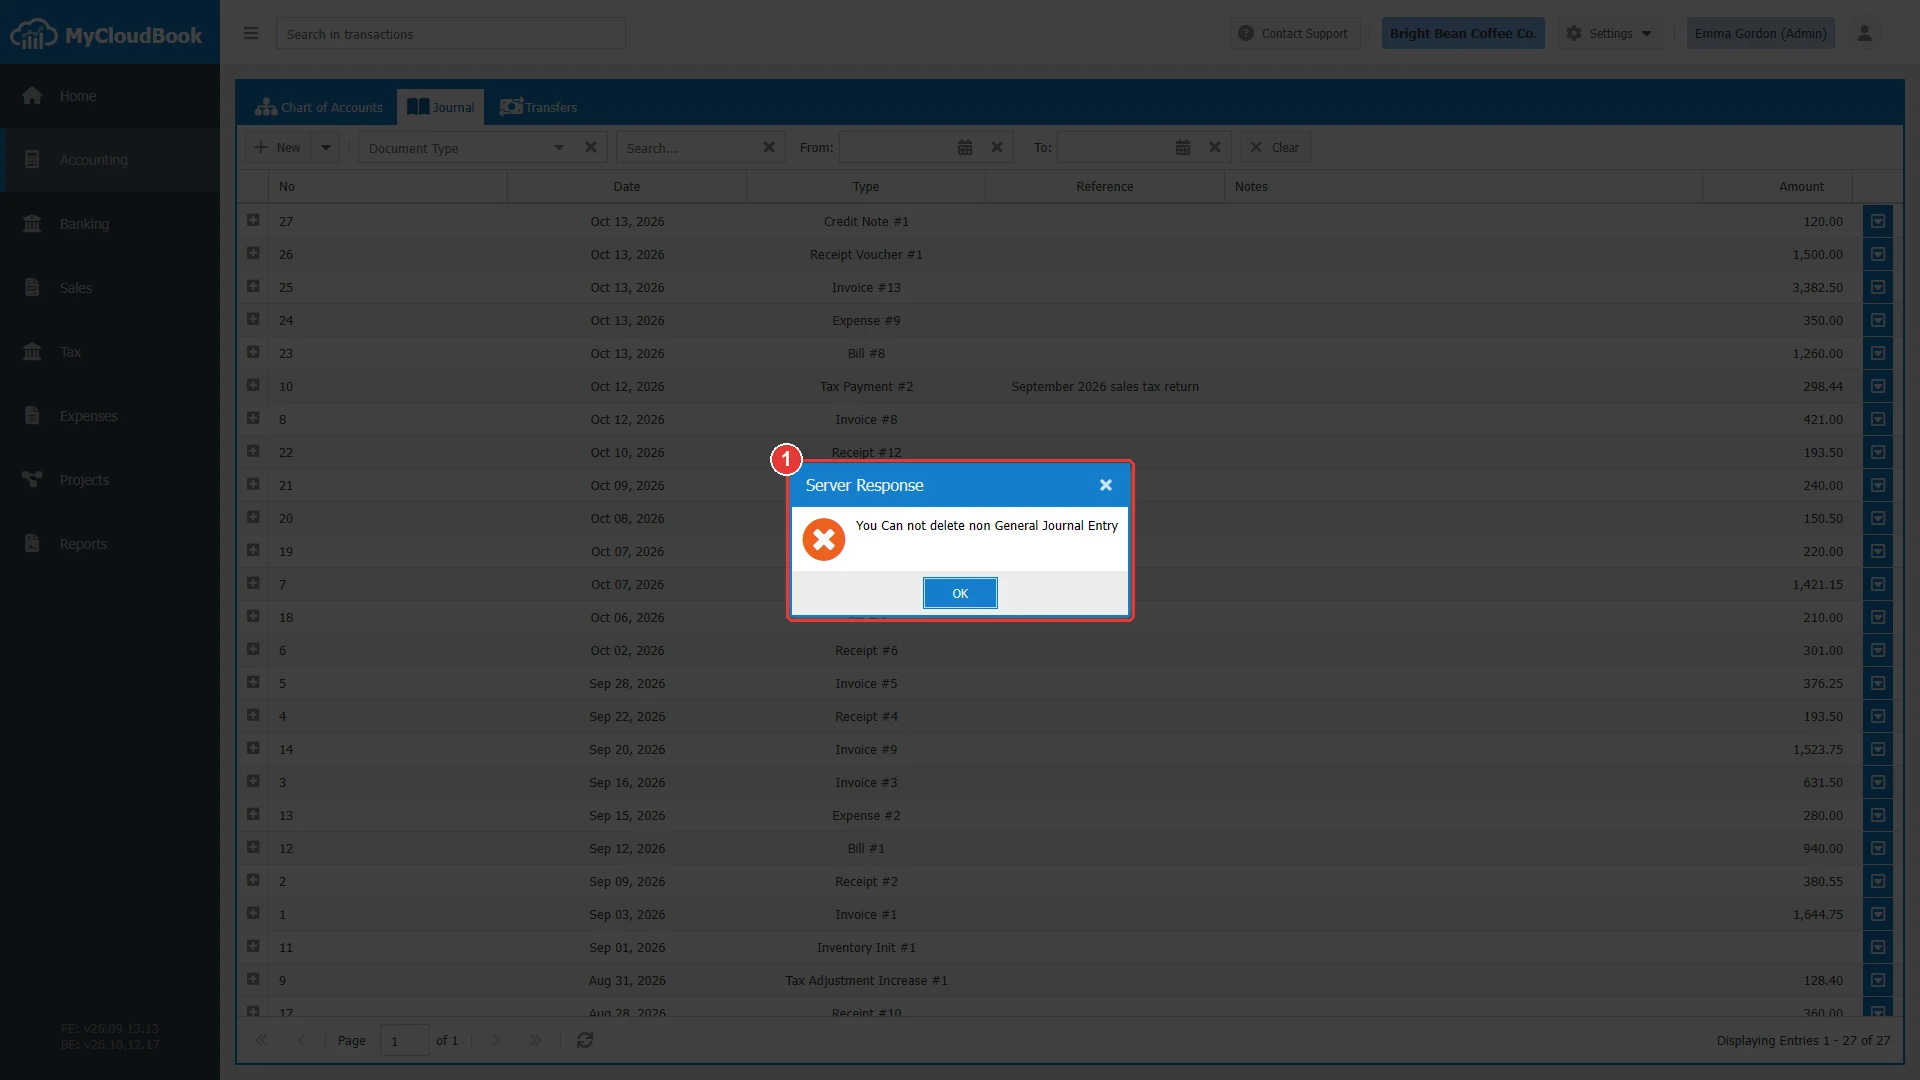
- 1The message from the server.
Multi-currency entries
When multi-currency is enabled in Settings, Preferences, the entry window shows the Currency field. The amounts of the lines are typed in that currency.
- When the currency is a foreign currency, a rate field appears next to it, and the rate can be changed for the entry.
- Every account of the entry must be in the main currency or in the currency of the entry. An account in a third currency is refused.
- Under the lines, a second total shows the amounts in the other currency: the foreign currency for an entry in the main currency, and the main currency for an entry in a foreign currency.
- When the posts of the entry do not balance exactly in the main currency because of the rate, MyCloudBook adds a post to the Exchange Gain or Loss account.
Messages and their meaning
Questions and answers
What is the Journal in MyCloudBook?
The Journal is the list of every journal entry of the company, in date order. Every document, such as an invoice, a bill, or a receipt voucher, creates one journal entry automatically. A manual journal entry records a transaction that no document covers, for example an opening balance, a depreciation, or a correction.
How do I create a manual journal entry?
Open Accounting, Journal, and click New. Keep the Entry No at 0 for an automatic number, set the date, add at least two lines with an account and an amount, make the total debit equal to the total credit, and click Save.
Why does MyCloudBook say that the total debit and the total credit must be equal?
MyCloudBook keeps double entry books. Every journal entry must balance: the sum of the debit amounts of its lines must equal the sum of the credit amounts. Correct the amounts until the two totals under the lines are equal.
Can I edit or delete the journal entry of an invoice from the Journal?
No. The journal entry of a document is managed through the document. Edit opens the document itself, and Delete is refused. Change or delete the invoice, the bill, or the other document instead, and MyCloudBook updates its journal entry.
When does a line of a journal entry need a contact?
A line on the Accounts Receivable account needs a customer, and a line on the Accounts Payable account needs a supplier. A line on any other account must not carry a contact. Tax amounts are recorded in the Sales Tax Center.
How do I import a journal entry from a CSV file?
Click the arrow of the New button and then New Journal Entry from CSV. Download a template, fill in the account names and the amounts, set the entry date, choose the file, and click Upload.