Estimates
This guide explains estimates in MyCloudBook: creating and sending an estimate, the answer of the customer on the customer page, the statuses and their history, and the conversion of an estimate into an invoice or a receipt.
Overview
An estimate is a price offer to a customer before the sale: the products or the services, the quantities, the prices, the taxes, and the last day of the offer. The customer can accept or decline the estimate on a web page that MyCloudBook sends by email. When the customer agrees, an invoice or a receipt is created from the estimate with one click.
An estimate has no accounting effect: it creates no journal entry, no inventory movement, and no balance for the customer. Estimates have their own number sequence, separate from the invoices.
Estimates are listed in the Invoices & Receipts tab of the Sales page, and they use the same screen as an invoice. This guide describes what is different. The Invoices and Receipts guide describes the shared parts: the lines, the taxes, the discounts, the totals, printing, and email.
How to open the screen
- In the left navigation, click Sales, then the Invoices & Receipts tab.
- To see the estimates only, set the Document Type filter to Estimate.
- To create an estimate, click New and then New Estimate.
The estimate screen
The estimate screen is the invoice screen with these differences:
- The number field is Estimate No. Estimates have their own sequence.
- The date field is Expire Date, the last day of the offer. It is optional and has no default value.
- The large figure is labelled AMOUNT, and the status of the estimate appears under it.
- There is no Save as Draft, no Receive Payment, no Payments tab, and no Credit Notes tab.
- A Status tab shows the history of the status.
- After the save, the button Create Invoice appears, with Create Receipt in its menu.
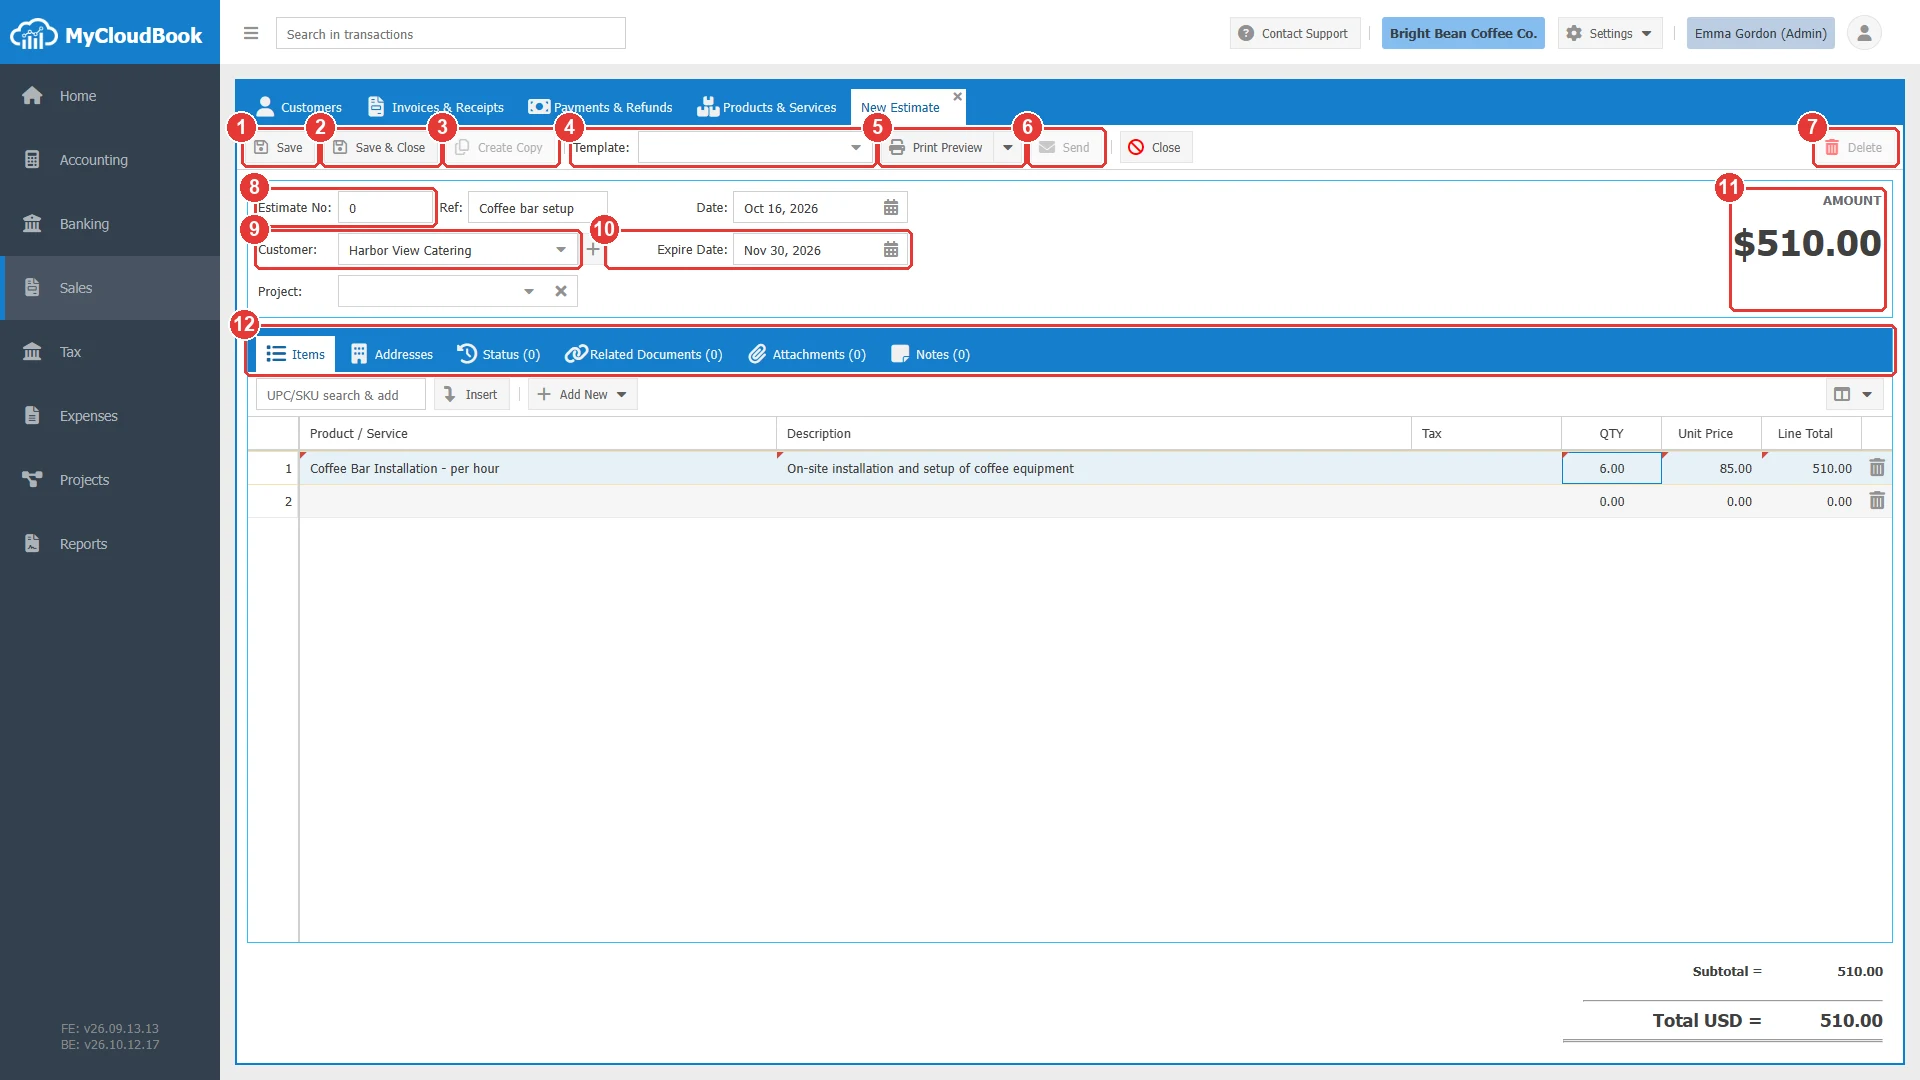
- 1Save. There is no draft for an estimate.
- 2Save & Close.
- 3Create Copy. Available after the save.
- 4Template. The estimate templates only.
- 5Print Preview.
- 6Send. Sends the estimate with the link of the customer page. Available after the save.
- 7Delete. Available after the save.
- 8Estimate No. 0 means the next number of the estimate sequence.
- 9Customer. Required.
- 10Expire Date. The last day of the offer. Optional.
- 11The amount of the estimate and, after the save, its status.
- 12The tabs, with the Status tab.
The fields
| Field | Required | Purpose and rules |
|---|---|---|
| Estimate No | Required | Keep 0 for the next number of the estimate sequence. A typed number must not be used by another estimate. |
| Ref | Optional | A free reference, for example the subject of the offer. |
| Date | Required | The date of the estimate. It starts with today. |
| Customer | Required | The customer who receives the offer. |
| Expire Date | Optional | The last day on which the customer can accept or decline the estimate on the customer page. After this day the page refuses the answer. The date does not change the status of the estimate. |
| Project | Optional | Shown when projects are enabled. |
| Lines | Required | At least one line, as on an invoice. See the fields of an invoice. |
Statuses
A new estimate starts with the status Pending. The status changes when the customer answers on the customer page, or when a user clicks Change Status in the Status tab. Every change is kept in the history.
| Status | Meaning and what it allows |
|---|---|
| Pending | The first status after the save, and the only status in which the estimate can be changed. The customer can accept or decline it. |
| Accepted | The customer agreed, on the customer page or by another way that the company records. The estimate cannot be changed. |
| Declined | The customer refused. On the customer page a reason is required. The estimate cannot be changed. |
| Canceled | The company withdrew the offer. Only a user can set this status. The estimate cannot be changed. |
An estimate that is not Pending cannot be saved. To change it, set the status back to Pending first. A closed estimate can still be printed, sent, copied, and deleted. An invoice or a receipt can be created from an accepted estimate.
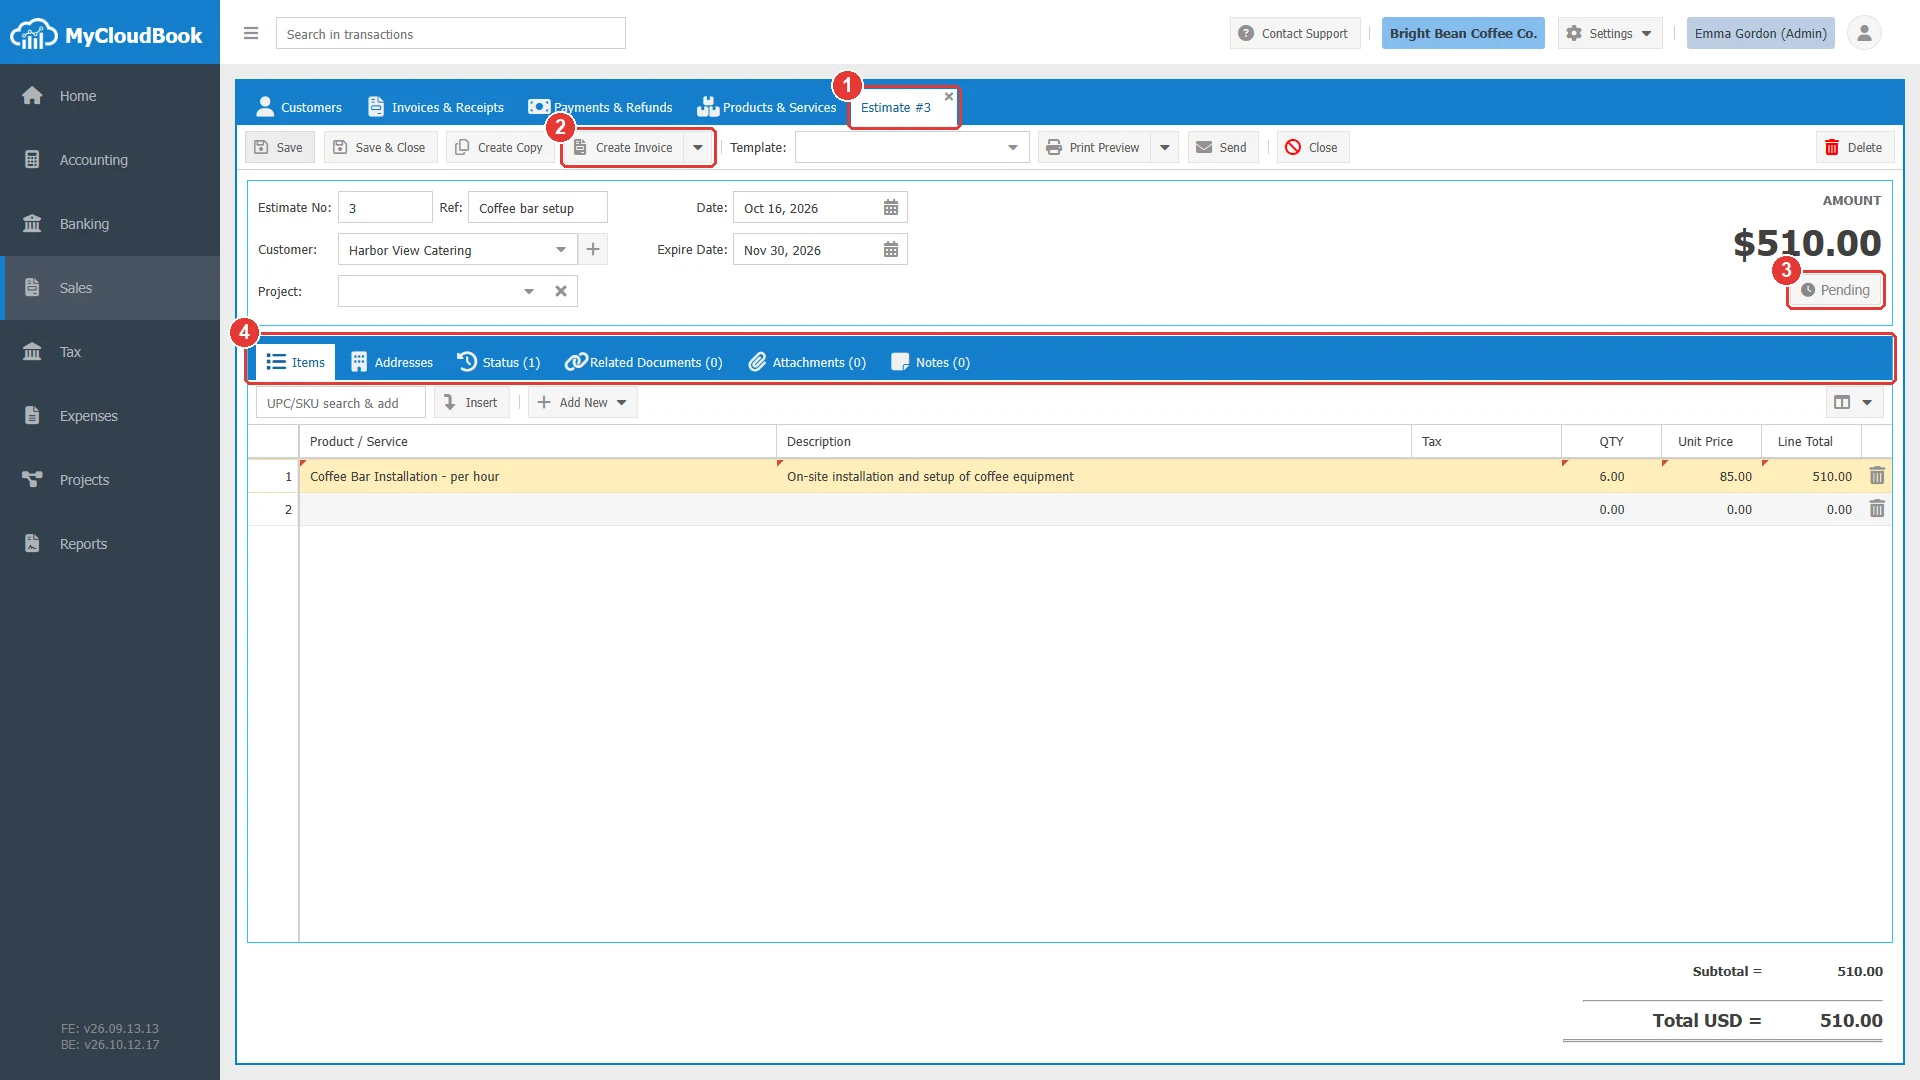
- 1The tab shows the number of the estimate.
- 2Create Invoice, with Create Receipt in its menu.
- 3The status Pending.
- 4The Status tab.
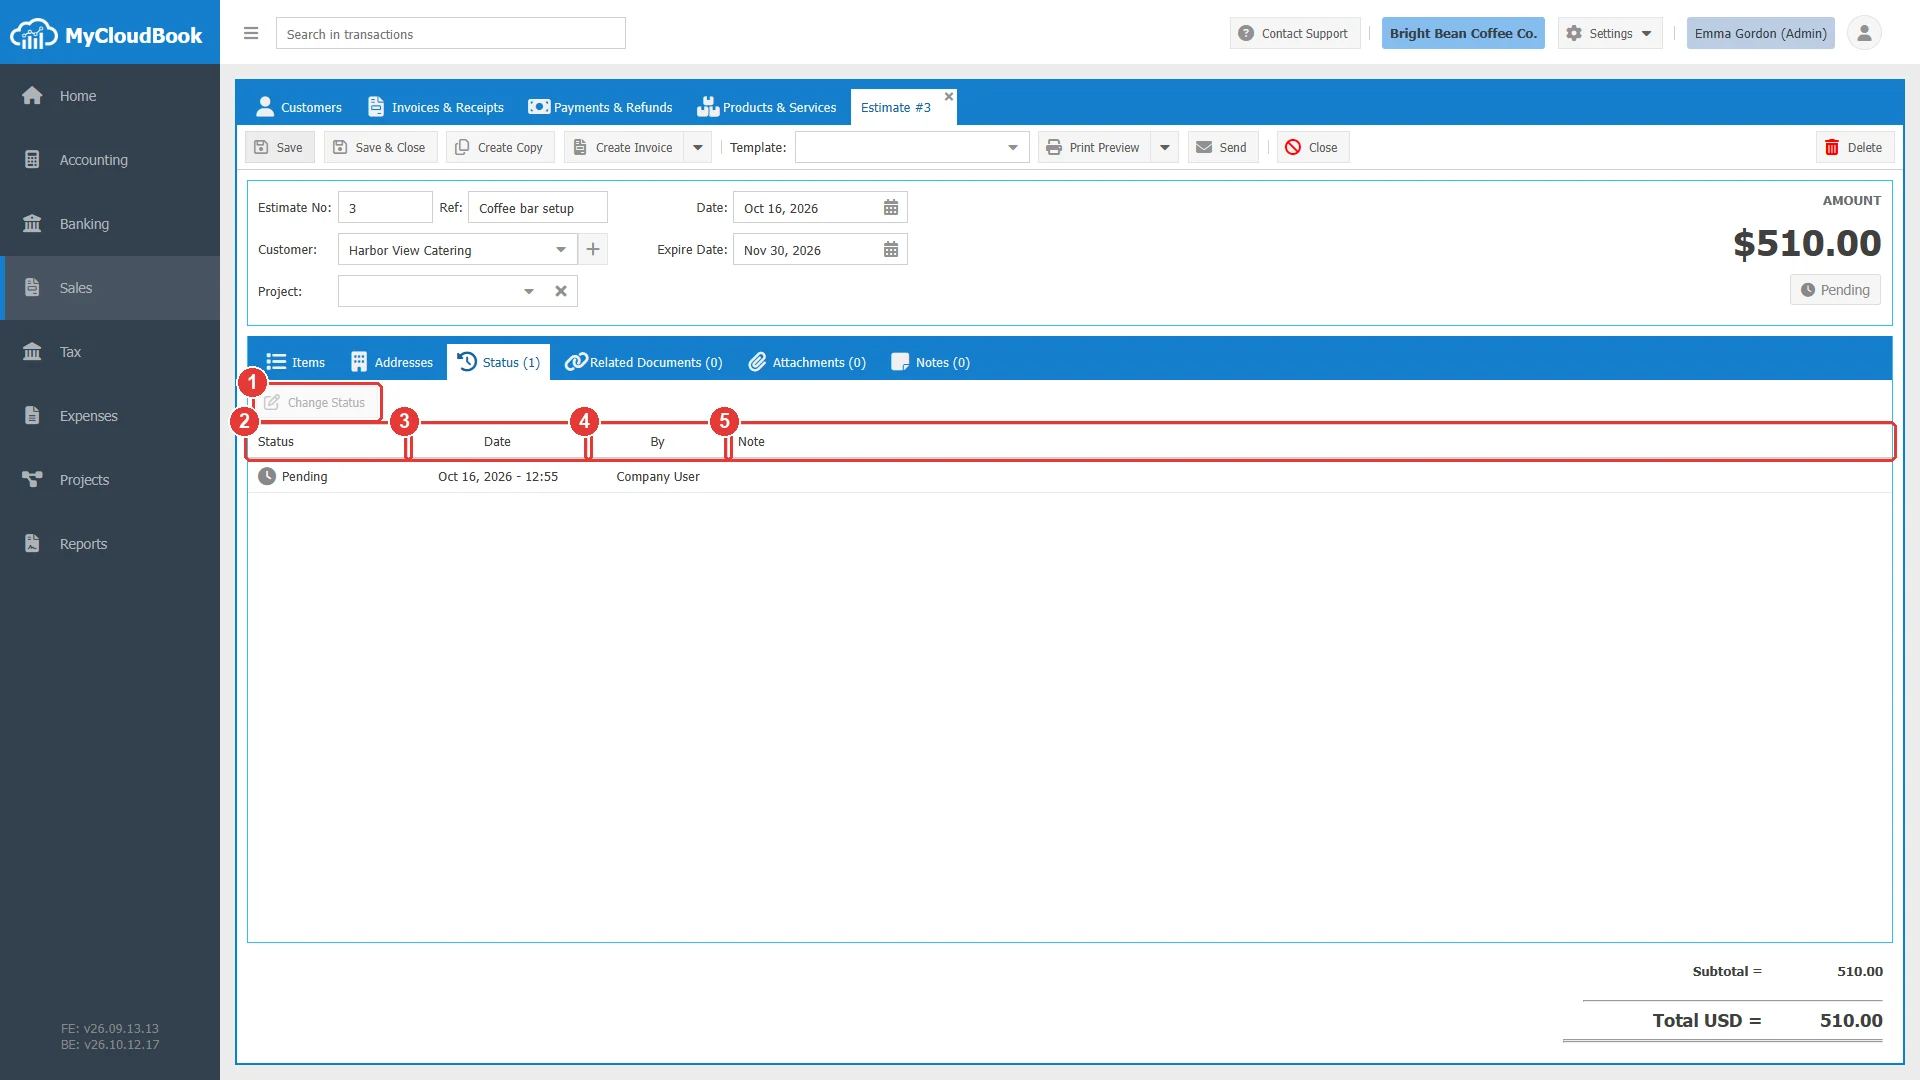
- 1Change Status.
- 2Status.
- 3Date. The date and the time of the change.
- 4By. Company User for a change by a user, Customer for an answer on the customer page.
- 5Note. The note of the change, or the reason of a decline.
The answer of the customer
Send emails the estimate to the customer. The message holds a link to a secure page where the customer sees the estimate, its amounts, its expiry date, and its status, and can download it. While the estimate is Pending, the page shows two buttons:
- Accept Estimate records the acceptance at once.
- Decline Estimate asks for a reason (up to 1000 characters) and then records the decline.
The answer is accepted only once and only until the Expire Date. After the expiry date the page shows The estimate #N expired on DATE. Please ask for a new estimate.
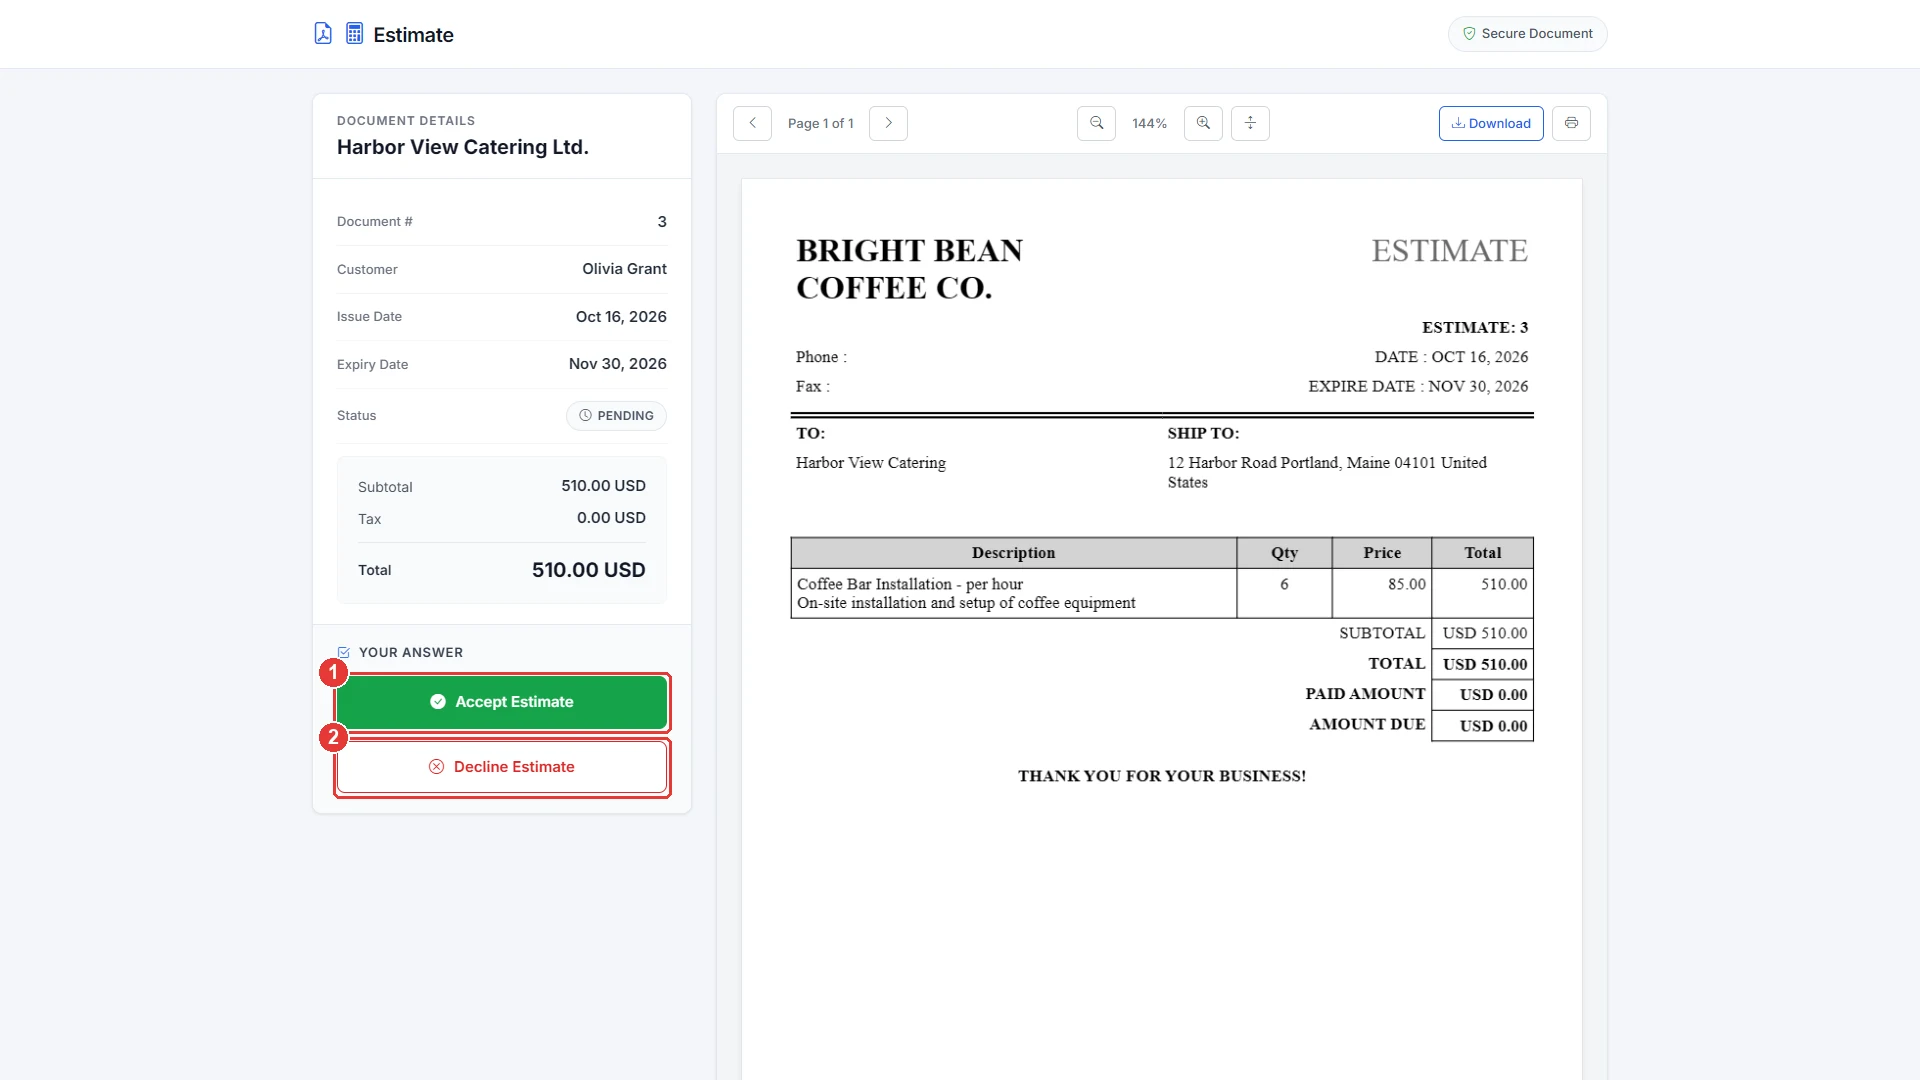
- 1Accept Estimate.
- 2Decline Estimate. The customer must give a reason.
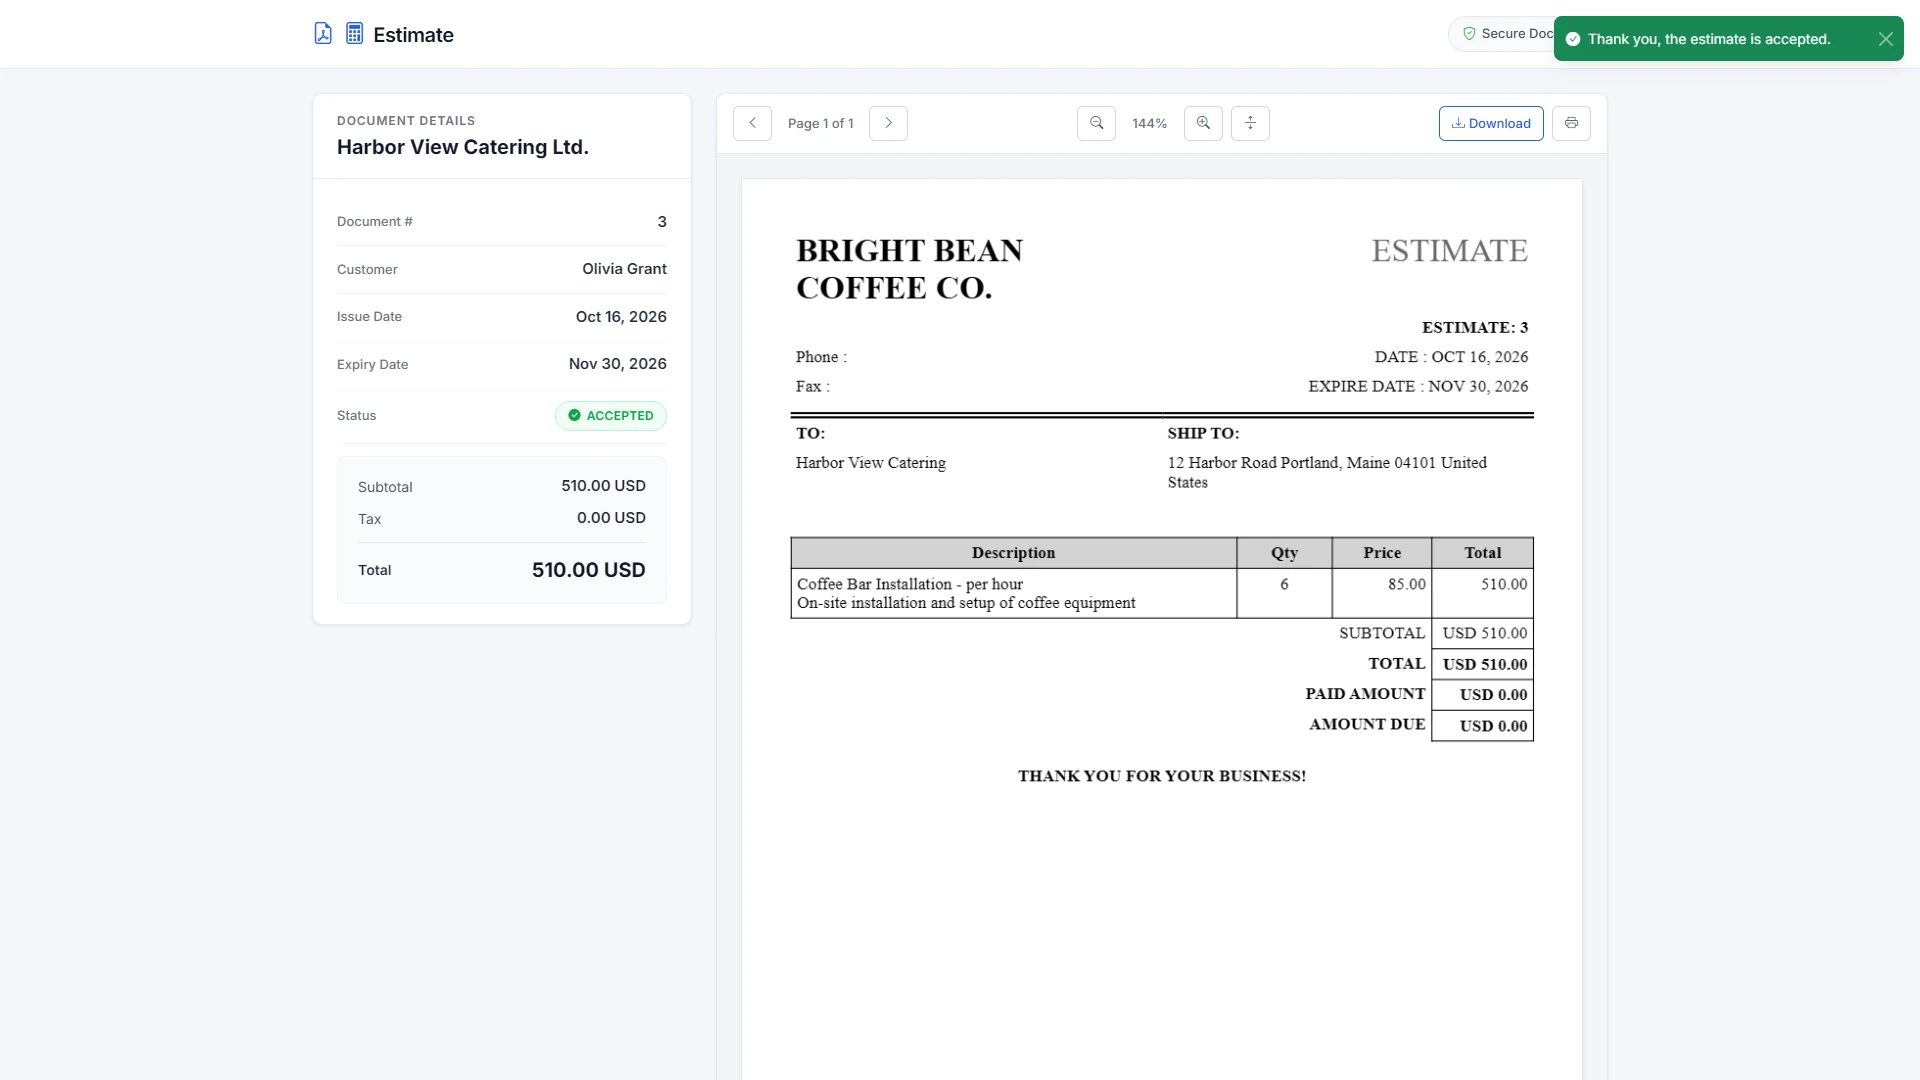
In MyCloudBook the estimate then shows Accepted, and the history names the customer as the author of the answer.
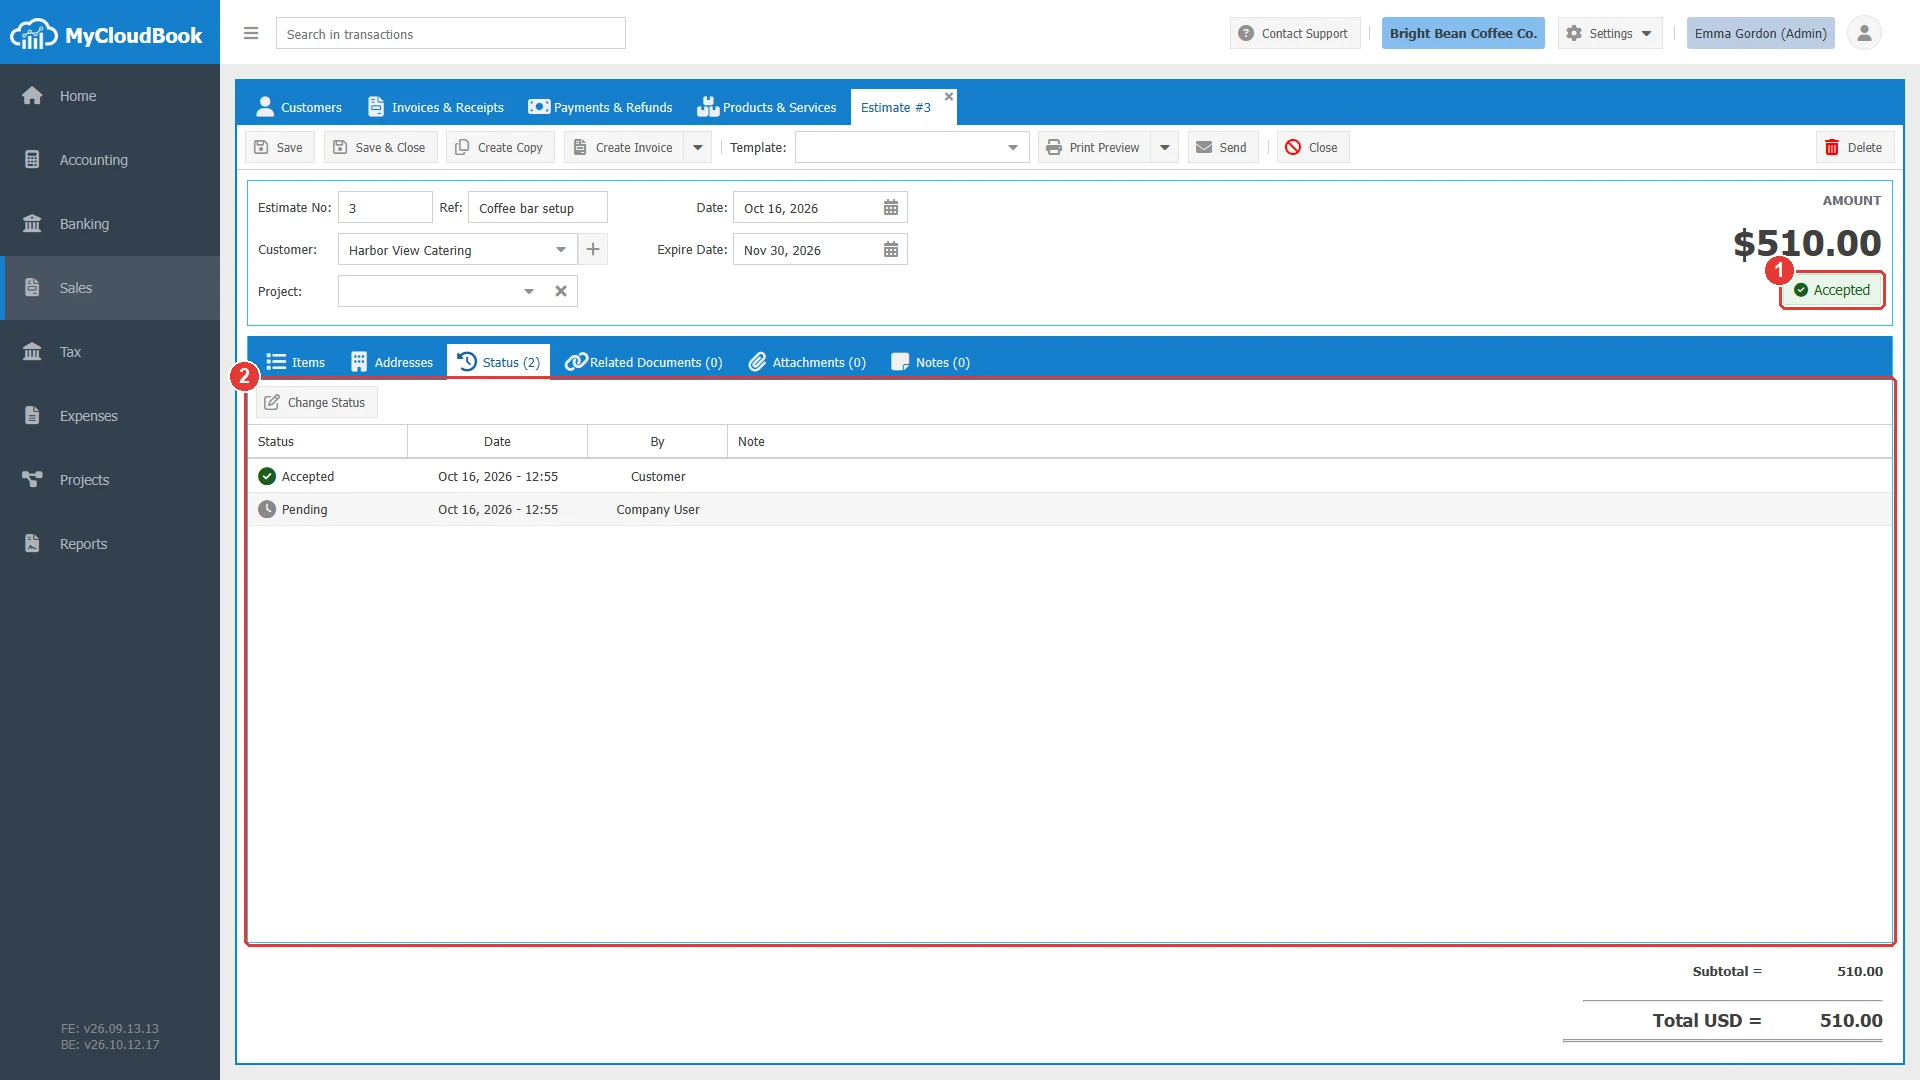
- 1The status Accepted.
- 2The history: Pending by the company, Accepted by the customer.
Changing the status
- Open the estimate and click the Status tab.
- Click Change Status. The window offers the statuses other than the current one.
- Select the new status, type a note if needed, and click Save.
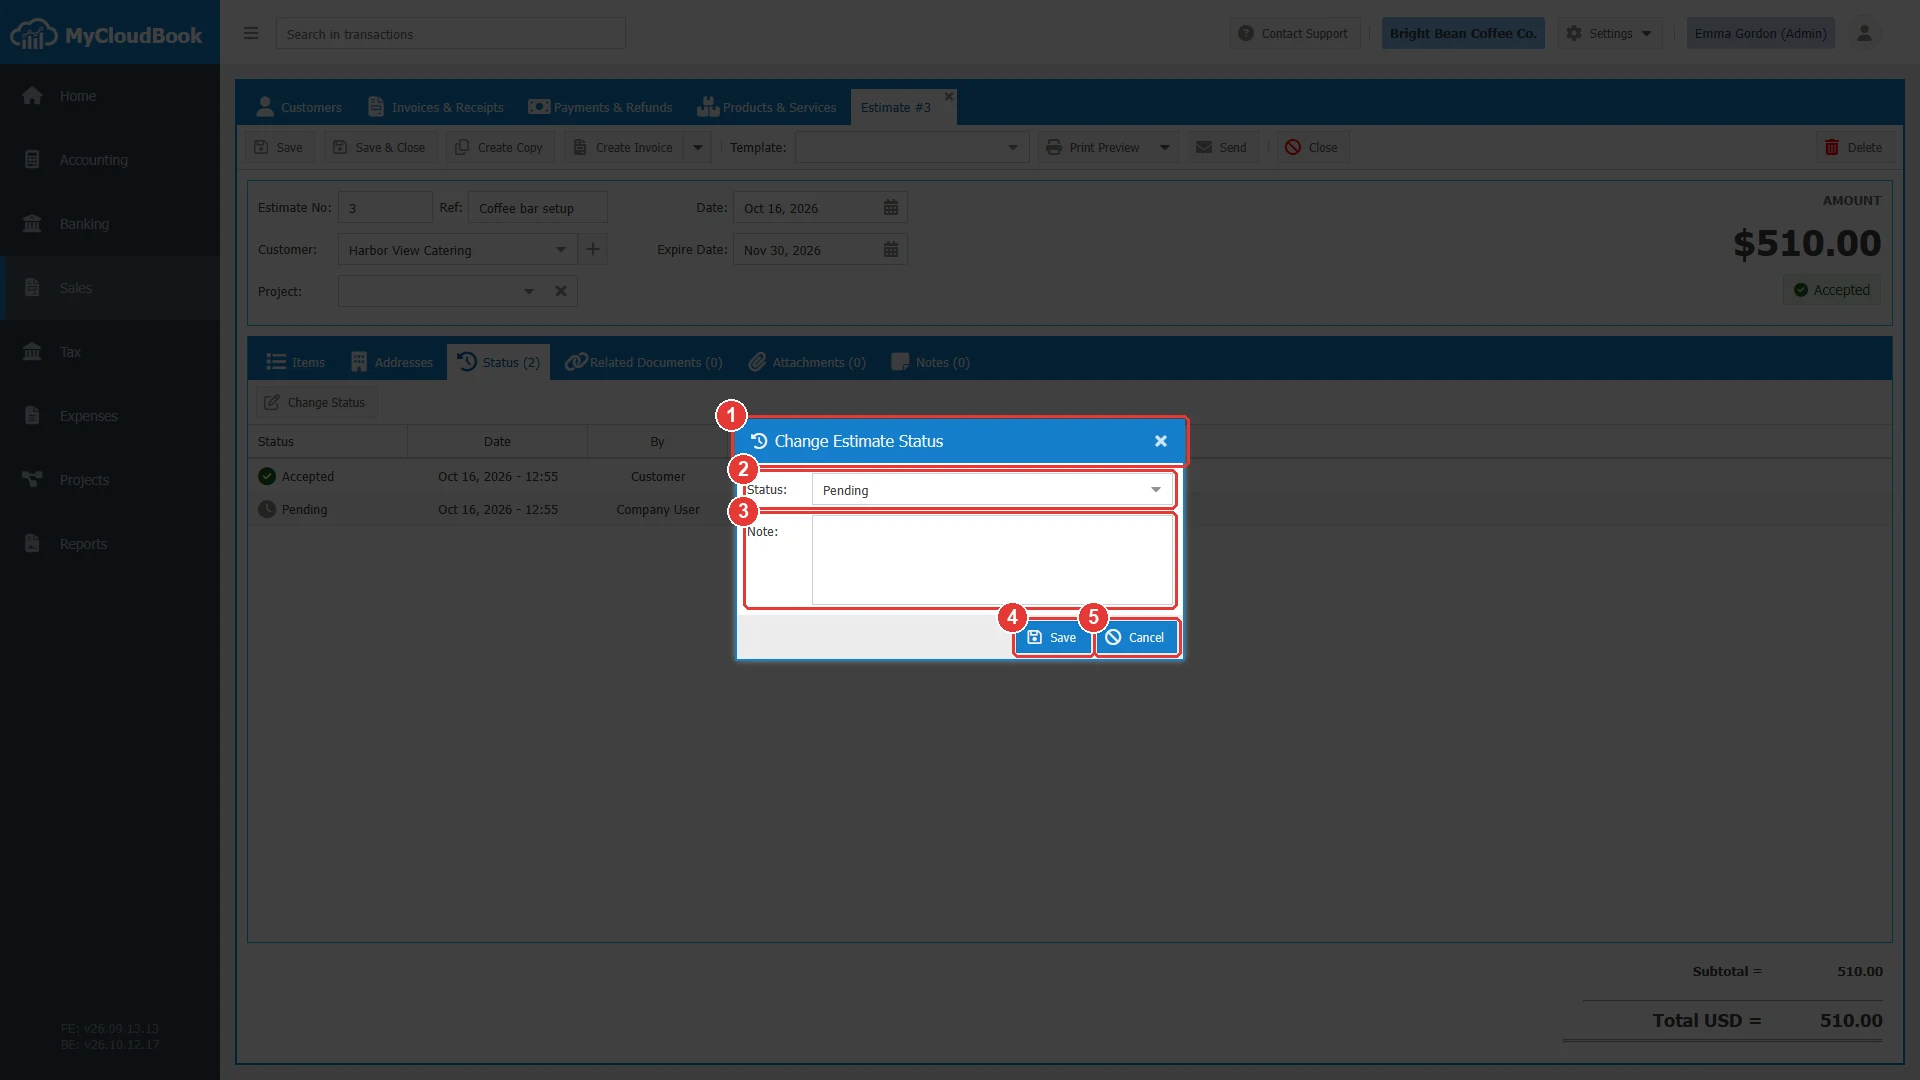
- 1The window title.
- 2Status. The new status. The list holds the statuses other than the current one.
- 3Note. Up to 1000 characters.
- 4Save.
- 5Cancel.
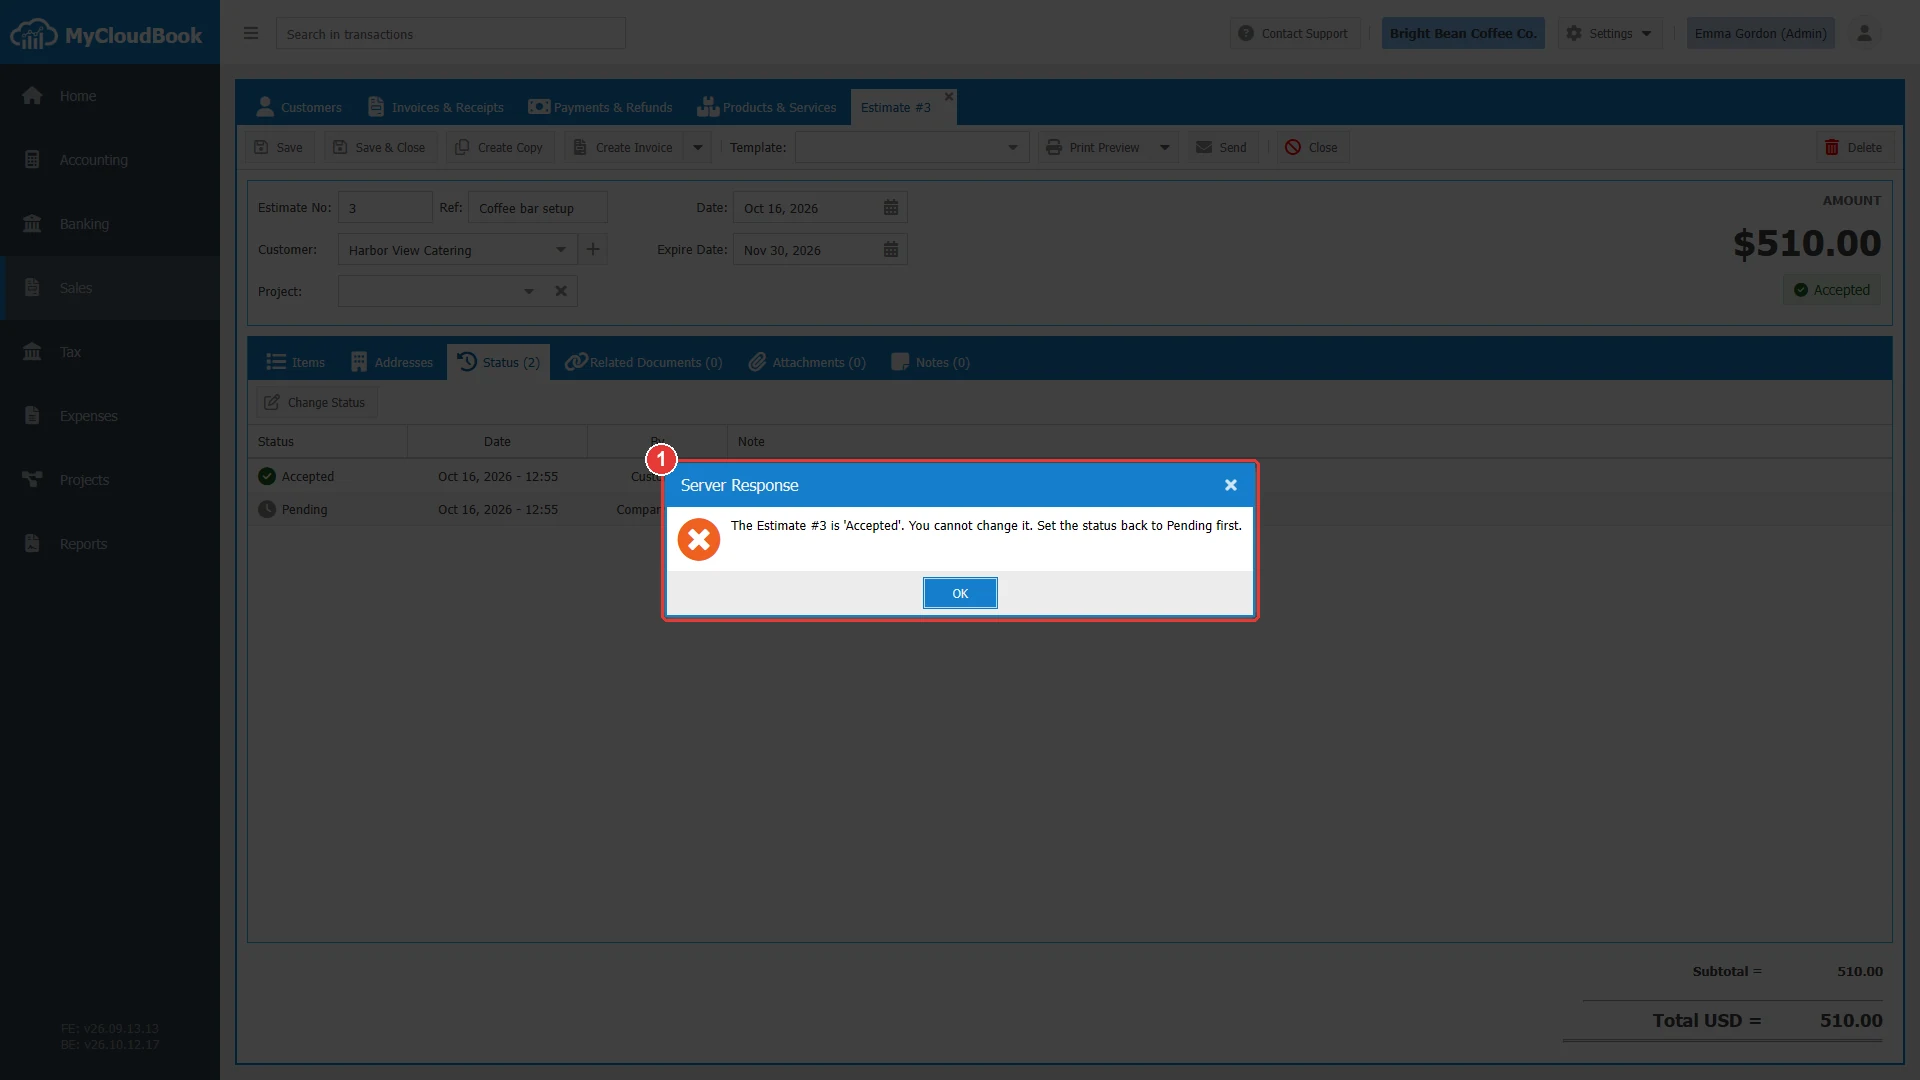
- 1The message from the server.
Creating an invoice or a receipt
Create Invoice opens a new invoice filled from the estimate: the customer, the reference, the date, the project, the lines, and the addresses. The arrow of the button offers Create Receipt for a sale paid at once. The new document is not saved yet: check it, set the due date of the invoice, and click Save.
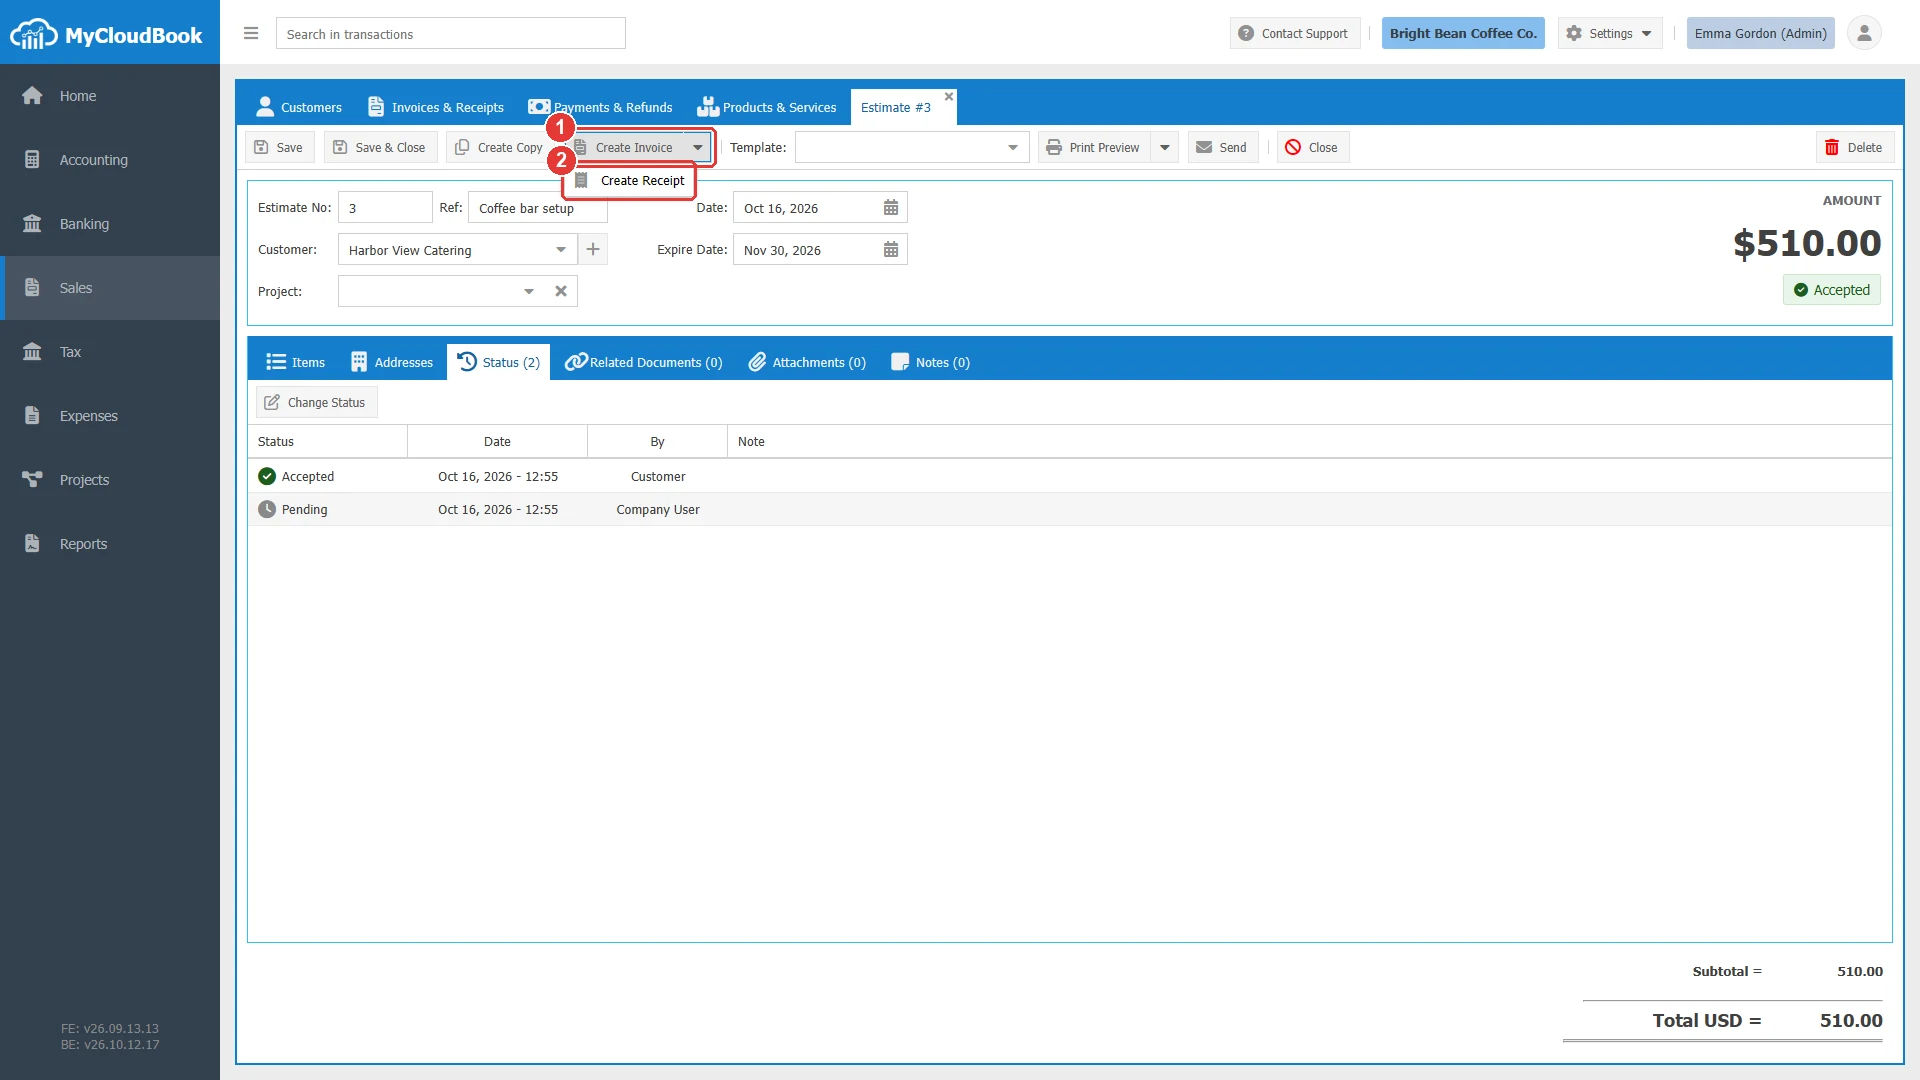
- 1Create Invoice.
- 2Create Receipt.
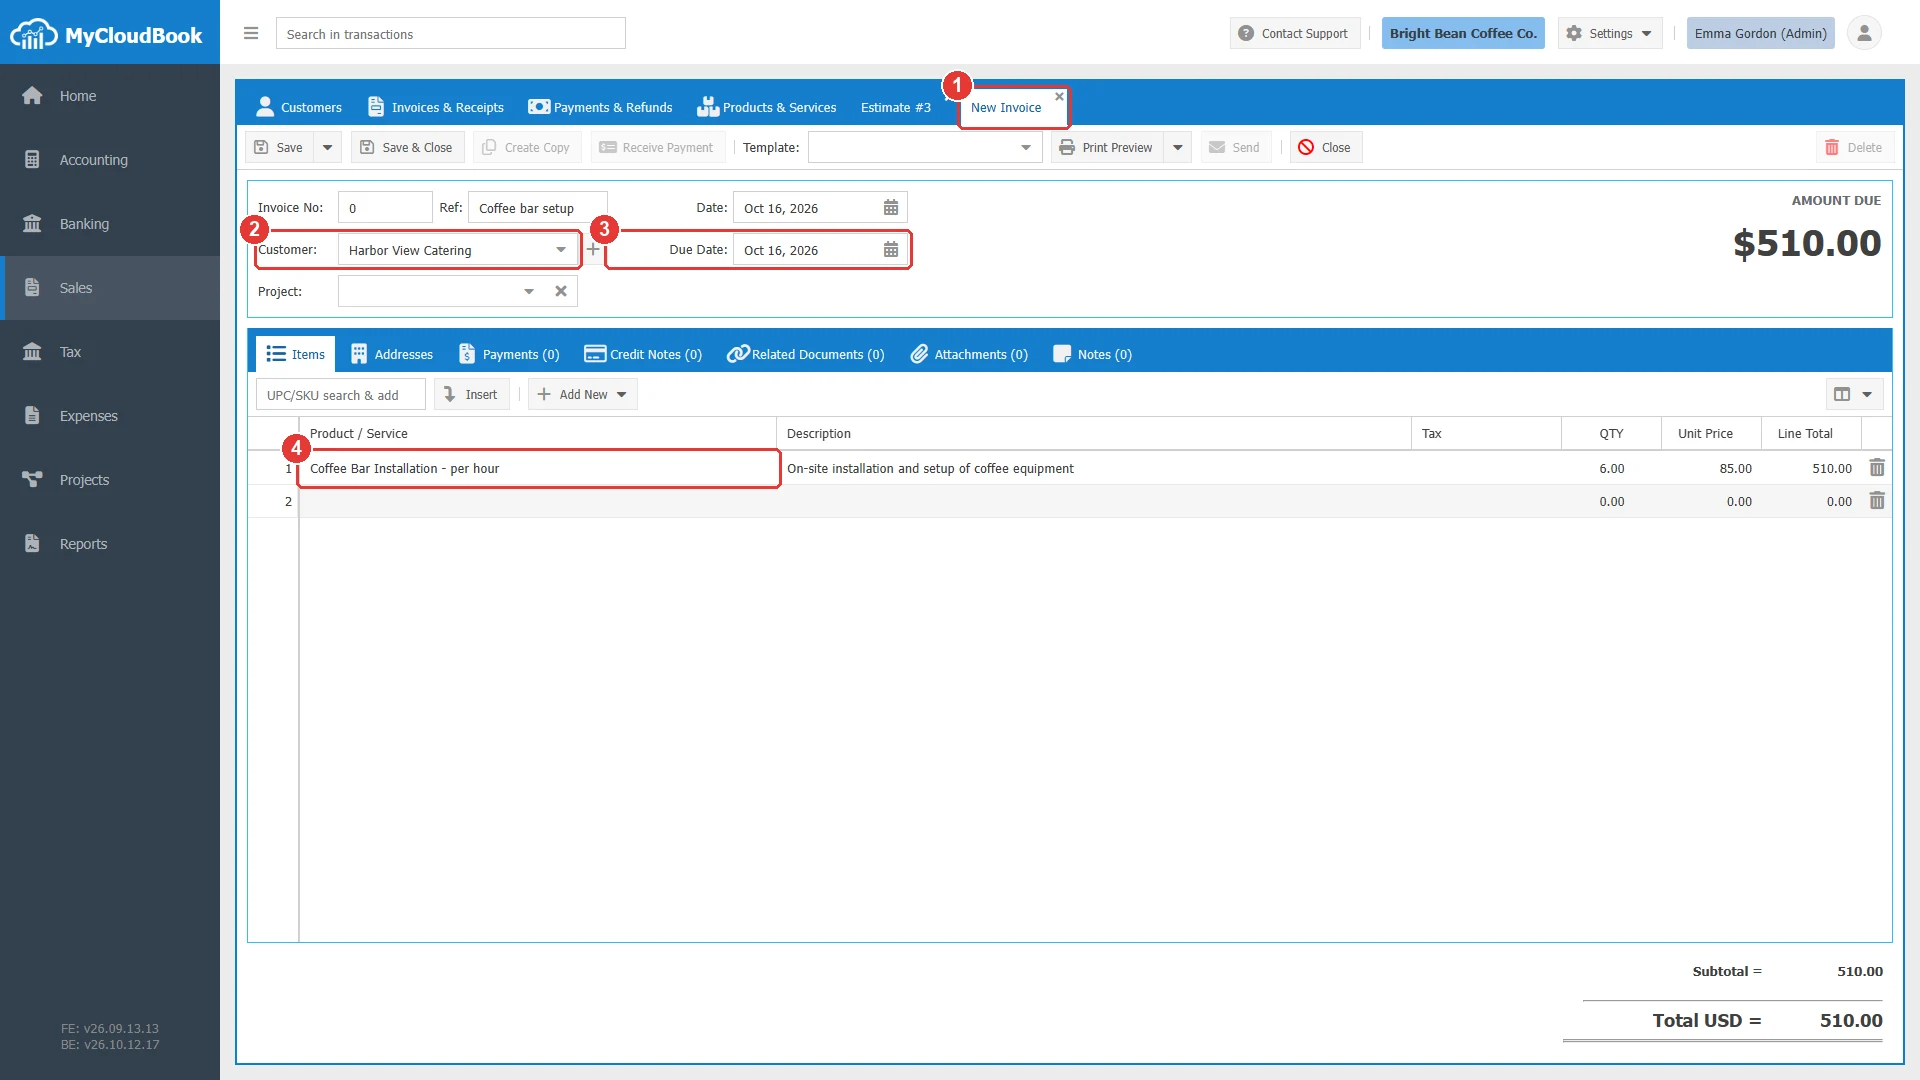
- 1A new invoice opens.
- 2The customer of the estimate.
- 3The due date starts with today. Set the real due date.
- 4The lines of the estimate.
Printing, sending, and deleting
Print Preview and Send work as for an invoice and use the estimate templates. The PDF shows EXPIRE DATE instead of a due date. An estimate can be deleted in every status; the confirmation names its number. Deleting an estimate also deletes its status history.
Messages and their meaning
Questions and answers
How does a customer accept an estimate in MyCloudBook?
Send the estimate by email. The message holds a link to a secure page with the Accept Estimate and Decline Estimate buttons. The answer is recorded in the Status tab of the estimate, with the customer as its author.
How do I change an estimate after the customer accepted it?
Use Change Status in the Status tab to set it back to Pending, change it, and send it again. An estimate is changed while it is Pending.
How do I turn an estimate into an invoice?
Open the estimate and click Create Invoice, or Create Receipt in its menu. A new invoice opens with the customer and the lines of the estimate. Set the due date and save it.
Does an estimate change the accounts or the stock?
No. An estimate creates no journal entry and no inventory movement. Only the invoice or the receipt created from it does.
What happens when the expiry date passes?
The status does not change, but the customer page refuses an answer after the Expire Date. Change the date and send the estimate again to extend the offer.